2012 Honda Odyssey Serpentine Belt Diagram
Alright, let's dive into the serpentine belt diagram for a 2012 Honda Odyssey. Whether you're tackling a repair, replacing a worn belt, or simply expanding your automotive knowledge, understanding this diagram is crucial. This guide will break down the key components, symbols, and function of the serpentine belt system in your Odyssey, equipping you with the knowledge to work confidently.
Purpose of the Serpentine Belt Diagram
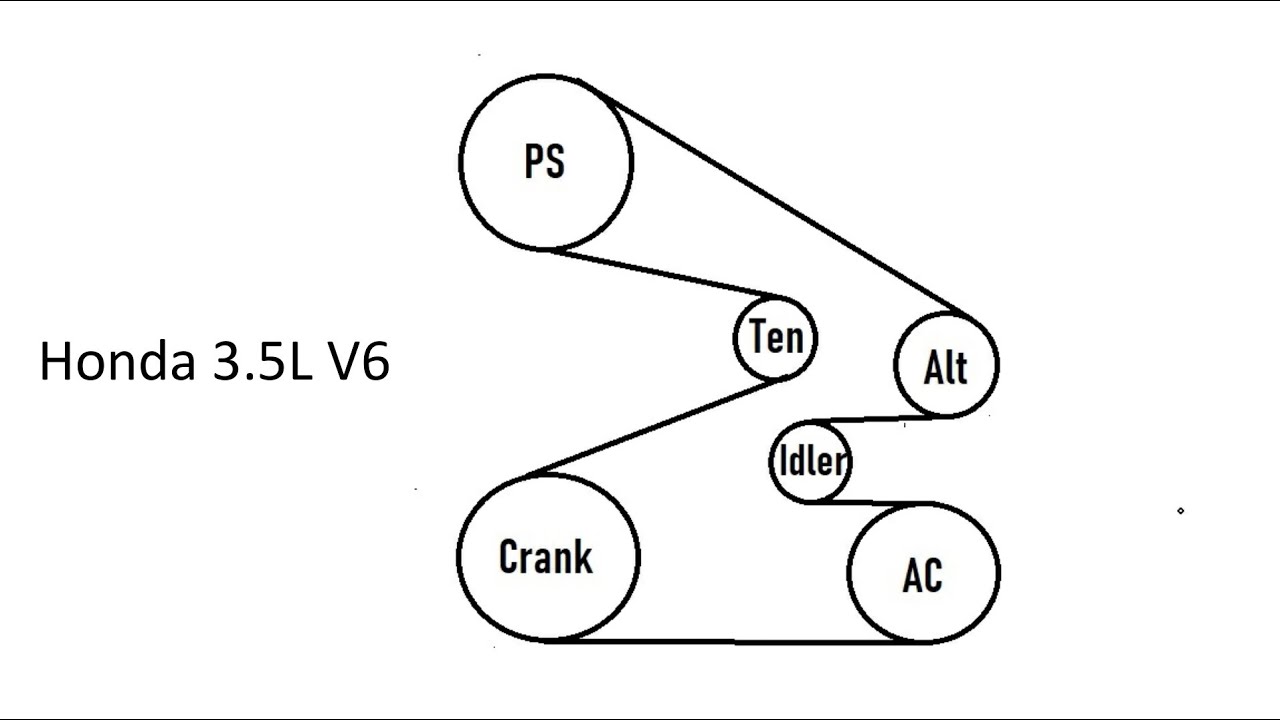
The serpentine belt diagram is your roadmap to understanding how the serpentine belt routes through the engine bay of your 2012 Honda Odyssey. The belt is a single, continuous belt that drives multiple engine accessories. Without a clear diagram, replacing or troubleshooting a serpentine belt issue can quickly become a frustrating guessing game. This diagram matters for several reasons:
- Accurate Belt Routing: Ensures the new belt is correctly installed, preventing premature wear, noise, and accessory malfunction. Incorrect routing can cause the belt to rub against components or improperly tensioned pulleys.
- Troubleshooting: Helps diagnose issues like squealing, accessory failure (e.g., no power steering, AC not working), or belt slippage. By visually tracing the belt's path, you can pinpoint the source of the problem.
- Preventative Maintenance: Facilitates routine inspection for wear, cracks, and proper tension. Early detection can prevent a complete belt failure, which can leave you stranded.
- Learning: Deepens your understanding of the engine's accessory drive system and how the various components work together.
Key Specs and Main Parts
Before we dissect the diagram, let's identify the key players in the 2012 Odyssey's serpentine belt system:
- Serpentine Belt: The main component; a long, ribbed belt made of reinforced rubber, designed for flexibility and durability. Specific to the 2012 Odyssey, you'll need to ensure you're using the correct length and rib configuration. A common part number is often available through online parts retailers and automotive stores.
- Crankshaft Pulley (Crank Pulley): Driven directly by the engine's crankshaft, this pulley is the starting point for the serpentine belt's journey. It’s usually the largest pulley in the system.
- Alternator Pulley: Powers the alternator, which charges the battery and provides electrical power to the vehicle.
- Power Steering Pump Pulley: Drives the power steering pump, providing hydraulic assistance for steering.
- Air Conditioning Compressor Pulley: Engages and disengages to power the AC compressor, cooling the vehicle's cabin.
- Tensioner Pulley (Automatic Belt Tensioner): A spring-loaded pulley that maintains constant tension on the serpentine belt. This is absolutely critical for proper operation. A faulty tensioner can cause the belt to slip, squeal, or even break. It allows for slight belt stretching over time and temperature changes.
- Idler Pulley: A smooth, non-driven pulley that guides the belt around the engine, optimizing its wrap angle around the driven pulleys and preventing interference.
Important Note on Belt Specs: While the diagram doesn't explicitly provide the belt length, it's crucial to use the correct belt for your 2012 Odyssey. Check your owner's manual or an online parts catalog using your vehicle's VIN (Vehicle Identification Number) to ensure you get the right belt length. Using the wrong size can have catastrophic results.
Symbols and Diagram Conventions
Serpentine belt diagrams aren't complex, but understanding the symbols makes them far easier to read:
- Solid Lines: Represent the *path* of the serpentine belt. Follow these lines carefully to understand the belt's routing.
- Arrows: Indicate the direction of belt *rotation*. Pay attention to these to ensure you're visualizing the belt moving correctly.
- Pulleys: Depicted as circles, often with a small icon inside indicating the accessory they drive (e.g., an AC compressor symbol, a steering wheel for power steering).
- Tensioner Pulley: Usually labeled or indicated with a specific symbol differentiating it from the idler pulleys. The diagram will illustrate the tensioner's location and how to relieve tension when removing/installing the belt.
- Labels: Each pulley is typically labeled with its function (e.g., "ALT" for alternator, "P/S" for power steering, "A/C" for air conditioning).
While color-coding isn't always present in basic serpentine belt diagrams, some more detailed diagrams might use colors to highlight different sections or paths of the belt. A legend, if present, will explain the meaning of any color codes.
How It Works
The serpentine belt system is elegantly simple in its function. The engine's crankshaft, rotating at varying speeds, turns the crankshaft pulley. This, in turn, drives the serpentine belt. The belt, routed through various pulleys, transfers rotational force to each of the engine accessories. The automatic tensioner applies consistent force to the belt, preventing slippage and ensuring efficient power transfer to each component. Without proper tension, the belt will slip, causing squealing noises and potentially damaging the accessories. A loose belt also won't be able to properly drive components like the alternator and A/C compressor.
The tensioner is key. Its spring-loaded design accommodates slight variations in belt length due to temperature changes and normal wear and tear. When installing a new belt, you'll use a wrench (typically a socket wrench) to rotate the tensioner arm, relieving tension on the belt. This allows you to slip the belt off the pulleys and install the new one. Once released, the tensioner will automatically apply the correct tension to the new belt.
Real-World Use and Basic Troubleshooting
Here's how you can put this knowledge to practical use:
- Belt Replacement: Use the diagram as your guide when replacing the serpentine belt. Before removing the old belt, take a picture or draw your own diagram to ensure you remember the correct routing. This is especially important if the old belt has already broken or slipped off.
- Squealing Noise: A squealing noise, especially when starting the engine or using accessories like the AC, often indicates a slipping serpentine belt. Check the belt tensioner for proper operation and inspect the belt for cracks, glazing (a shiny, hard surface), or wear.
- Accessory Failure: If your power steering fails, AC stops working, or the charging system light comes on, inspect the serpentine belt and its routing. A broken or slipped belt can cause these issues.
- Visual Inspection: Regularly inspect the serpentine belt for signs of wear, such as cracks, fraying, or missing ribs. Replace the belt if you notice any of these issues. Also check the pulleys for damage, wobbling, or excessive play.
Safety Considerations
Working on the serpentine belt system involves certain risks:
- Engine Must Be Off: Never work on the serpentine belt system with the engine running. Serious injury can result. Make sure the ignition is off, and the key is removed.
- Hot Engine: Allow the engine to cool completely before working on the serpentine belt. Exhaust components and other engine parts can be extremely hot and cause burns.
- Moving Parts: Be extremely careful when working near the serpentine belt system, even with the engine off. The engine can unexpectedly crank over (for example, if someone accidentally turns the key), causing the belt and pulleys to move suddenly.
- Eye Protection: Wear safety glasses to protect your eyes from debris.
- Proper Tools: Use the correct tools for the job, including a serpentine belt tool or socket wrench with the appropriate size socket for the tensioner. Don't improvise; it could damage components or cause injury.
The alternator carries a high electrical charge. Disconnecting the negative terminal on the battery is a good idea before beginning to work on the system.
By understanding the diagram and following these safety precautions, you can confidently tackle serpentine belt-related tasks on your 2012 Honda Odyssey. And remember, if you're ever unsure about a procedure, consult a qualified mechanic.
We have a detailed serpentine belt diagram file specifically for the 2012 Honda Odyssey available for download. This resource includes high-resolution images and clear labeling to help you with your repairs. Contact us for access to the file.