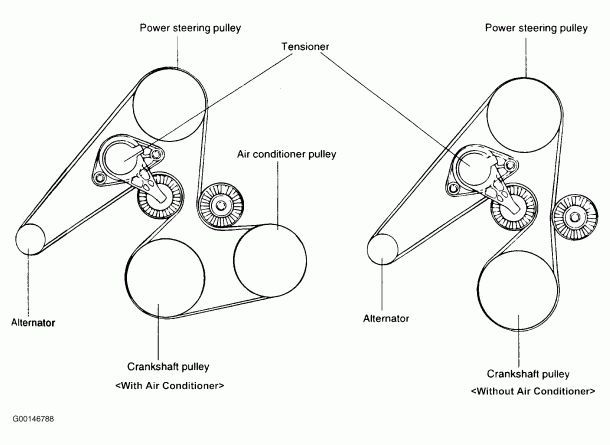
2012 Hyundai Sonata 2.4 Serpentine Belt Diagram
Okay, let's dive into the serpentine belt system of the 2012 Hyundai Sonata with the 2.4L engine. Understanding this system is crucial for preventative maintenance, troubleshooting, and even certain performance upgrades. We're going to break down the serpentine belt diagram, explaining its purpose, key components, and how to use it for practical applications.
Purpose of the Serpentine Belt Diagram
Why bother with a serpentine belt diagram? Well, it's your roadmap to understanding how your engine's accessories are driven. Specifically, this diagram is indispensable for:
- Belt Replacement: When your belt cracks, frays, or snaps (and they do!), knowing the belt routing is essential for installing a new one correctly. Incorrect routing can damage components and lead to immediate belt failure.
- Troubleshooting Accessory Issues: If your alternator isn't charging, your power steering isn't working, or your AC is blowing hot air, the serpentine belt and its tension are prime suspects. The diagram helps you visually check the belt's path and identify potential problems.
- Preventative Maintenance: Regular inspection of the belt and pulleys, guided by the diagram, can help you spot wear and tear *before* a catastrophic failure strands you on the side of the road.
- Component Identification: The diagram clearly shows the location of each accessory, making it easier to identify and access them for repairs or replacements.
- Learning and Understanding: For DIYers and those looking to improve their understanding of automotive mechanics, the serpentine belt system is a great place to start. The diagram provides a visual representation of a fundamental engine system.
Key Specs and Main Parts
The 2012 Hyundai Sonata 2.4L engine typically uses a single serpentine belt to drive the following accessories:
- Crankshaft Pulley: The driving force behind the entire system. This pulley is directly connected to the engine's crankshaft.
- Alternator: Provides electrical power to the car.
- Power Steering Pump: Assists in steering the vehicle.
- Air Conditioning Compressor: Cools the cabin air.
- Water Pump: Circulates coolant to regulate engine temperature. While some vehicles drive the water pump directly via the serpentine belt, some 2012 Hyundai Sonata 2.4L models have an electric water pump (consult your specific vehicle's repair manual for confirmation). If the water pump *is* belt-driven, it will be included in the serpentine belt path.
- Tensioner Pulley: Maintains the correct tension on the serpentine belt. This is a spring-loaded pulley that automatically adjusts to belt wear and temperature changes.
- Idler Pulley(s): Smooth, non-driven pulleys used to guide the belt and optimize its wrap angle around the driven components.
Important Specs: The serpentine belt length and specific belt number are crucial. Consult your owner's manual or a parts catalog (like those from Gates or Dayco) for the correct replacement belt for your specific Sonata's VIN. Using the wrong belt length will lead to improper tension and premature failure.
Symbols and Diagram Interpretation
Serpentine belt diagrams are generally standardized, but here's how to interpret the common symbols:
- Solid Lines: Represent the section of the belt that makes contact with the pulleys.
- Dashed Lines: Represent the section of the belt that's on the *back* side of the pulley (not in contact). This is often used to illustrate the belt's path behind other components.
- Arrows: Indicate the direction of belt rotation. This is crucial for understanding how each component is driven.
- Circles/Discs: Represent pulleys. They are often labeled with abbreviations indicating their function (e.g., ALT for Alternator, P/S for Power Steering, A/C for Air Conditioning, CRANK for Crankshaft).
- Squares/Rectangles: May represent other engine components that the belt passes near but doesn't interact with (e.g., engine mounts, brackets).
- Tensioner Symbol: A specialized symbol, often resembling a spring, indicates the location of the tensioner pulley. It may also be labeled with "TENSIONER".
Color coding is less common on serpentine belt diagrams than on electrical diagrams, but sometimes different colors are used to highlight specific belt routing sections for clarity.
How It Works
The serpentine belt system is elegantly simple. The crankshaft pulley, powered by the engine, drives the serpentine belt. This belt, in turn, wraps around all the other pulleys attached to the engine accessories. As the crankshaft rotates, it spins the belt, which spins the accessory pulleys, powering the alternator, power steering pump, AC compressor, and (potentially) the water pump. The tensioner pulley maintains the proper tension on the belt, preventing slippage and ensuring efficient operation.
The wrap angle of the belt around each pulley is important. This refers to the amount of the pulley's circumference that the belt contacts. A larger wrap angle provides more grip and reduces the chance of slippage. Idler pulleys are often used to increase the wrap angle on certain accessories, especially those that require significant torque (like the power steering pump).
Real-World Use: Troubleshooting Tips
Here's how you can use the serpentine belt diagram for troubleshooting:
- Squealing Belt: A squealing belt is often caused by slippage. Use the diagram to check the belt tensioner. Is it moving freely? Is the belt properly seated in all the pulleys' grooves? Look for signs of glazing (a smooth, shiny appearance) on the belt, which indicates slippage. Also, check for pulley misalignment.
- Accessory Failure: If a particular accessory isn't working, use the diagram to verify that the belt is properly routed to that accessory and that the pulley is spinning when the engine is running. If the pulley is spinning, the problem likely lies within the accessory itself.
- Belt Wear: Regularly inspect the belt for cracks, fraying, and missing chunks. The diagram helps you locate the entire belt path for a thorough inspection. Pay close attention to areas where the belt bends sharply or passes close to hot engine components.
- Belt Jumping Off: If the belt repeatedly jumps off the pulleys, suspect a misaligned pulley, a worn-out tensioner, or excessive play in one of the accessory bearings. Use a straight edge to check pulley alignment.
Safety Considerations
Working on the serpentine belt system can be dangerous if you don't take proper precautions:
- Hot Engine: Never work on the system when the engine is hot. Allow it to cool completely before starting any work.
- Moving Parts: Keep your hands, clothing, and tools clear of the serpentine belt and pulleys when the engine is running. These parts can cause serious injury.
- Battery Disconnect: Disconnect the negative battery cable before working on the electrical components, such as the alternator.
- Tensioner Spring: Be extremely careful when releasing the tension on the belt. The tensioner is spring-loaded and can snap back with considerable force. Use the correct tool (usually a serpentine belt tool) to safely release the tension. Incorrect release methods can damage the tensioner or cause injury.
- Electrical Components: The alternator contains high-voltage components. Avoid touching the terminals when the engine is running or when the battery is connected.
Always consult your vehicle's repair manual for specific instructions and safety guidelines before performing any maintenance or repairs. When in doubt, seek the assistance of a qualified mechanic.
We have a high-resolution, printable serpentine belt diagram specific to the 2012 Hyundai Sonata 2.4L engine readily available. You can download it here for detailed reference during your maintenance or repair projects.