2012 Hyundai Sonata Serpentine Belt Diagram
The serpentine belt, also known as the accessory drive belt, is a crucial component in your 2012 Hyundai Sonata's engine. It’s responsible for powering several essential accessories that keep your car running smoothly and comfortably. Understanding its configuration and how it interacts with various pulleys is key for maintenance, troubleshooting, and repairs. This article serves as a guide to the 2012 Hyundai Sonata serpentine belt diagram, providing you with the knowledge to confidently tackle related tasks.
Purpose of Understanding the Serpentine Belt Diagram
Why bother understanding the serpentine belt diagram? Quite simply, it’s essential for several reasons:
- Maintenance and Replacement: If your belt is worn, cracked, or showing signs of damage, replacing it is vital to prevent a breakdown. The diagram ensures you route the new belt correctly.
- Troubleshooting: A squealing noise under the hood often indicates a problem with the belt or one of the accessories it drives. The diagram helps you identify the source of the issue.
- Accessory Repair/Replacement: Replacing components like the alternator, power steering pump, or AC compressor requires removing and reinstalling the serpentine belt.
- Learning Engine Mechanics: Even if you're not doing repairs yourself, understanding the belt system provides valuable insight into how your engine works.
Key Specs and Main Parts (2.4L and 2.0L Turbo)
The 2012 Hyundai Sonata comes with either a 2.4L naturally aspirated engine or a 2.0L turbocharged engine. While the core principle remains the same, there might be slight variations in the belt routing depending on the engine. Regardless, here are the core components involved in serpentine belt system:
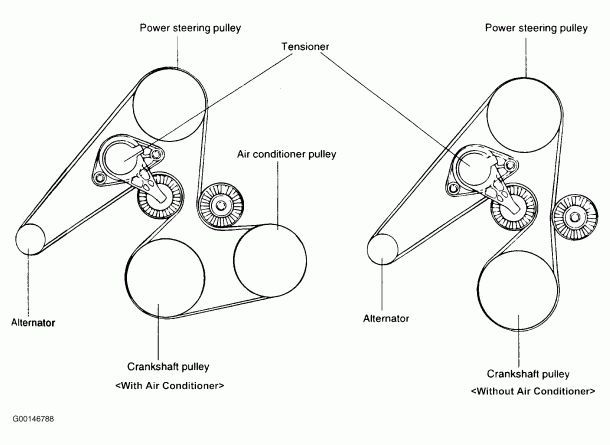
- Crankshaft Pulley (or Crank Pulley): This pulley is driven directly by the engine's crankshaft and is the primary driver of the serpentine belt.
- Alternator Pulley: The alternator converts mechanical energy from the engine into electrical energy, which is used to power the car's electrical systems and charge the battery.
- Power Steering Pump Pulley: The power steering pump provides hydraulic pressure to assist with steering.
- Air Conditioning (AC) Compressor Pulley: The AC compressor circulates refrigerant through the air conditioning system, providing cool air.
- Idler Pulley(s): These pulleys are smooth, without grooves, and are used to guide and tension the belt, preventing it from rubbing against other components or vibrating excessively. They are sometimes called "tensioner pulleys" although they are not the tensioner itself.
- Tensioner Pulley Assembly: This spring-loaded pulley maintains the correct tension on the serpentine belt. The tensioner ensures that the belt grips the pulleys effectively and prevents slippage. It consists of the tensioner pulley, the tensioner arm, and the spring mechanism.
The specific length of the belt can vary slightly depending on the exact configuration, but it will be a multi-ribbed belt designed for the specific engine. Refer to your owner’s manual or a reputable parts supplier for the correct belt part number. The belt width is also standardized.
Symbols on the Diagram
A serpentine belt diagram isn’t just a pretty picture; it uses specific symbols to convey important information:
- Solid Lines: These represent the serpentine belt itself, showing its path around the various pulleys.
- Arrows: Indicate the direction of belt rotation around each pulley. This is crucial for proper installation.
- Pulleys: Depicted as circles, with labels indicating their function (e.g., ALT for alternator, P/S for power steering).
- Grooved Pulleys: Indicate pulleys that are driven by the grooved side of the belt.
- Smooth Pulleys: Indicate pulleys that are driven by the smooth side of the belt. Usually these are idler pulleys.
- Tensioner: Usually symbolized by a pulley with an arrow indicating the direction it rotates to relieve tension.
Sometimes, diagrams use shading or color to differentiate between the front and back sides of the engine for clarity. However, most diagrams are black and white.
How It Works
The serpentine belt system is relatively simple in principle. The crankshaft pulley, driven by the engine's rotation, transfers power to the other accessories via the serpentine belt. The belt wraps around each pulley, using friction to turn them. The tensioner pulley maintains consistent tension on the belt, preventing slippage and ensuring efficient power transfer. Without proper tension, the belt can slip, causing a loss of power to the accessories and leading to various issues, such as a dead battery (due to a non-charging alternator) or a lack of power steering.
The key is the proper routing. The belt must follow the exact path shown in the diagram. If it's routed incorrectly, it won't function properly, and can lead to serious engine damage.
Real-World Use: Basic Troubleshooting Tips
Here's how you can use your understanding of the serpentine belt system for basic troubleshooting:
- Squealing Noise: A squealing noise, especially when the engine is first started or under heavy load, often indicates a slipping belt. Check the belt for wear, cracks, or glazing. Also, inspect the tensioner to ensure it's functioning correctly. If the tensioner is weak, it might not be applying enough pressure to the belt.
- Visible Cracks or Damage: Regularly inspect the belt for signs of wear and tear. Cracks, fraying, or missing chunks indicate that the belt needs to be replaced.
- Accessory Malfunctions: If you notice your alternator isn't charging properly, your power steering is weak, or your AC isn't cooling, it could be due to a slipping or broken serpentine belt.
- Belt Slippage: Check for belt dust around the pulleys. Excessive dust indicates that the belt is slipping, which can damage the pulleys and shorten the belt's lifespan.
If you suspect a problem with your serpentine belt, consult the diagram to verify the correct belt routing and inspect all the components. If you're unsure about any aspect of the repair, it's always best to consult a qualified mechanic.
Safety Considerations
Working on the serpentine belt system can be dangerous if proper precautions aren't taken. Here are some key safety considerations:
- Disconnect the Battery: Before working on any electrical components, disconnect the negative terminal of the battery to prevent accidental shocks.
- Allow the Engine to Cool: Never work on the engine while it's hot. Allow it to cool down completely to avoid burns.
- Keep Hands and Clothing Clear: Keep your hands, clothing, and tools clear of the moving parts. The serpentine belt can cause serious injury if it catches on anything.
- Use Proper Tools: Use the correct tools for the job, including a serpentine belt tool, which makes it easier to relieve tension on the belt and remove it from the pulleys.
- Identify Risky Components: The alternator is a particularly risky component, as it contains high-voltage electrical components even when the engine is off. Avoid touching any exposed wiring on the alternator. Also be careful with the AC compressor as it contains refrigerant under high pressure.
Always prioritize safety when working on your car. If you're not comfortable performing the repairs yourself, seek the assistance of a qualified mechanic.
We have the 2012 Hyundai Sonata Serpentine Belt Diagram available for download. Please contact us, and we will send you the file.