2012 Jeep Grand Cherokee 3.6 Serpentine Belt Diagram
Alright, let's dive into the serpentine belt diagram for your 2012 Jeep Grand Cherokee with the 3.6L Pentastar engine. This isn't just a piece of paper; it's your roadmap to understanding, maintaining, and, when necessary, repairing the accessory drive system. Whether you're chasing down a squeal, planning a belt replacement, or simply expanding your automotive knowledge, this guide will arm you with the information you need. We have the diagram available for download, so you'll have it for easy reference as we go.
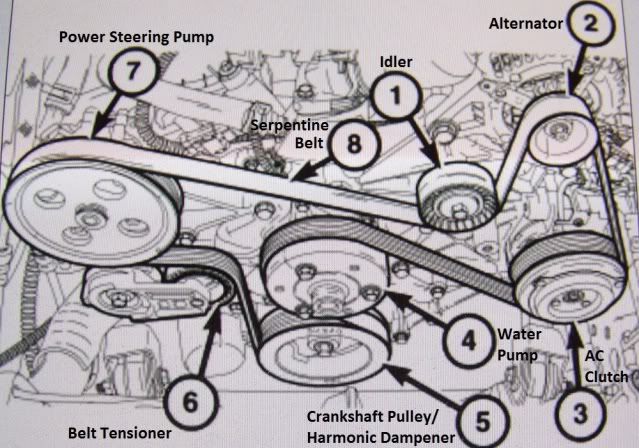
Purpose of the Serpentine Belt Diagram
Why bother with a diagram? Well, the serpentine belt is a crucial component. It's responsible for powering several vital accessories in your Grand Cherokee, including:
- Alternator: Keeps your battery charged and powers electrical systems.
- Power Steering Pump: Provides hydraulic assist for steering.
- Air Conditioning Compressor: Cools the cabin.
- Water Pump: Circulates coolant through the engine to prevent overheating.
A faulty or broken serpentine belt can lead to a breakdown and potentially damage other components. The diagram helps you:
- Properly Route the Belt: Ensures the belt is installed correctly, following the factory specifications. Incorrect routing can cause damage to components or belt failure.
- Identify Components: Quickly locate and identify each component driven by the belt.
- Troubleshoot Issues: Diagnose problems like belt slippage, noise, or accessory malfunction by understanding the belt's path and the function of each component.
- Replace the Belt: Facilitates a smooth and efficient belt replacement.
Key Specs and Main Parts
Before we get into the specifics of the diagram, let's highlight some key elements of your 2012 Grand Cherokee's serpentine belt system:
- Engine: 3.6L Pentastar V6. This is crucial because different engines have different belt routing.
- Belt Type: Typically a multi-ribbed (V-ribbed) belt. The exact belt length and number of ribs will be specified by the manufacturer (check your owner's manual or an auto parts store).
- Tensioner: A spring-loaded pulley that maintains the correct tension on the belt. This is *critical* for proper operation and belt longevity.
- Idler Pulley(s): Smooth pulleys that guide the belt and provide necessary wrap around other components.
- Crankshaft Pulley (Harmonic Balancer): The main pulley driven by the engine that powers the serpentine belt.
Understanding the function of each component is vital for correctly interpreting the diagram. For example, knowing the tensioner's role helps you understand why the belt is routed in a specific way to allow the tensioner to effectively maintain tension.
Symbols and Diagram Conventions
Automotive diagrams use a common set of symbols to represent components and their relationships. Here's what you'll typically find in the serpentine belt diagram:
- Solid Lines: These generally represent the belt itself, showing its path around the various pulleys. The thickness of the line doesn't necessarily indicate belt width.
- Dashed Lines: May indicate the back (smooth) side of the belt, if it's relevant.
- Circles/Ovals: Represent pulleys. Sometimes they'll be labelled with abbreviations like "ALT" for Alternator, "P/S" for Power Steering, "A/C" for Air Conditioning Compressor, and "CRANK" for Crankshaft.
- Arrows: Indicate the direction of rotation of the belt and the pulleys.
- Tensioner Symbol: The tensioner is often depicted with a spring symbol, indicating its spring-loaded mechanism.
- Idler Pulley Symbol: Simple smooth pulley representation.
Keep in mind that diagrams might have slight variations in visual style, but the underlying principles remain consistent. If you see a symbol you're unsure about, consult your vehicle's repair manual or a reliable online resource.
How It Works: The Serpentine Belt System
The serpentine belt system is relatively simple in principle. The engine's rotational force is transferred from the crankshaft pulley to the serpentine belt. The belt then loops around the various accessory pulleys, transferring power to them. The tensioner plays a crucial role in maintaining proper belt tension. Without adequate tension, the belt can slip, leading to reduced performance from the accessories and potential belt damage. The idler pulleys help guide the belt and optimize the amount of wrap around each pulley, ensuring sufficient grip and power transfer.
The order in which the belt wraps around the pulleys is also significant. For example, the alternator often requires a good amount of wrap to ensure proper charging, so the belt path is designed to maximize contact with the alternator pulley.
Real-World Use: Basic Troubleshooting
Here's how you can use the serpentine belt diagram to troubleshoot common issues:
- Squealing Noise: A squealing noise often indicates belt slippage. The diagram can help you visually inspect the belt for signs of wear, glazing, or cracks. Check the tensioner to ensure it's functioning correctly and maintaining proper tension. If the noise persists after replacing the belt and checking the tensioner, the problem could be a failing pulley bearing on one of the accessories.
- Accessory Malfunction: If your power steering is weak, air conditioning isn't cooling, or battery isn't charging, the belt could be the culprit. Use the diagram to trace the belt path and identify which accessory is not functioning correctly. Check the belt's condition and tension. A broken or severely worn belt will prevent accessories from operating properly.
- Belt Alignment: Visual inspection using the diagram to ensure belt alignment is critical. Misalignment will cause excessive wear on the belt edges, fraying and possible premature belt failure. Use a straight edge to verify each pulley is aligned.
- Belt Jumping Off: If the belt comes off the pulleys, it's a sign of a serious problem. This could be caused by a damaged pulley, a seized accessory (like a locked-up AC compressor), or a malfunctioning tensioner. The diagram will help you identify the belt path and inspect the pulleys for damage.
For example, if your air conditioning isn't working, locate the A/C compressor pulley on the diagram. Inspect the belt to ensure it's properly engaged with the pulley and that the pulley is rotating freely. If the pulley is seized or difficult to turn, the compressor may be faulty.
Safety Considerations
Working on the serpentine belt system can be hazardous. Always disconnect the negative battery cable before starting any work to prevent electrical shock. Never put your hands or tools near a running engine or moving belt. The rotating parts can cause serious injury. Be especially careful when working near the crankshaft pulley, as it has a high rotational speed.
The tensioner is under significant spring pressure. When releasing the tension on the belt, use the correct tool (usually a wrench or socket) and follow the manufacturer's instructions carefully. Avoid getting your fingers caught in the tensioner mechanism.
Also, be sure the engine is cool before attempting any work. Exhaust manifolds and other engine components can get extremely hot and cause burns.
With the serpentine belt diagram for your 2012 Jeep Grand Cherokee 3.6L, you're better equipped to diagnose and repair issues related to the accessory drive system. Remember to prioritize safety and consult your repair manual or a qualified mechanic if you're unsure about any procedure.
As mentioned, we have the file of the Serpentine Belt Diagram available to download. Please contact us to receive the file.