
2012 Kia Sedona Serpentine Belt Diagram
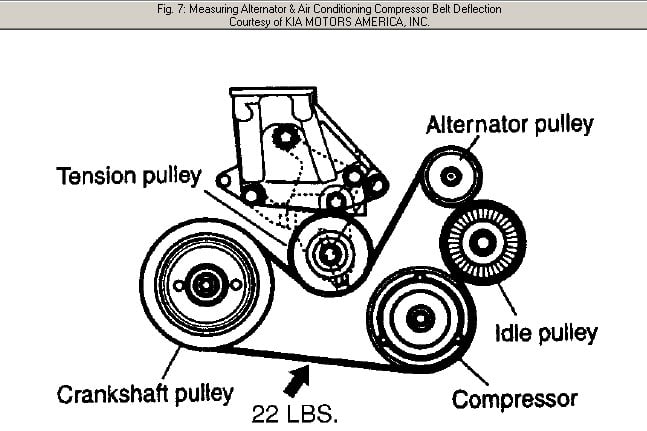
Alright, let's dive into the serpentine belt diagram for the 2012 Kia Sedona. This isn't just a pretty picture; it's your roadmap to keeping your minivan running smoothly. Whether you're tackling a preventative maintenance task, diagnosing a squealing belt, or just want to understand how your engine accessories are driven, this diagram is invaluable.
Purpose of the Serpentine Belt Diagram
The serpentine belt diagram serves several crucial purposes:
- Belt Routing: First and foremost, it shows the correct path the belt takes around all the pulleys. Getting this wrong is a surefire way to damage your engine components.
- Component Identification: The diagram labels each pulley, allowing you to identify the alternator, power steering pump, AC compressor, idler pulleys, and tensioner pulley.
- Troubleshooting: By understanding the belt's route, you can more easily pinpoint the source of noises, vibrations, or accessory failures. For example, a squeal might indicate a worn belt or a failing pulley bearing.
- Repair & Replacement: When replacing the serpentine belt, the diagram is your reference to ensure proper installation and tension. It can also help to identify which components, if any, need replacement along with the belt.
Key Specs and Main Parts for the 2012 Kia Sedona
Before we jump into the diagram itself, let's get the basics covered:
- Engine Type: The 2012 Kia Sedona typically uses a 3.5L V6 engine. This is important because the belt routing *can* vary slightly between different engine configurations.
- Belt Length: The serpentine belt length will vary based on specific vehicle options, but it's typically in the range of 90-95 inches. When purchasing a replacement, always verify that it's the correct part number specified for your VIN.
- Main Components:
- Crankshaft Pulley (or Harmonic Balancer): This is driven directly by the engine and powers everything else.
- Alternator Pulley: Charges the battery and powers the electrical system.
- Power Steering Pump Pulley: Provides hydraulic pressure for power steering.
- Air Conditioning (AC) Compressor Pulley: Compresses refrigerant for the AC system.
- Idler Pulleys: Smooth the belt's path and prevent excessive wear. These are typically smooth and have no grooves.
- Tensioner Pulley: Maintains the correct tension on the belt. This usually includes a spring-loaded arm that automatically adjusts for belt stretch.
- Water Pump Pulley: Circulates coolant through the engine to prevent overheating.
Understanding the Symbols in the Serpentine Belt Diagram
Diagrams aren't just pictures; they use symbols to convey information efficiently. Here's a breakdown of what you'll typically find:
- Solid Lines: Represent the path of the belt itself.
- Arrows: Indicate the direction of belt travel around each pulley. Pay close attention to these!
- Pulley Symbols: Each pulley is represented by a circle. Some pulleys have grooves (for ribbed belts), while others are smooth (idler pulleys).
- Component Labels: Abbreviations are used to identify each component. Look for labels like "ALT" for Alternator, "P/S" for Power Steering, "A/C" for Air Conditioning, "IDLER" for idler pulleys, and "TENSIONER" for the tensioner.
- Tensioner Direction Arrow: This indicates the direction you need to move the tensioner arm to release tension on the belt for removal or installation.
- Diagram Orientation: Most diagrams are drawn as if you're standing in front of the engine, looking at it. Knowing this can help you orient yourself in the engine bay.
How It Works: The Serpentine Belt's Role
The serpentine belt is a single, continuous belt that drives multiple engine accessories. It receives rotational power from the crankshaft pulley and transfers this power to the other pulleys by friction. The tensioner pulley ensures that the belt maintains adequate grip on all the pulleys to prevent slippage. Without the serpentine belt, your alternator wouldn't charge your battery, your power steering wouldn't work, and your AC wouldn't cool your cabin, and in many vehicles, the water pump wouldn't circulate coolant leading to almost immediate engine overheating.
The *tension* of the belt is critical. Too little tension and the belt will slip, causing squealing and reduced accessory performance. Too much tension and you risk premature bearing failure in the accessories and accelerated belt wear.
Real-World Use: Basic Troubleshooting Tips
Here are some common issues and how the diagram can help you diagnose them:
- Squealing Belt: A common culprit is a worn, cracked, or glazed belt. The diagram helps you inspect the entire belt length for damage. A squeal *can* also be caused by a failing pulley bearing. To check, carefully spin each pulley by hand (with the engine OFF and the belt removed!). Listen for roughness or grinding.
- Accessory Failure: If your alternator isn't charging or your AC isn't working, verify that the belt is properly routed and tensioned. If the belt is slipping on the affected accessory's pulley, it may not be rotating at the correct speed.
- Belt Slippage: Look for signs of belt dust or debris around the pulleys. This indicates slippage, which can be caused by a worn belt, a faulty tensioner, or a seized accessory.
- Incorrect Belt Routing: If you recently replaced the belt and are experiencing problems, double-check the routing against the diagram. It's easy to make a mistake, especially if you're working in a tight space.
Safety Precautions
Working on the serpentine belt system involves potential hazards. Always follow these safety precautions:
- Disconnect the Battery: Before working on any electrical components (like the alternator), disconnect the negative battery terminal to prevent shorts.
- Engine OFF and Cool: Never work on the serpentine belt system with the engine running or hot. Serious injury can result.
- Keep Fingers Clear: Be extremely careful when releasing the tensioner. The spring-loaded arm can snap back forcefully.
- Wear Eye Protection: Protect your eyes from flying debris.
- Belt Debris: Be sure to clean up any belt debris after replacement, it can cause problems in other components in the engine bay.
Important Note about Risky Components: The crankshaft pulley (harmonic balancer) is a critical component. If it's damaged or separating, it *must* be replaced. Ignoring this can lead to severe engine damage. Also, be aware that accessing the serpentine belt can be tight, and some components may have sharp edges. Exercise caution.
With a little care and attention to detail, you can confidently use the serpentine belt diagram for your 2012 Kia Sedona to keep your vehicle running smoothly. Remember, safety first!
We have the 2012 Kia Sedona Serpentine Belt Diagram available for download. It provides a detailed visual reference for belt routing and component identification. This resource will be invaluable when you're performing maintenance, troubleshooting issues, or simply gaining a better understanding of your vehicle's engine system. Click the link below to access the diagram.