2012 Mazda 3 Serpentine Belt Diagram
Alright, let's dive into the serpentine belt system on your 2012 Mazda 3. This might seem like a simple component, but it’s the unsung hero powering several crucial systems. Understanding the serpentine belt diagram is essential for preventative maintenance, troubleshooting issues, and even some common performance modifications. We're going to break down everything you need to know to confidently work with this system.
Why Bother with the Serpentine Belt Diagram?
Why spend time learning about a seemingly basic diagram? Well, having a solid understanding of the serpentine belt routing and its associated components offers several key benefits:
- DIY Repairs: Replacing a worn serpentine belt is a common maintenance task. The diagram ensures you route the new belt correctly, preventing damage and ensuring proper operation.
- Troubleshooting: Squealing noises, power steering failure, or AC issues can often be traced back to a faulty or improperly routed serpentine belt. The diagram helps pinpoint the source of the problem.
- Performance Modifications: Upgrading pulleys or adding aftermarket components like superchargers requires a thorough understanding of the belt routing to ensure proper fitment and tension.
- General Knowledge: As an experienced DIYer, understanding the inner workings of your car empowers you to make informed decisions and potentially save money on labor costs.
Key Specs and Main Parts of the 2012 Mazda 3 Serpentine Belt System
The 2012 Mazda 3, depending on the engine (2.0L or 2.5L), will have a slightly different serpentine belt layout, but the core components remain the same. Here’s a rundown of the main players:
- Serpentine Belt: A single, continuous belt made of reinforced rubber, responsible for transmitting power from the crankshaft to various engine accessories. The specific belt length will vary between the 2.0L and 2.5L engines. Always use the correct belt specified for your engine.
- Crankshaft Pulley (or Harmonic Balancer): Driven directly by the engine, this pulley is the source of power for the entire serpentine system. It dampens torsional vibrations from the engine.
- Alternator: The alternator generates electrical power to charge the battery and run the car's electrical systems. The serpentine belt drives the alternator pulley.
- Power Steering Pump: Provides hydraulic assistance for steering. It's driven by the serpentine belt.
- Air Conditioning Compressor: Compresses refrigerant to cool the cabin air. Again, driven by the serpentine belt.
- Idler Pulleys: Smooth, non-driven pulleys that guide the belt and maintain proper tension. Their placement is crucial for correct belt routing.
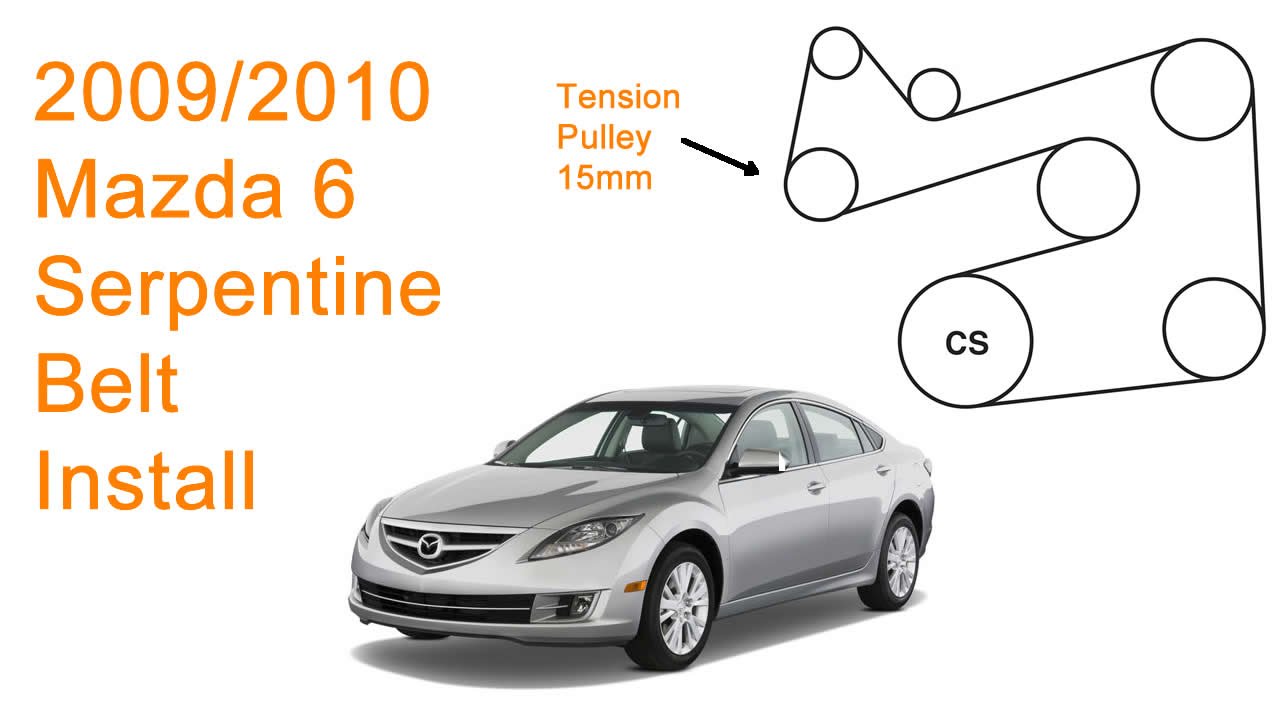
- Tensioner Pulley: This spring-loaded pulley automatically maintains the correct tension on the serpentine belt. A properly functioning tensioner is vital for belt longevity and system performance. The tensioner is a critical component; a faulty tensioner can cause belt slippage, noise, and premature failure.
While not technically part of the belt system, the water pump on some Mazda 3 configurations is also driven by the serpentine belt. Confirm if your specific engine uses the belt for the water pump.
Decoding the Serpentine Belt Diagram: Symbols and Conventions
The serpentine belt diagram is more than just a picture; it's a technical drawing with specific conventions. Here's how to interpret it:
- Solid Lines: Represent the path of the serpentine belt itself. Follow the solid lines carefully when routing the belt.
- Circles: Indicate pulleys. The diagram will typically label each pulley (e.g., ALT for alternator, P/S for power steering).
- Arrows: Show the direction of rotation of each pulley. This is crucial for understanding how the belt wraps around each component.
- Tensioner Symbol: The tensioner pulley is often depicted with a spring symbol or a note indicating its function. It's essential to identify the tensioner to release the belt for removal and installation.
- Ribbed vs. Smooth Surfaces: The diagram doesn't explicitly show this, but remember that the *ribbed side* of the belt always makes contact with the grooved pulleys (crankshaft, alternator, power steering, AC compressor). The *smooth side* of the belt rides on the idler and tensioner pulleys.
- Color Coding (Optional): Some diagrams might use color coding to highlight specific components or the belt path. However, black and white diagrams are more common.
Understanding these symbols allows you to quickly decipher the diagram and visualize the belt's path around the engine.
How the Serpentine Belt System Works
The serpentine belt system is relatively straightforward in principle. The crankshaft pulley, driven by the engine's rotation, spins the serpentine belt. The belt, in turn, drives the pulleys of the various accessories (alternator, power steering pump, AC compressor, and sometimes the water pump). The tensioner pulley maintains the correct tension on the belt, preventing slippage and ensuring efficient power transfer.
The belt is designed to wrap around each pulley with sufficient contact to prevent slipping under load. The specific routing and the tension applied by the tensioner are critical for the system to function correctly.
Insufficient tension will lead to belt slippage and reduced performance of the accessories. Excessive tension can damage the belt and the bearings in the driven components.
Real-World Use: Basic Troubleshooting Tips
Knowing your serpentine belt diagram comes in handy for troubleshooting common problems:
- Squealing Noise: Often indicates a loose or worn serpentine belt. Check the belt tensioner and the condition of the belt. Look for cracks, glazing, or missing ribs on the belt surface.
- Accessory Failure: If your power steering, AC, or charging system suddenly stops working, check the serpentine belt. A broken or slipped belt is a likely culprit.
- Visual Inspection: Regularly inspect the serpentine belt for signs of wear, such as cracks, fraying, or missing chunks. Early detection can prevent a complete belt failure and potential damage to other components.
- Misalignment: If you notice the belt riding unevenly on the pulleys, check for misalignment. A misaligned pulley can cause premature belt wear and damage to the pulley itself.
- Belt Jumping: If the belt keeps jumping off the pulleys, this often indicates a problem with the tensioner, a misaligned pulley, or a damaged belt.
Always refer to the diagram when replacing the belt to ensure proper routing. Incorrect routing can lead to immediate accessory failure and potential engine damage.
Safety First: Serpentine Belt System Hazards
Working on the serpentine belt system requires caution. Here are some key safety considerations:
- Engine Off: Always work on the serpentine belt system with the engine turned off and the key removed from the ignition.
- Hot Engine: Avoid working on the system immediately after the engine has been running, as components can be extremely hot.
- Moving Parts: Be extremely careful when working near the serpentine belt system with the engine running. The belt and pulleys are moving at high speeds and can cause serious injury.
- Tensioner Spring: The tensioner pulley is spring-loaded and can snap back forcefully when released. Use the correct tool to safely release the tension before removing the belt.
- Sharp Edges: Be aware of sharp edges on the pulleys and other components. Wear gloves to protect your hands.
The crankshaft pulley is especially risky because of its direct link to the engine's rotation. Always disconnect the negative battery cable to prevent accidental starting of the engine while you are working near the crankshaft.
By understanding the diagram, the components, and the safety precautions, you can confidently tackle serpentine belt-related tasks on your 2012 Mazda 3. Remember to double-check your work and consult the service manual for your specific engine for detailed instructions and torque specifications.
And remember, we have the full, printable serpentine belt diagram file available for download to make your next project even easier.