2012 Mitsubishi Outlander Serpentine Belt Diagram
The serpentine belt, also known as the accessory drive belt, is a crucial component in your 2012 Mitsubishi Outlander. It's responsible for powering a range of essential systems, from the alternator that keeps your battery charged to the air conditioning compressor that keeps you cool. Understanding its routing and condition is paramount for preventative maintenance and troubleshooting.
Why You Need a 2012 Outlander Serpentine Belt Diagram
Having a reliable serpentine belt diagram for your 2012 Mitsubishi Outlander is invaluable for several reasons:
- Accurate Belt Replacement: Ensuring you route the new belt correctly is absolutely critical. Incorrect routing can lead to component damage, premature belt wear, and system failures.
- Troubleshooting Accessory Issues: If your power steering, air conditioning, or charging system isn't working correctly, the serpentine belt (or its tensioner) might be the culprit. The diagram helps you visualize the system and identify potential problem areas.
- Learning About Your Vehicle: For DIY mechanics and enthusiasts, the diagram is a gateway to understanding how the various accessories are driven by the engine.
- Preventative Maintenance: Regular inspection of the belt, pulleys, and tensioner, guided by the diagram, allows you to catch problems before they lead to breakdowns.
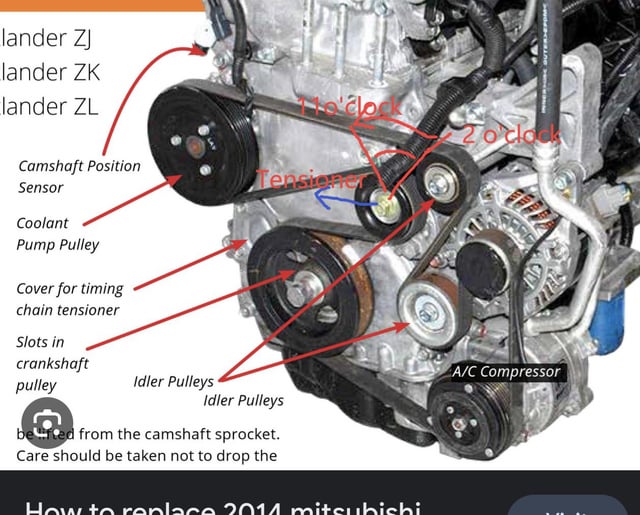
Key Specs and Main Parts of the Serpentine Belt System
The serpentine belt system in the 2012 Outlander (depending on the engine – 2.4L or 3.0L V6) consists of several key components. These parts must work in harmony for optimal performance:
- Serpentine Belt: A long, continuous belt made of reinforced rubber that transmits power from the crankshaft pulley to the accessory pulleys.
- Crankshaft Pulley (or Harmonic Balancer): The driven pulley, connected directly to the engine's crankshaft. This provides the power source for the belt.
- Alternator Pulley: Driven by the belt, this pulley spins the alternator, which generates electricity to charge the battery and power the vehicle's electrical systems.
- Air Conditioning (A/C) Compressor Pulley: Another driven pulley, connected to the A/C compressor. When engaged, the compressor circulates refrigerant to cool the cabin.
- Power Steering Pump Pulley: Driven by the belt, this pulley operates the power steering pump, providing hydraulic assistance for steering.
- Idler Pulley(s): Smooth pulleys that guide the belt and maintain proper routing. They don't drive any specific accessory.
- Tensioner Pulley: A spring-loaded pulley that automatically maintains the correct tension on the serpentine belt. This is vital for preventing slippage and premature wear. The tensioner assembly consists of the pulley itself and a spring mechanism.
Important Note: The specific configuration and number of pulleys can vary slightly depending on your engine type (2.4L or 3.0L V6). Always refer to the correct diagram for your specific vehicle.
Understanding the Symbols on the Diagram
Serpentine belt diagrams use standardized symbols to represent different components and their relationships. Here's a breakdown:
- Solid Lines: Generally represent the serpentine belt itself. The thickness of the line may or may not be significant.
- Circles or Discs: Represent pulleys. They are often labeled with abbreviations indicating the component they drive (e.g., ALT for alternator, A/C for air conditioning, P/S for power steering).
- Arrows: Indicate the direction of belt travel. Following these arrows is crucial for understanding the belt routing.
- Spring Symbol (Zigzag Line): Represents the tensioner assembly. This symbol often indicates the direction of the tensioner's movement (tightening or loosening).
- Abbreviations: Common abbreviations include:
- CRANK: Crankshaft Pulley
- ALT: Alternator
- A/C: Air Conditioning Compressor
- P/S: Power Steering
- IDLER: Idler Pulley
- TENS: Tensioner
While color-coding isn't consistently used, some diagrams might use different colors to highlight specific sections of the belt or to differentiate between different belt paths (though this is less common with serpentine belt diagrams compared to, say, wiring diagrams).
How the Serpentine Belt System Works
The serpentine belt system is elegantly simple in concept. The engine's crankshaft rotates, driving the crankshaft pulley. This pulley, in turn, drives the serpentine belt. The belt then wraps around the various accessory pulleys (alternator, A/C compressor, power steering pump, etc.), transferring the rotational force from the crankshaft to these components, enabling them to function.
The tensioner pulley plays a critical role in maintaining proper belt tension. As the belt stretches over time (which is normal), the tensioner automatically adjusts its position to compensate, ensuring that the belt remains tight enough to prevent slippage. Without proper tension, the accessories will not be driven efficiently, leading to reduced performance or complete failure. A slipping belt can cause squealing noises, especially when the engine is first started or when under heavy load (e.g., turning on the A/C).
Real-World Use and Basic Troubleshooting Tips
Here's how you can use the serpentine belt diagram for troubleshooting:
- Belt Squealing: A common symptom of a worn or loose belt. Check the belt tensioner. If the tensioner is bouncing excessively or near the end of its travel, it may be failing or the belt may be too stretched and need replacement. Refer to the diagram to locate the tensioner.
- Accessory Malfunction: If your A/C isn't cooling, the power steering is difficult to use, or the battery isn't charging, check the serpentine belt routing. Ensure the belt is properly seated on all pulleys. The diagram is essential here. A belt that has jumped off a pulley won't drive that accessory.
- Belt Inspection: Regularly inspect the belt for cracks, fraying, glazing (a shiny appearance), or missing chunks. Any of these signs indicates the need for replacement. Use the diagram to help you systematically inspect the entire length of the belt.
- Pulley Inspection: Spin each pulley by hand (with the engine off!). They should rotate smoothly and quietly. Any roughness, wobble, or noise indicates a potential bearing problem. Identify each pulley using the diagram.
Safety Precautions
Working on the serpentine belt system involves inherent risks. Here's what you need to keep in mind:
- Engine Off: Always ensure the engine is completely off and the key is removed from the ignition before working on the serpentine belt system. Accidental starting of the engine can cause serious injury.
- Hot Components: Be aware that the engine and its components, including the pulleys, can be extremely hot after the engine has been running. Allow sufficient time for cooling before touching anything.
- Moving Parts: The serpentine belt and pulleys are moving parts and can cause serious injury if your fingers or clothing get caught in them while the engine is running. Never attempt to diagnose or repair the system with the engine running unless absolutely necessary for specific diagnostic tests (and then, exercise extreme caution).
- Tensioner Spring: The tensioner spring is under significant tension. When releasing the tension on the belt, use the correct tools to prevent the spring from snapping back unexpectedly, which can cause injury.
Using the correct tools, such as a serpentine belt tool (a wrench with specialized sockets for the tensioner), is highly recommended. This makes the job easier and safer.
We have the 2012 Mitsubishi Outlander Serpentine Belt Diagram available for download. This detailed diagram will provide you with the precise routing and component locations specific to your vehicle, ensuring accurate repairs and confident maintenance.