2012 Nissan Altima 2.5 Belt Diagram
Hey gearheads! Let's dive into the serpentine belt system of the 2012 Nissan Altima with the 2.5L engine. This seemingly simple component is crucial for your car's operation, powering vital accessories. Having a good understanding of its layout and function, with the belt diagram, can save you time and money on repairs, help you diagnose issues accurately, and even allow you to perform preventative maintenance like a pro.
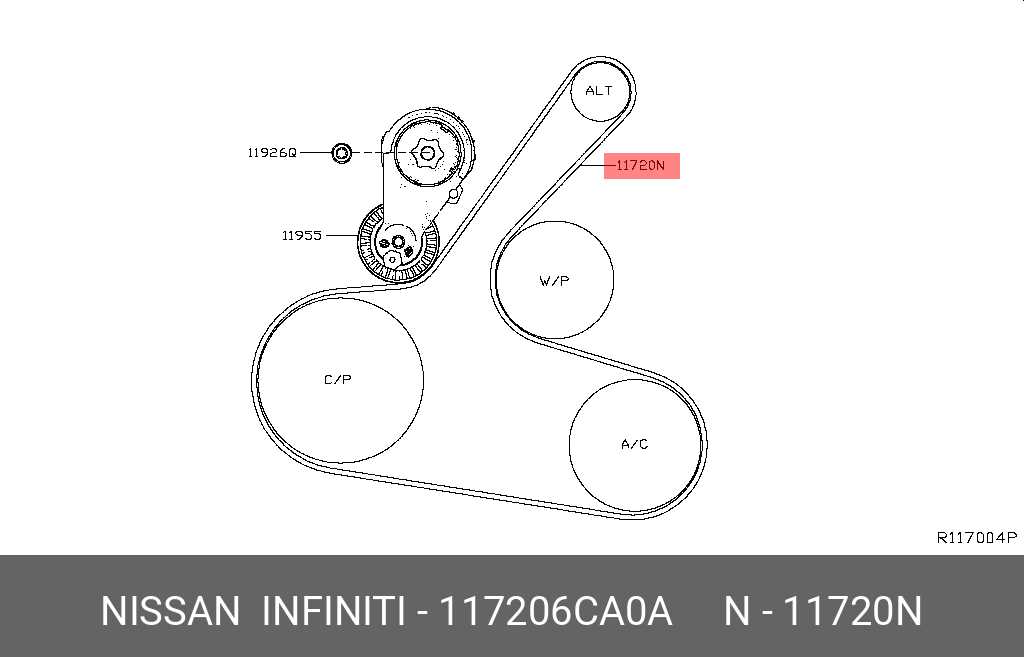
Purpose of the Serpentine Belt Diagram
Why bother with a belt diagram? Well, it's your roadmap to understanding the serpentine belt system. This diagram is absolutely essential for:
- Replacement: If your belt is cracked, frayed, or missing entirely, the diagram shows you exactly how the new belt should be routed. Incorrect routing can lead to component failure and engine damage.
- Troubleshooting: A squealing belt could be a sign of misalignment, a failing component (like a tensioner or pulley), or the belt itself being worn. The diagram helps you identify each component and check its function.
- Maintenance: Knowing the belt routing allows you to inspect it thoroughly for wear and tear, ensuring it's replaced before it fails unexpectedly.
- Learning: Even if you're not planning on working on your Altima right now, understanding the belt system is a valuable piece of automotive knowledge.
Key Specs and Main Parts of the 2.5L Altima Serpentine Belt System
The 2012 Altima 2.5L utilizes a single serpentine belt to drive several critical accessories. Key components include:
- Crankshaft Pulley (Crank Pulley): This is the engine's drive pulley. It's connected directly to the crankshaft and provides the initial rotational force to the serpentine belt.
- Alternator Pulley: The alternator generates electrical power for your car's systems and to recharge the battery. The belt spins this pulley to keep everything running smoothly.
- Power Steering Pump Pulley: This pulley drives the power steering pump, which provides hydraulic assistance to make steering easier.
- Air Conditioning Compressor Pulley: This pulley engages and disengages the air conditioning compressor, allowing you to cool the cabin. When the A/C is off, this pulley still spins freely.
- Water Pump Pulley: The water pump circulates coolant throughout the engine to prevent overheating. The serpentine belt's connection here is critical!
- Tensioner Pulley: This spring-loaded pulley maintains the correct tension on the serpentine belt. Proper tension is crucial for preventing slippage and premature wear. A failing tensioner is a common cause of squealing belts.
- Idler Pulley: An idler pulley is a smooth pulley used to guide the belt and provide the necessary wrap angle around other pulleys.
- Serpentine Belt: The unsung hero of the system! It's a long, continuous belt made of rubber and reinforcing fibers.
Decoding the Diagram: Symbols and Conventions
A serpentine belt diagram isn't just a random jumble of lines. Here's how to interpret the typical symbols:
- Solid Lines: Represent the belt itself, indicating the path it follows around the pulleys.
- Pulleys: Shown as circles, often with a letter inside to indicate which component they belong to (e.g., "ALT" for alternator, "AC" for air conditioning).
- Arrows: Indicate the direction of rotation for each pulley. This is important for understanding how the belt is driven.
- Tensioner Representation: The tensioner pulley is often shown with a spring symbol or an arrow indicating the direction of its movement. This pulley is key for keeping the belt tight.
- Routing Details: The diagram will illustrate whether the belt runs on the outside of a pulley (grooved side of the belt making contact) or on the inside (smooth side of the belt making contact).
How the Serpentine Belt System Works
The serpentine belt system is relatively simple in concept, but complex in execution. The crankshaft pulley acts as the engine's power source. As the crankshaft rotates, it spins the crankshaft pulley, which in turn drives the serpentine belt. The belt then transmits this rotational force to all the other pulleys connected to various accessories, such as the alternator, power steering pump, air conditioning compressor, and water pump. The tensioner pulley is absolutely critical. It uses a spring to maintain consistent tension on the belt, preventing it from slipping or becoming too loose. Without proper tension, the accessories won't function correctly, and the belt will wear out quickly. The system is designed to be relatively efficient, but a worn belt or a failing component can significantly reduce its performance.
Real-World Use: Troubleshooting Tips
Here's how you can use the belt diagram for basic troubleshooting:
- Squealing Belt: A common problem. Check the belt tensioner. Is it moving freely? Is it applying enough pressure? Look for signs of wear on the belt itself (cracks, glazing). Use the diagram to ensure the belt is routed correctly, as incorrect routing can cause slippage.
- Accessory Failure: If your power steering suddenly stops working, or the air conditioning isn't blowing cold air, check the belt. Is it still intact? Is it slipping on the corresponding pulley? Use the diagram to identify the correct pulley and inspect it for damage.
- Visual Inspection: Regularly inspect the belt for cracks, fraying, missing chunks, or glazing (a shiny, smooth surface). If you see any of these signs, replace the belt immediately. Use the diagram to make sure the new belt is installed correctly.
- Belt Routing After Maintenance: If you've recently had work done on your engine, double-check the belt routing using the diagram to ensure it was reinstalled correctly.
Safety First!
Working on the serpentine belt system can be dangerous if you're not careful. Always disconnect the negative battery cable before working on the system to prevent accidental starting. Never put your hands or tools near a moving belt or pulleys. Be especially cautious around the crankshaft pulley, as it's directly connected to the engine and can cause serious injury. If you're not comfortable working on the system yourself, take your car to a qualified mechanic. When replacing the belt, use the correct size and type specified for your 2012 Altima 2.5L. An incorrect belt can damage components and shorten the belt's lifespan.
Final Thoughts
Understanding your 2012 Nissan Altima 2.5L's serpentine belt system is a valuable skill for any car owner. The belt diagram is your essential tool for maintenance, troubleshooting, and repairs. By using the diagram in conjunction with careful observation and safe practices, you can keep your Altima running smoothly for years to come. Don't underestimate the power of a well-maintained serpentine belt!
We have the high-resolution PDF file containing the precise serpentine belt diagram for your 2012 Nissan Altima 2.5L. Contact us and we will happily share this file to aid you with repairs.