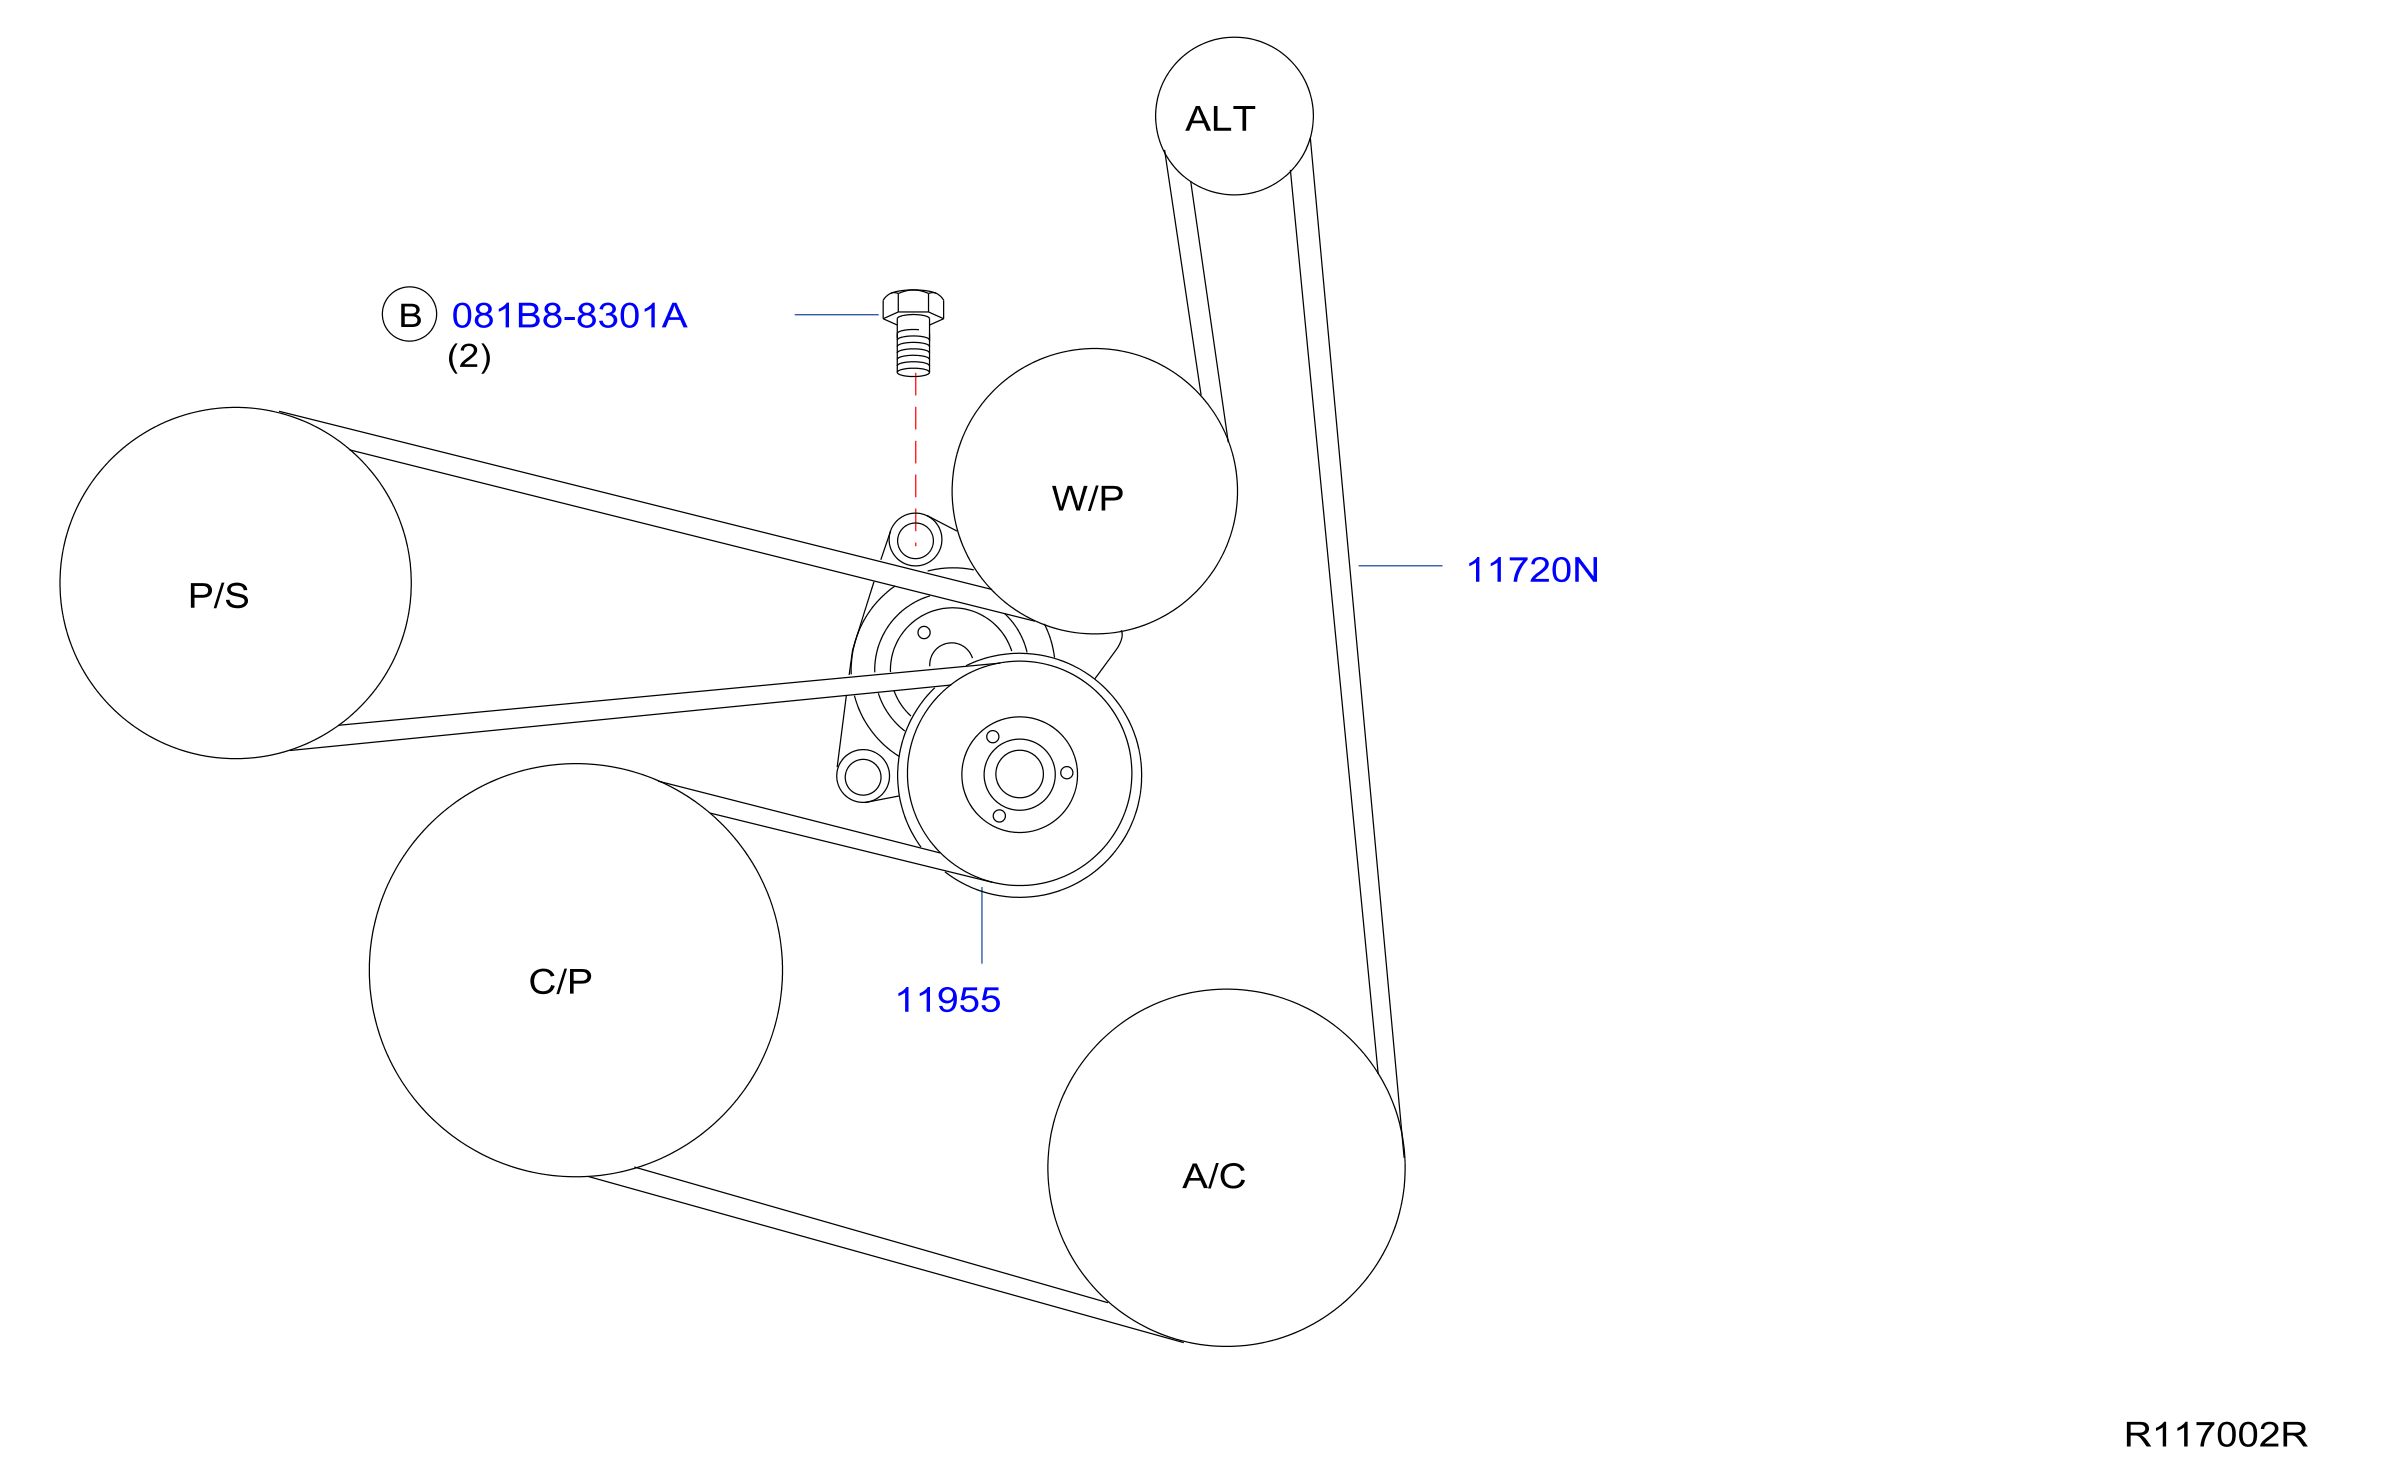
2012 Nissan Altima 2.5 Serpentine Belt Diagram
If you're tackling a repair or maintenance project on your 2012 Nissan Altima 2.5L, understanding the serpentine belt routing is absolutely crucial. This article dives deep into the serpentine belt diagram for your vehicle, providing the knowledge you need to confidently navigate belt replacement, tension adjustment, and troubleshooting.
Purpose of the Serpentine Belt Diagram
The serpentine belt diagram is more than just a picture; it's a roadmap. It outlines the exact path the serpentine belt takes around various engine components. Why is this important? Several reasons:
- Proper Belt Routing: Incorrect routing leads to component malfunction (like the alternator not charging), belt slippage, and even belt failure.
- Tensioner Adjustment: Knowing the belt's path helps you locate and properly adjust the belt tensioner, ensuring optimal belt performance.
- Troubleshooting: A diagram aids in identifying potential issues like misalignment or damaged pulleys.
- Part Replacement: When replacing the serpentine belt, the diagram serves as a reference to ensure the new belt is installed correctly.
Key Specs and Main Parts
Before we jump into the diagram, let's familiarize ourselves with the key components involved:
- Serpentine Belt: A single, continuous belt that drives multiple engine accessories. It's typically made of reinforced rubber.
- Crankshaft Pulley (Harmonic Balancer): Driven directly by the engine's crankshaft, it's the starting point for the serpentine belt's journey.
- Alternator Pulley: The alternator generates electrical power for the vehicle. The serpentine belt spins this pulley to drive the alternator.
- Power Steering Pump Pulley: The power steering pump provides hydraulic pressure to assist steering.
- Air Conditioning (A/C) Compressor Pulley: The A/C compressor circulates refrigerant in the air conditioning system.
- Tensioner Pulley: A spring-loaded pulley that maintains the correct tension on the serpentine belt. Crucial for preventing slippage and extending belt life.
- Idler Pulley: A smooth pulley that guides the belt and provides optimal wrap angle on other pulleys.
The 2012 Nissan Altima 2.5L typically uses a single serpentine belt to drive these accessories. The exact length of the belt can vary slightly depending on the vehicle's specific options, but it's generally around 85-87 inches. Always verify the correct belt length using the vehicle's VIN or by consulting your local parts store.
Understanding the Serpentine Belt Diagram Symbols
Serpentine belt diagrams often use symbols to convey information efficiently. Here’s a breakdown of common symbols:
- Solid Lines: Represent the front (grooved) side of the belt contacting the pulley. This is the side that actually drives the accessory.
- Dashed Lines: Represent the back (smooth) side of the belt contacting the pulley. This is typically seen on idler pulleys and the tensioner pulley.
- Arrows: Indicate the direction of belt rotation around each pulley. Pay close attention to these, as they’re vital for correct routing.
- Pulleys: Each pulley is represented by a circle. Some diagrams may label the pulleys with abbreviations (e.g., ALT for alternator, P/S for power steering).
- Tensioner: The tensioner pulley is often depicted with a spring symbol indicating its spring-loaded mechanism.
While most diagrams are black and white, some may use color to further differentiate belt sides or components. Always refer to the diagram's legend for clarification.
How the Serpentine Belt System Works
The crankshaft pulley, driven directly by the engine, initiates the serpentine belt's movement. As the crankshaft rotates, it turns the serpentine belt, which then drives the other accessory pulleys. The belt wraps around each pulley in a specific sequence, dictated by the diagram. The tensioner pulley plays a critical role by maintaining constant tension on the belt. This prevents slippage, ensures efficient power transfer, and prolongs the belt's lifespan. Without proper tension, the belt may slip, causing accessories to malfunction and potentially damaging the belt itself.
Real-World Use: Basic Troubleshooting Tips
The serpentine belt diagram is invaluable when troubleshooting issues related to the belt system. Here are a few scenarios:
- Squealing Noise: A common symptom of a loose or worn serpentine belt. Check the belt tension and look for signs of cracking, glazing, or fraying. Use the diagram to locate the tensioner and adjust it accordingly.
- Accessory Malfunction: If the alternator isn't charging, the power steering isn't working, or the A/C isn't cooling, the serpentine belt could be the culprit. Inspect the belt for damage and ensure it's properly routed according to the diagram. Also, check the individual accessory pulleys for free rotation; a seized pulley can cause the belt to break.
- Belt Slippage: Visible signs of belt dust or debris around the pulleys indicate slippage. This could be due to a loose belt, a worn pulley, or contamination (oil or coolant) on the belt. Clean the pulleys and replace the belt if necessary. Ensure the tensioner is functioning correctly.
- Belt Breakage: A broken serpentine belt is a serious issue, as it immediately disables all driven accessories. Replacing the belt requires careful routing according to the diagram. Before installing a new belt, inspect all pulleys for damage or misalignment. A misaligned pulley will cause premature belt wear and breakage.
Safety Considerations
Working on the serpentine belt system involves several safety considerations:
- Engine Off: Always ensure the engine is off and the key is removed from the ignition before working on the serpentine belt.
- Battery Disconnect: Disconnecting the negative battery terminal is a good safety precaution to prevent accidental starting of the engine.
- Hot Components: The engine and its components, including pulleys, can be extremely hot after running. Allow sufficient cooling time before touching anything.
- Moving Parts: Never attempt to adjust the serpentine belt while the engine is running. The moving parts can cause serious injury.
- Tensioner Spring: The tensioner pulley is spring-loaded and can snap back forcefully when released. Use the correct tools and techniques to relieve tension safely.
Specifically, the crankshaft pulley (harmonic balancer) is a critical component. Inspect it carefully for signs of damage or separation. A failing harmonic balancer can cause significant engine damage. If you suspect the harmonic balancer is faulty, consult a qualified mechanic.
By understanding the serpentine belt diagram and following proper safety precautions, you can confidently tackle various maintenance and repair tasks on your 2012 Nissan Altima 2.5L. Remember to always consult the vehicle's repair manual for specific instructions and torque specifications.
We have a high-resolution version of the 2012 Nissan Altima 2.5L Serpentine Belt Diagram available for download. This will provide you with a clear and detailed reference for your projects.