2012 Smart Car Front Hood Wiring Diagram
Alright, let's dive into the often-overlooked, yet critically important, wiring diagram for the front hood of a 2012 Smart Car. Whether you're troubleshooting a malfunctioning component, planning a custom modification, or simply trying to better understand your vehicle, having a clear understanding of this diagram is invaluable. Think of it as the roadmap to the electrical system housed under that tiny hood.
Purpose
The front hood wiring diagram serves several crucial purposes. First and foremost, it's essential for repairs. When a light fails, a sensor malfunctions, or any other electrical issue arises in the front of the car, the diagram allows you to trace the circuit, identify the faulty component, and locate any breaks or shorts in the wiring. Secondly, it's vital for modifications. If you're adding aftermarket lights, sensors, or other electrical accessories, you'll need to know where to tap into the existing system safely and effectively. Finally, understanding the wiring diagram enhances your overall understanding of the Smart Car's electrical system. It provides insight into how different components interact and how the car's systems are integrated.
Key Specs and Main Parts
Before we get into the nitty-gritty of the diagram itself, let's identify the key components typically found within the front hood wiring schematic of a 2012 Smart Car. Keep in mind that the exact layout may vary slightly depending on the specific model and options.
- Headlights: Includes low beam, high beam, and potentially daytime running lights (DRL). These circuits involve relatively high current, so be cautious when working with them.
- Turn Signals/Parking Lights: These usually have their own dedicated circuits and relays.
- Fog Lights (if equipped): Often controlled by a separate switch and relay.
- Horn: A simple circuit, but can still be tricky to diagnose without a diagram.
- Temperature Sensor (Ambient Air): Used by the climate control system. It sends a signal to the ECU (Engine Control Unit) reflecting the outside temperature.
- Windshield Washer Pump Motor: Small but essential! Its circuit includes the pump and the wiring to the stalk switch.
- Hood Switch (Security System): If your car is equipped with an alarm, a switch on the hood ensures the alarm triggers if the hood is opened without authorization.
- Wiring Harness Connectors: These are the physical connections that join different sections of the wiring harness. Knowing their locations is critical for troubleshooting.
Furthermore, understand the specifications of the wiring itself. Typically, you'll find different gauge wires. Wire gauge refers to the thickness of the wire. Thicker wires are used for circuits that carry more current (like headlights), while thinner wires are sufficient for lower-current circuits (like sensors). The diagram might indicate the wire gauge with a number (e.g., 18 AWG, 16 AWG). Also, be aware of wire insulation material, which can vary.
Symbols – Deciphering the Code
The wiring diagram is essentially a symbolic representation of the electrical system. Understanding these symbols is crucial for interpreting the diagram correctly.
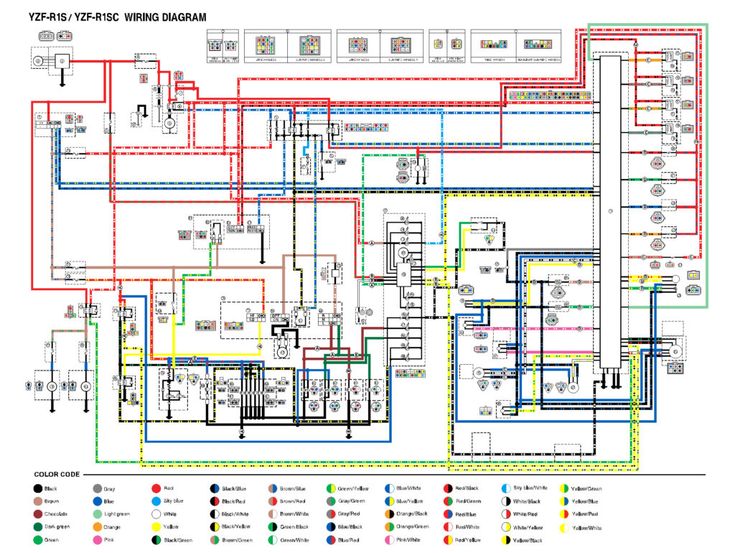
- Solid Lines: Represent wires. Thicker lines often indicate wires that carry higher current.
- Dashed Lines: May represent shielded wires or ground connections. Shielded wires protect sensitive signals from interference.
- Colors: Each wire is identified by a color code (e.g., BLU for blue, RED for red, GRN for green, BLK for black). This is vital for tracing wires physically in the car. A wire might be labeled "BLU/WHT," indicating a blue wire with a white stripe.
- Circles: Often represent connectors or terminals.
- Rectangles: Can represent switches, relays, or control modules.
- Zigzag Lines: Typically represent resistors.
- Ground Symbols: Indicate a connection to the vehicle's chassis, providing a return path for the current.
- Component Symbols: Each component (headlight, sensor, motor) has a specific symbol, which will be explained in the diagram's legend.
The wiring diagram will also use alphanumeric codes to identify specific circuits and wires. These codes are specific to the vehicle manufacturer and are used for internal documentation and troubleshooting.
How It Works
The wiring diagram depicts the flow of electricity from the power source (battery) through various components and back to ground. Each circuit is designed to power a specific component. A typical circuit will include:
- Power Source: The battery provides the initial electrical energy.
- Fuse: A safety device that protects the circuit from overloads. If the current exceeds the fuse's rating, the fuse will blow, interrupting the circuit.
- Switch: Controls the flow of electricity to the component. When the switch is closed, the circuit is complete, and the component receives power.
- Relay (Optional): Used to control high-current circuits with a low-current signal. A small current from a switch activates the relay, which then closes a separate high-current circuit.
- Component: The device that performs the intended function (e.g., headlight, motor, sensor).
- Ground: Provides a return path for the electricity back to the battery, completing the circuit.
The ECU (Engine Control Unit) plays a critical role in many of these circuits. The ECU receives signals from sensors, processes the information, and controls various actuators (like relays) to manage the car's systems.
Real-World Use – Basic Troubleshooting Tips
Let's say your headlight isn't working. Here's how the wiring diagram can help:
- Consult the Diagram: Locate the headlight circuit in the diagram.
- Identify Key Components: Find the fuse, switch, relay (if present), and the headlight itself.
- Check the Fuse: Use a multimeter to test the fuse for continuity. If it's blown, replace it with the correct amperage rating. Never use a fuse with a higher amperage rating, as this could cause a fire.
- Test the Switch: Use a multimeter to check if the switch is providing power to the headlight circuit when turned on.
- Check the Relay: If there's a relay, test it to ensure it's functioning correctly. You can usually hear a click when the relay is activated.
- Inspect the Wiring: Look for any signs of damage, such as frayed wires, corroded connectors, or loose connections. Use the color codes in the diagram to trace the wires.
- Test the Headlight: Finally, test the headlight itself to ensure it's not the problem.
Remember to always disconnect the battery before working on any electrical components to prevent accidental shorts or shocks.
Safety – Handle with Care
Working with automotive electrical systems can be dangerous if you're not careful. Here are some safety precautions to keep in mind:
- Disconnect the Battery: Always disconnect the negative battery terminal before working on any electrical components.
- Use Proper Tools: Use insulated tools to prevent shocks.
- Avoid Water: Never work on electrical systems in wet conditions.
- Be Aware of High-Current Circuits: Headlight circuits, in particular, can carry significant current. Be especially careful when working with these circuits.
- Never Bypass Fuses: Fuses are safety devices designed to protect the circuit. Never bypass them with a wire or a higher-amperage fuse.
- Understand the Diagram: Make sure you fully understand the wiring diagram before starting any work. If you're unsure about something, consult a qualified mechanic.
Certain components, such as the ECU and airbag control module, are particularly sensitive to voltage fluctuations. Mishandling these components can cause serious damage or malfunction. If you're not comfortable working with these components, it's best to leave them to a professional.
With the proper knowledge and precautions, you can safely and effectively use the 2012 Smart Car front hood wiring diagram to troubleshoot electrical problems, plan modifications, and gain a deeper understanding of your vehicle's electrical system.
We have the complete 2012 Smart Car front hood wiring diagram file available for download. It's a high-resolution, detailed schematic that will be an invaluable resource for your projects. Get in touch, and we'll provide you with the download link.