2012 Toyota Corolla Serpentine Belt Diagram
The serpentine belt in your 2012 Toyota Corolla is a critical component responsible for powering several vital engine accessories. Understanding its routing and function is crucial for DIY maintenance, troubleshooting, and even performance modifications. This article provides a detailed breakdown of the 2012 Corolla's serpentine belt system, equipping you with the knowledge to handle related repairs and upgrades confidently.
Purpose of the Serpentine Belt Diagram
A serpentine belt diagram isn't just a pretty picture; it's an essential tool for several reasons:
- Replacement and Installation: The primary use is to ensure correct belt routing during replacement. Incorrect routing can lead to accessory failure, belt damage, and even engine overheating.
- Troubleshooting: When diagnosing issues like squealing belts, failing power steering, or a non-charging battery, the diagram helps you visualize the system and identify potential problem areas like misaligned pulleys or worn tensioners.
- Understanding Engine Layout: Studying the diagram provides valuable insight into the engine's accessory drive system and how various components interact.
- Planning Modifications: If you're considering upgrading components like the alternator or adding aftermarket accessories, knowing the belt routing and available space is critical for planning and execution.
Key Specs and Main Parts of the 2012 Corolla Serpentine Belt System
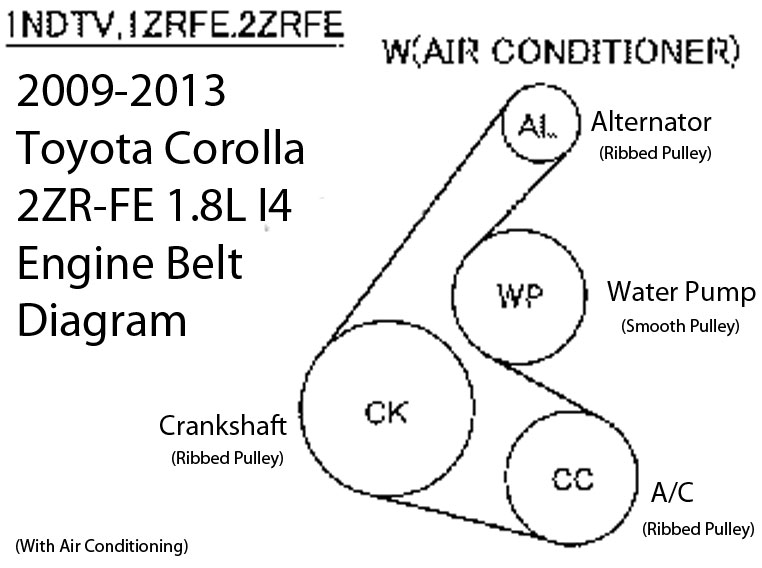
The 2012 Toyota Corolla, with its 1.8L 2ZR-FE engine, uses a single serpentine belt to drive the following accessories:
- Crankshaft Pulley: The driving force of the system, directly connected to the engine's crankshaft. This is where the belt initially receives its rotational energy.
- Alternator: Charges the battery and provides electrical power to the vehicle's systems. A failing belt can lead to a dead battery and electrical issues.
- Power Steering Pump: Provides hydraulic assistance for steering. Belt slippage will result in hard steering, especially at low speeds.
- Air Conditioning (A/C) Compressor: Compresses the refrigerant to cool the cabin. A failing belt can mean no A/C.
- Water Pump: Circulates coolant through the engine to regulate temperature. Failure to drive the water pump will quickly lead to overheating and potential engine damage.
- Tensioner Pulley: Maintains proper belt tension, preventing slippage and extending belt life. This is a spring-loaded pulley, which can wear out over time, causing belt noise and premature wear.
- Idler Pulley (if equipped): A smooth pulley used to guide the belt around other components and maintain proper wrap angle. Not all Corollas use an idler pulley.
Belt Specification: The specific belt length is crucial. Consult your owner's manual or a parts catalog for the correct part number and dimensions for your 2012 Corolla. Using the wrong size can lead to improper tension, slippage, or even damage to the accessories. Typical belt length is in the range of 80-85 inches, but always verify the correct part number. The belt is made of reinforced rubber designed to withstand high temperatures and friction.
Symbols and Diagram Interpretation
Understanding the symbols in the diagram is key to interpreting it correctly:
- Solid Lines: Represent the path of the serpentine belt. The lines usually indicate the outside surface of the belt.
- Dashed Lines: Sometimes used to indicate the 'backside' of the belt, which is the smooth surface that contacts certain pulleys.
- Arrows: Indicate the direction of belt travel. Follow these to ensure you're routing the belt correctly.
- Pulleys: Depicted as circles or stylized representations of the specific component (alternator, A/C compressor, etc.).
- Labels: Each pulley is usually labeled with an abbreviation indicating its function (ALT for alternator, P/S for power steering, A/C for air conditioning, etc.).
- Tensioner: Often has a distinct symbol indicating its adjustable nature and spring mechanism.
How It Works: The Serpentine Belt System in Action
The crankshaft pulley, driven by the engine, initiates the system. The serpentine belt wraps around this pulley and transmits rotational force to all the other driven accessories. The tensioner pulley maintains the correct belt tension, ensuring adequate grip on each pulley. Without proper tension, the belt can slip, leading to reduced performance of the accessories or even complete failure. The belt snakes around all the pulleys in a specific configuration, dictated by the diagram. It is important to understand that the belt drives these components via friction; therefore, proper tension is paramount for efficient operation. The design also allows components to be clustered on one side of the engine, saving space.
Real-World Use: Troubleshooting Tips
Here are some common issues and how the diagram helps diagnose them:
- Squealing Belt: Often caused by a loose belt. Use the diagram to locate the tensioner and check its function. A worn tensioner may not be applying sufficient force. Also, inspect the belt for cracks, glazing, or wear.
- Power Steering Failure: If steering becomes difficult, especially at low speeds, the belt may be slipping on the power steering pump pulley. Verify belt tension and inspect the pulley for damage or contamination.
- Charging Issues (Battery Light): A slipping belt can prevent the alternator from charging the battery properly. Check belt tension and alternator pulley condition.
- Overheating: If the water pump isn't being driven correctly due to a slipping belt, the engine can overheat quickly. Stop immediately and check the belt and water pump pulley.
- A/C Problems: Insufficient belt tension can also prevent the A/C compressor from engaging effectively, leading to poor cooling performance.
When troubleshooting, always visually inspect the belt for wear, cracks, and proper alignment. Listen for unusual noises, such as squealing or chirping, which can indicate a problem. A multimeter can be used to verify proper charging output from the alternator.
Safety Precautions
Working on the serpentine belt system involves potential hazards:
- Engine Heat: Ensure the engine is cool before working on the system. Exhaust manifolds and other components can remain extremely hot for a significant time after the engine is turned off.
- Moving Parts: Never work on the system while the engine is running. The rotating belt and pulleys can cause serious injury.
- Tensioner Spring: The tensioner is spring-loaded and can snap back forcefully. Use the correct tools and techniques to release tension safely. Most tensioners require a wrench or socket to relieve pressure on the belt.
- Battery Disconnect: It's good practice to disconnect the negative battery terminal before working on any electrical components, including the alternator. This prevents accidental shorts.
- Sharp Edges: Be mindful of sharp edges on pulleys and brackets. Wear appropriate gloves to protect your hands.
The area around the crankshaft pulley is particularly dangerous due to its location and high rotational speed. Exercise extreme caution when working near this component.
By understanding the function, components, and safety considerations of the 2012 Toyota Corolla serpentine belt system, you're well-equipped to handle a variety of maintenance and repair tasks. Always consult the service manual for specific torque specifications and procedures.
We have the detailed serpentine belt diagram available for download in PDF format. This will be invaluable when you're working on your Corolla. Contact us to get the file.