2012 Toyota Highlander Serpentine Belt Diagram
For the experienced DIYer tackling maintenance or repairs on a 2012 Toyota Highlander, understanding the serpentine belt system is crucial. This article will delve into the specifics of the 2012 Highlander's serpentine belt diagram, providing you with the knowledge to confidently diagnose issues, perform replacements, and ensure your vehicle runs smoothly. A clear understanding of this system can save you money and prevent potential damage to critical engine components.
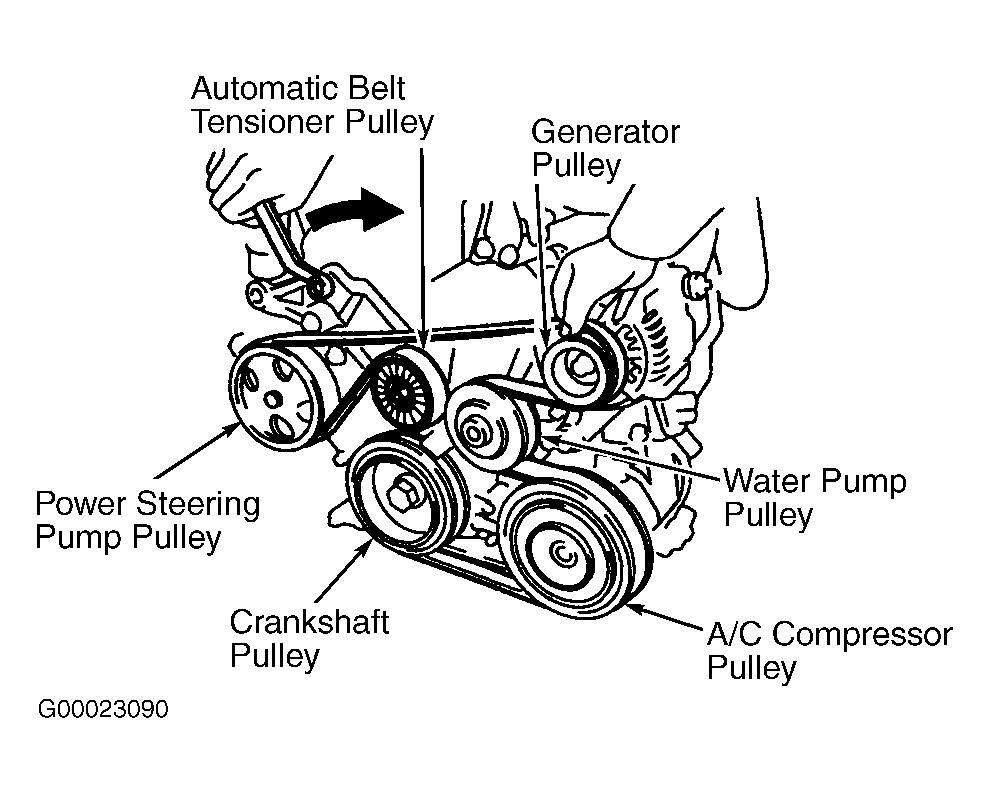
Purpose and Importance of the Serpentine Belt Diagram
The serpentine belt diagram is more than just a picture; it's a roadmap to your Highlander's accessory drive system. Its primary purpose is to illustrate the routing path of the serpentine belt around various engine components. This is essential for several reasons:
- Belt Replacement: When replacing a worn or damaged belt, the diagram is your guide to ensuring proper installation. An incorrectly routed belt can lead to component failure and potential engine damage.
- Troubleshooting: A squealing belt can indicate a problem with one of the driven components (e.g., alternator, power steering pump). The diagram helps you identify which component might be the culprit.
- Preventative Maintenance: Studying the diagram allows you to understand the belt's tensioner system and identify potential wear points, aiding in proactive maintenance.
- Learning the System: Understanding the serpentine belt system provides a deeper knowledge of how the engine accessories function and interact.
Key Specs and Main Parts of the 2012 Toyota Highlander Serpentine Belt System
The 2012 Toyota Highlander came with several engine options. The most common are the 2.7L inline-4 (2AR-FE) and the 3.5L V6 (2GR-FE). While the specific routing might vary slightly depending on the engine, the core components remain similar. Here are the key parts:
- Serpentine Belt: A long, continuous belt made of durable rubber compound. It transmits power from the crankshaft to various engine accessories. The belt tension is critical for optimal performance.
- Crankshaft Pulley (or Damper): Driven directly by the engine's crankshaft, it provides the rotational force to drive the serpentine belt.
- Alternator Pulley: The alternator generates electricity to power the vehicle's electrical system and charge the battery.
- Power Steering Pump Pulley: Provides hydraulic pressure to assist in steering.
- Air Conditioning (A/C) Compressor Pulley: Compresses refrigerant for the air conditioning system.
- Idler Pulley(s): Smooth pulleys that guide the belt and maintain optimal wrap around other pulleys. They can reduce vibration and noise.
- Tensioner Pulley: A spring-loaded pulley that automatically maintains the correct tension on the serpentine belt. This is crucial for preventing slippage and extending belt life. The tensioner typically has a square opening to accept a wrench or socket to relieve tension during belt removal and installation.
The exact belt length can vary depending on the engine and optional equipment. Consult the parts catalog for your specific Highlander model to ensure you purchase the correct replacement belt.
Understanding the Diagram: Symbols and Conventions
Serpentine belt diagrams use standardized symbols to represent the components and belt routing. Here's a breakdown:
- Solid Line: Represents the visible portion of the serpentine belt.
- Dashed Line: Typically indicates the portion of the belt hidden behind a component.
- Circles: Represent pulleys. The pulleys will often be labeled (e.g., ALT for alternator, P/S for power steering).
- Arrows: Show the direction of belt travel around each pulley. This is vital for ensuring correct routing.
- Square or Rectangle (with a lever arm): Represents the tensioner assembly. The diagram will usually indicate the direction to move the tensioner to relieve belt tension.
Some diagrams may also use color-coding to differentiate belt sections or highlight specific components. However, color-coding is less common in factory service manuals. The pulley sizes are usually proportional on the diagram to reflect their real-world sizes.
How the Serpentine Belt System Works
The serpentine belt system is relatively simple in concept. The crankshaft pulley, driven by the engine, spins the serpentine belt. The belt, in turn, drives the pulleys of the alternator, power steering pump, A/C compressor, and sometimes other accessories. The tensioner pulley automatically adjusts to maintain the correct belt tension, compensating for belt stretch and variations in engine speed. Without proper tension, the belt will slip, leading to reduced performance of the driven components and potential overheating. Belt slippage creates friction which can damage the belt and pulleys.
Real-World Use: Basic Troubleshooting Tips
The serpentine belt system is robust, but issues can arise. Here are some common problems and how the diagram can help:
- Squealing Belt: A squealing belt is often caused by slippage. Use the diagram to inspect the belt for cracks, wear, or glazing. Check the tensioner for proper operation. A seized or failing pulley on one of the driven components can also cause squealing. The diagram helps you isolate which component might be causing the problem.
- Cracked or Frayed Belt: Inspect the belt regularly for signs of wear. Cracks, fraying, or missing chunks of rubber indicate the need for replacement. Use the diagram to ensure proper routing of the new belt.
- Accessory Failure: If the alternator, power steering, or A/C system is not functioning correctly, the problem might be related to the serpentine belt or the pulley driving that component. The diagram helps you visually confirm that the belt is properly routed and engaging the pulley. Component failure can cause belt squealing.
- Belt Jumping Off: If the belt repeatedly jumps off the pulleys, it could indicate a misaligned pulley, a faulty tensioner, or the wrong belt size. Use the diagram to verify that all pulleys are properly aligned and that the belt is the correct length.
When diagnosing a problem, always visually inspect all components in the serpentine belt system. Look for signs of wear, damage, or misalignment.
Safety Precautions
Working on the serpentine belt system can be hazardous if proper precautions are not taken:
- Disconnect the Battery: Always disconnect the negative battery terminal before working on any electrical components or around moving parts. This prevents accidental starting and potential electrical shock.
- Hot Engine: Never work on the serpentine belt system while the engine is hot. Allow the engine to cool completely before starting any work.
- Moving Parts: The serpentine belt and pulleys are exposed moving parts. Keep your hands, clothing, and tools clear of the system when the engine is running.
- Tensioner Spring: The tensioner pulley is spring-loaded and can snap back forcefully. Use caution when relieving tension on the belt. Eye protection is recommended to avoid injury from debris or the tensioner.
- Sharp Edges: Be aware of sharp edges on pulleys and other engine components. Wear gloves to protect your hands.
The alternator is a particularly risky component to work around due to its high voltage potential. Always disconnect the battery before disconnecting any wiring to the alternator. The A/C compressor also contains refrigerant, which can be harmful if released into the atmosphere. If you suspect a refrigerant leak, consult a qualified technician.
By understanding the 2012 Toyota Highlander's serpentine belt diagram and following safe work practices, you can confidently perform maintenance and repairs on this critical engine system. Remember to always consult the vehicle's service manual for specific procedures and torque specifications.
We have a downloadable copy of the 2012 Toyota Highlander Serpentine Belt Diagram file available. You can [link to download - hypothetically].