
2012 Traverse Serpentine Belt Diagram
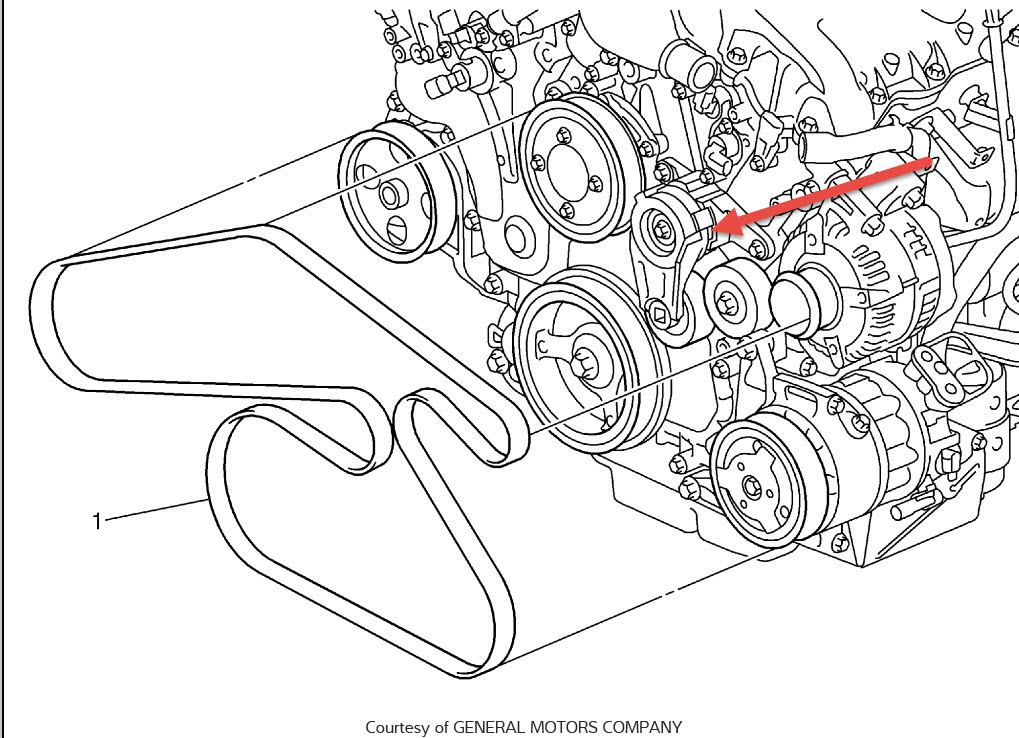
Let's dive into the serpentine belt system on your 2012 Chevrolet Traverse. This guide is aimed at giving you, the experienced DIYer, a solid understanding of the belt routing, components, and troubleshooting techniques. We'll cover the diagram in detail, explaining its purpose and how to use it effectively.
Purpose of the Serpentine Belt Diagram
The serpentine belt diagram is your go-to resource for understanding the routing of the belt around the various engine accessories. It's crucial for several reasons:
- Correct Installation: Ensuring the belt is routed correctly after replacement is paramount. Incorrect routing can lead to accessory malfunction and belt failure.
- Troubleshooting: The diagram helps you identify the accessories driven by the belt, aiding in diagnosing issues such as power steering failure, charging problems, or air conditioning malfunctions.
- Maintenance and Repair: When replacing components like the alternator, power steering pump, or idler pulley, the diagram ensures proper reassembly.
- General Understanding: Even if you're not actively working on your Traverse, understanding the serpentine belt system allows you to spot potential problems early.
Key Specs and Main Parts (2012 Traverse - 3.6L V6)
The 2012 Traverse, typically equipped with the 3.6L V6 engine (LLT or LFX), utilizes a specific serpentine belt system. Key components involved are:
- Crankshaft Pulley: The main pulley driven directly by the engine's crankshaft, providing rotational force to the entire system.
- Alternator: Generates electricity to charge the battery and power the vehicle's electrical systems.
- Power Steering Pump: Provides hydraulic pressure to assist steering.
- Air Conditioning Compressor: Compresses refrigerant to cool the cabin.
- Water Pump: Circulates coolant through the engine to regulate temperature. In some Traverse configurations, the water pump may be driven by the timing chain instead of the serpentine belt. Confirm the serpentine belt routing on your specific vehicle.
- Tensioner Pulley: A spring-loaded pulley that maintains constant tension on the serpentine belt. This is *critical* for proper operation and prevents slippage. It includes a spring and a pivoting arm.
- Idler Pulley(s): Smooth, non-driven pulleys that guide the belt and maintain the correct wrap angle around other pulleys. These are usually mounted on bearings for smooth rotation.
- Serpentine Belt: A long, continuous belt made of reinforced rubber that transmits power to all the accessories. The belt is typically a multi-ribbed V-belt.
The belt length for the 2012 Traverse 3.6L V6 varies depending on whether or not the vehicle is equipped with a heavy duty cooling system. Common belt length is approximately 91 inches (231 cm). Always verify the correct belt length for your specific vehicle using the VIN.
Symbols on the Diagram
Understanding the symbols on the serpentine belt diagram is crucial for interpreting its information. Here's a breakdown:
- Solid Lines: Represent the path of the serpentine belt itself. The thickness of the line does not necessarily indicate belt thickness.
- Arrows: Indicate the direction of rotation for each pulley. Pay close attention to these, as incorrect rotation can cause severe damage.
- Pulley Symbols: Each pulley is represented by a circle. The diagram will usually label the component associated with each pulley (e.g., "ALT" for alternator, "P/S" for power steering, "A/C" for air conditioning compressor).
- Tensioner Symbol: The tensioner is often represented by a spring symbol or an arrow indicating the direction in which the tensioner arm moves to apply tension.
- Ribbed vs. Smooth: The diagram will notate if the ribbed side of the belt contacts the pulley, or if the smooth side does.
How It Works
The serpentine belt system operates on a simple principle: rotational force from the engine's crankshaft is transferred to various accessories via the belt. The crankshaft pulley drives the belt, which in turn rotates the pulleys attached to the alternator, power steering pump, AC compressor, and water pump. The tensioner pulley maintains constant tension on the belt, preventing slippage and ensuring efficient power transfer. The idler pulleys are strategically placed to provide the necessary wrap angle (the amount of the pulley circumference the belt touches) for optimal grip and performance.
The tensioner is critical. As the belt stretches over time, the tensioner automatically adjusts to maintain the proper tension. A failing tensioner will cause belt slippage, noise, and eventually, component failure.
Real-World Use: Troubleshooting
Here's how to use the diagram for basic troubleshooting:
- Squealing Noise: A common issue is a squealing noise, often most prominent on cold starts. Using the diagram, visually inspect the belt for cracks, wear, or glazing. Check the tensioner pulley for proper movement and tension. A worn tensioner might be vibrating excessively. Check the alignment of the pulleys with a straight edge. Misaligned pulleys can cause premature belt wear and noise.
- Accessory Malfunction: If you experience a loss of power steering, charging problems, or the AC stops working, refer to the diagram. Verify that the belt is properly routed and that all pulleys are rotating. A broken or slipped belt will immediately disable all driven accessories.
- Belt Slippage: Slippage can occur due to a worn belt, a failing tensioner, or oil contamination. The diagram helps you identify the potential source of the problem. Look for signs of oil leaks near the belt and pulleys.
- Visual Inspection: Regularly inspect the belt for cracks, fraying, or missing ribs. Use the diagram to ensure the belt is properly seated in all the pulley grooves.
If a specific accessory is failing, use the diagram to check belt routing and tension before assuming the accessory itself is faulty. Sometimes, a simple belt issue can mimic a more serious component failure.
Safety Considerations
Working on the serpentine belt system involves several potential hazards:
- Moving Parts: Never work on the serpentine belt system with the engine running. The rotating belt and pulleys can cause serious injury.
- Hot Components: The engine and exhaust components can be extremely hot. Allow the engine to cool completely before working on the system.
- Spring Tension: The tensioner pulley is spring-loaded and can snap back with considerable force. Use the correct tools to relieve tension when removing or installing the belt.
- Battery Disconnection: Disconnect the negative battery terminal before working on the system to prevent accidental electrical shorts.
Always wear safety glasses and gloves when working on the serpentine belt system.
When relieving tension on the belt, use a serpentine belt tool. These are inexpensive and will safely let you remove the belt.
We have a high-resolution diagram of the 2012 Chevrolet Traverse serpentine belt routing available for download. It provides a clear and detailed view of the system, making it an invaluable resource for your DIY projects. This will help you clearly see the layout, part numbers, and exact locations.