2012 Volkswagen Fuse Box 2012 Jetta Fuse Diagram
For the seasoned DIY enthusiast, understanding your vehicle's electrical system is paramount. This article delves deep into the fuse box and fuse diagram of a 2012 Volkswagen Jetta. Knowing your way around this critical component allows for accurate diagnosis, safe modifications, and even potentially saving money on costly mechanic visits. We'll cover everything from interpreting the diagram's symbols to basic troubleshooting tips, ensuring you're equipped with the knowledge to tackle electrical issues confidently.
Purpose of Understanding Your Jetta's Fuse Diagram
The fuse diagram is your roadmap to your car's electrical system. Its primary purposes are:
- Troubleshooting: Identifying a blown fuse is the first step in diagnosing many electrical problems. The diagram pinpoints the exact fuse responsible for a particular circuit (e.g., headlights, power windows, radio).
- Repair: Replacing a blown fuse requires knowing its amperage rating, which is usually indicated on the fuse itself and reinforced in the diagram.
- Modification: When adding aftermarket accessories like amplifiers or auxiliary lighting, you need to tap into the vehicle's electrical system safely. The diagram shows available circuits and appropriate fuse sizes. Improperly fused modifications can lead to electrical fires or damage to the car's electrical control units (ECUs).
- Learning: Studying the diagram provides a better understanding of the electrical architecture of your Jetta, fostering greater confidence in performing automotive maintenance.
Key Specs and Main Parts of the 2012 Jetta Fuse Box
The 2012 Jetta typically has two fuse boxes:
- Interior Fuse Box: Located inside the cabin, often on the driver's side, behind a small access panel on the dashboard or underneath the steering wheel. This box houses fuses for interior components like lights, power windows, the infotainment system, and some control modules.
- Engine Compartment Fuse Box: Situated within the engine bay, typically near the battery. It contains fuses for vital engine components such as the fuel pump, ignition system, cooling fan, and exterior lighting.
Main Parts:
- Fuse Block (or Fuse Panel): The physical housing that holds the fuses. It's usually made of molded plastic.
- Fuses: Small, replaceable devices designed to protect electrical circuits from overcurrent. They contain a thin metal strip that melts and breaks the circuit if the current exceeds the fuse's rated amperage.
- Relays: Electrically operated switches used to control high-current circuits with a low-current signal. They are often used for headlights, horns, and other high-power accessories.
- Fuse Puller: A small plastic tool used to safely remove fuses without damaging them or the fuse box.
- Spare Fuses: Usually found within the fuse box or attached to the cover, these are essential for quick replacements.
Amperage Ratings: Fuses are rated in amps (A). Common ratings in the Jetta include 5A, 7.5A, 10A, 15A, 20A, 25A, 30A, and 40A. Using a fuse with a higher amperage rating than specified can cause serious damage to the electrical system.
Understanding Fuse Diagram Symbols and Conventions
Fuse diagrams aren't always straightforward. Here's a breakdown of common symbols and conventions:
- Lines: Lines on the diagram represent electrical circuits. A thicker line might indicate a higher current carrying capacity.
- Fuse Symbols: Fuses are typically represented by a small rectangle with a wavy line inside. The amperage rating is usually printed next to the symbol.
- Component Symbols: Each component (e.g., headlight, window motor, ECU) is represented by a specific symbol. Common symbols include:
- Light Bulb: Represents lighting circuits.
- Motor: Represents motors for windows, wipers, etc.
- Relay: Often a square or rectangle with internal connections.
- ECU/Module: Usually a box with pins, representing an electronic control unit.
- Color Coding: While not always present on the diagram itself, wire colors are crucial when tracing circuits in the car. Common wire colors include red (power), black (ground), and various other colors with stripes to identify specific circuits. Always consult a wiring diagram that details wire colors and pin assignments for specific components.
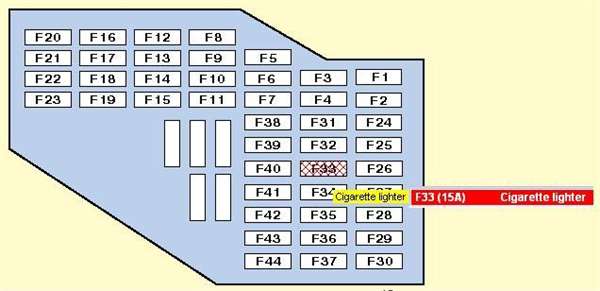
- Numbering/Labeling: Each fuse and relay is assigned a number or label (e.g., F1, F2, R1, R2) that corresponds to its position in the fuse box. The diagram's legend explains the function of each fuse/relay based on its number/label.
Example: A fuse labeled "F10 - 10A - Right Headlight" indicates that fuse number 10, rated at 10 amps, protects the right headlight circuit.
How the Fuse System Works
The fuse system is a series circuit. This means that the fuse is placed in the path of the electrical current flowing to a particular component. If the current draw of that component exceeds the fuse's amperage rating, the thin metal strip inside the fuse melts, breaking the circuit and stopping the flow of electricity. This prevents damage to the component and the wiring.
Scenario: Imagine the windshield wiper motor draws excessive current due to a blockage. This increased current flow causes the corresponding fuse to blow, preventing the motor from overheating and potentially causing a fire. Replacing the blown fuse allows the wipers to function again, but it's essential to address the underlying issue (the blockage) to prevent the fuse from blowing again.
Real-World Use: Basic Troubleshooting Tips
- Identify the Symptom: What isn't working? (e.g., power windows, radio, headlights).
- Consult the Fuse Diagram: Locate the fuse responsible for the affected component.
- Inspect the Fuse: Use the fuse puller to remove the fuse. Look for a broken filament inside the fuse. If the filament is broken, the fuse is blown.
- Replace the Fuse: Replace the blown fuse with a new fuse of the same amperage rating.
- Test the Component: Turn on the component to see if it works.
- If it works: The problem was a blown fuse.
- If it doesn't work: The problem may be more complex (e.g., wiring issue, faulty component). Further diagnosis is required.
- If the new fuse blows immediately: There is a short circuit in the system. Do not continue to replace fuses without addressing the short. This is a potential fire hazard and can damage other components. Seek professional help.
Safety Precautions
- Disconnect the Battery: Before working on any electrical system, disconnect the negative terminal of the battery to prevent accidental shorts.
- Use the Correct Fuse: Always replace a blown fuse with a fuse of the same amperage rating. Using a higher amperage fuse can overload the circuit and cause a fire.
- Avoid Moisture: Never work on the electrical system in wet conditions.
- High-Risk Components: Be extremely cautious when working around the airbag system. Incorrect handling can cause the airbags to deploy, resulting in serious injury. It's best to leave airbag-related repairs to qualified technicians.
- When in Doubt, Consult a Professional: If you're not comfortable working on the electrical system, seek the help of a qualified mechanic. Electrical problems can be complex and dangerous.
Remember, working on your car's electrical system requires caution and understanding. With the knowledge provided here and access to the correct fuse diagram, you can confidently troubleshoot and repair many common electrical issues in your 2012 Volkswagen Jetta.
We have the 2012 Jetta fuse box diagram available for download. This document provides a detailed layout of the fuse locations and their corresponding circuits, which will significantly aid in your troubleshooting and repair efforts.