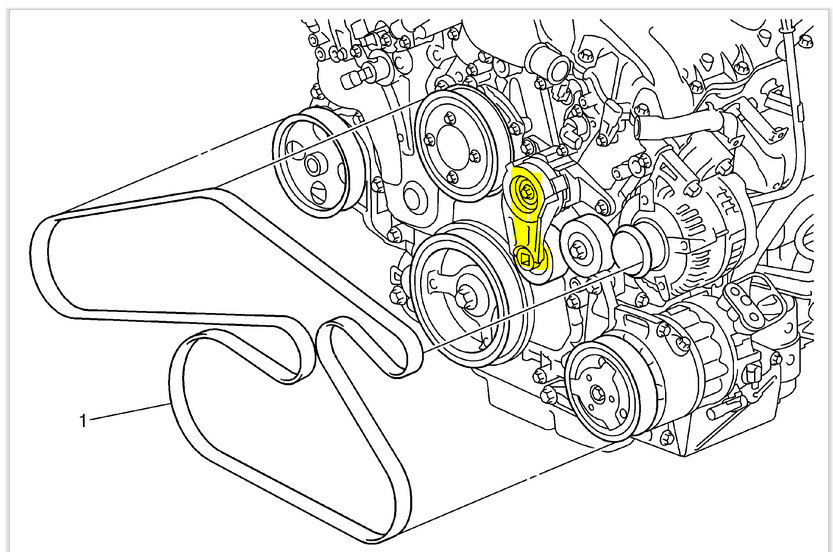
2013 Buick Lacrosse Serpentine Belt Diagram
Let's dive into the serpentine belt system on your 2013 Buick Lacrosse. Whether you're planning preventative maintenance, diagnosing a squealing noise, or just expanding your automotive knowledge, understanding the serpentine belt diagram is crucial. We'll break down the diagram, its components, and how it all works together.
Purpose of the Serpentine Belt Diagram
The serpentine belt diagram is your roadmap for understanding and working on the engine's accessory drive system. It's more than just a pretty picture; it’s essential for:
- Repairing or Replacing the Serpentine Belt: Knowing the correct belt routing is critical to ensure all components are driven properly. A misrouted belt can lead to component failure and even engine damage.
- Diagnosing Issues: A failing accessory component can sometimes be traced back to belt slippage or improper tension. The diagram helps you identify which component might be affecting belt performance.
- Component Replacement: If you're replacing components like the alternator, power steering pump, or AC compressor, you need to remove and reinstall the belt. The diagram ensures proper reinstallation.
- General Maintenance & Learning: Understanding the belt system is a valuable skill for any DIY mechanic. It allows you to perform basic maintenance tasks like checking belt condition and tension.
Key Specs and Main Parts (2013 Buick Lacrosse)
The 2013 Buick Lacrosse comes with several engine options, primarily the 2.4L Ecotec inline-4 and the 3.6L V6. Each engine variant has a slightly different serpentine belt routing. It's crucial to identify your engine type before referring to the diagram. The correct diagram for your specific engine is the only one that's useful.
Main Components Driven by the Serpentine Belt:
- Crankshaft Pulley: The crankshaft pulley, or harmonic balancer, is connected directly to the engine's crankshaft and provides the rotational force for the entire system. It's the driving force of the serpentine belt system.
- Alternator: The alternator charges the battery and powers the vehicle's electrical system. A malfunctioning alternator can cause a dead battery and electrical issues.
- Power Steering Pump: The power steering pump provides hydraulic pressure to assist steering. A failing power steering pump can lead to hard steering and a noticeable whining noise.
- Air Conditioning (A/C) Compressor: The A/C compressor circulates refrigerant through the A/C system, providing cooling. A malfunctioning compressor can result in warm air blowing from the vents.
- Water Pump: The water pump circulates coolant through the engine, preventing overheating. A failing water pump can lead to engine overheating and potential damage.
- Tensioner Pulley: The tensioner pulley maintains proper tension on the serpentine belt, preventing slippage and ensuring efficient operation of all components. It often includes a spring-loaded mechanism.
- Idler Pulley(s): Idler pulleys are smooth pulleys used to guide the belt and increase its wrap angle around certain components, ensuring adequate contact and preventing slippage.
The belt length itself is a critical specification. Using the wrong length belt will prevent the tensioner from working correctly and may lead to component damage.
Understanding the Serpentine Belt Diagram Symbols
Serpentine belt diagrams aren't complicated, but it's important to know how to interpret them. Here's a breakdown of common symbols:
- Solid Lines: Represent the serpentine belt itself. The path of the line shows how the belt wraps around each pulley.
- Arrows: Indicate the direction of belt rotation. This is crucial for understanding how each component is driven.
- Circles/Pulleys: Represent the various pulleys driven by the belt. The diagram usually labels each pulley with its corresponding component (e.g., "ALT" for Alternator, "P/S" for Power Steering).
- Tensioner Pulley Symbol: Usually depicted with a spring or an arrow indicating the direction of tension. Sometimes, a note will indicate the required tension reading when using a belt tension gauge.
- Text Labels: Short labels identifying each component driven by the belt (e.g., ALT, P/S, A/C).
- Routing Information: Some diagrams include notes about specific routing nuances or special tools required for belt installation.
Sometimes diagrams will use colored lines to highlight specific sections of the belt path. While less common, a color-coded diagram can be very helpful for visualizing the routing.
How the Serpentine Belt System Works
The serpentine belt system is a relatively simple but ingenious design. The engine's crankshaft provides the rotational force that drives all the accessory components. Here's a simplified explanation:
- The crankshaft pulley rotates as the engine runs.
- The serpentine belt wraps around the crankshaft pulley and transfers the rotational force to the other pulleys in the system.
- Each pulley, connected to a specific component (alternator, power steering pump, etc.), is driven by the belt.
- The tensioner pulley maintains constant tension on the belt, preventing slippage and ensuring all components are driven efficiently. This is often a spring-loaded system.
- Idler pulleys guide the belt around the various components, optimizing its contact and preventing it from contacting itself.
The correct routing of the belt is absolutely vital. A misrouted belt will likely not drive all the components correctly, leading to performance issues and potentially damaging components.
Real-World Use: Basic Troubleshooting Tips
Understanding the serpentine belt system is valuable for troubleshooting various issues:
- Squealing Noise: A common symptom of a worn or loose serpentine belt. Check the belt for cracks, glazing, or wear. Inspect the tensioner pulley for proper function.
- Loss of Power Steering: Could indicate a broken or slipping belt, or a problem with the power steering pump itself. Verify the belt is intact and properly routed around the power steering pump pulley.
- Battery Not Charging: Could be a sign of a failing alternator or a slipping belt preventing the alternator from spinning at the correct speed. Confirm the belt is properly tensioned and routed around the alternator pulley.
- Overheating: A failing water pump (often driven by the serpentine belt) can cause overheating. Ensure the belt is properly routed around the water pump pulley.
Pro Tip: Before replacing the belt, take a picture of the existing belt routing. This will serve as a valuable reference during reinstallation.
Safety Considerations
Working on the serpentine belt system can be risky if proper safety precautions aren't followed:
- Always disconnect the negative battery cable before working on the serpentine belt system. This will prevent accidental electrical shocks.
- Ensure the engine is cool before working on the belt. Components can get extremely hot, especially after the engine has been running.
- Keep your hands and clothing clear of the belt and pulleys while the engine is running. The rotating parts can cause serious injury.
- Be cautious when using tools near the belt and pulleys. Dropped tools can damage components or cause injury.
- The crankshaft pulley is directly connected to the engine. If the engine unexpectedly starts, severe injury is possible. Always ensure the engine is off and cannot start before working on the system.
Remember, if you're not comfortable working on the serpentine belt system yourself, it's always best to consult a qualified mechanic.
We have a detailed, high-resolution serpentine belt diagram specifically for the 2013 Buick Lacrosse, including both the 2.4L and 3.6L engine variants. You can download it for a clearer visual aid to your repair work. It's a valuable asset for any DIYer tackling this task.