2013 Chevy Cruze 1.4 Serpentine Belt Diagram
Alright, let's dive into the serpentine belt system on the 2013 Chevy Cruze with the 1.4L turbo engine. This system, driven by a single, continuous belt (hence the name "serpentine"), is crucial for powering several vital engine components. Having a clear understanding of the belt routing is essential for repairs, replacements, and even basic troubleshooting. We're going to break down the diagram and system functionality so you can tackle your own maintenance with confidence.
Purpose of Understanding the Serpentine Belt Diagram
Why bother learning this? Well, several reasons:
- Belt Replacement: The most obvious reason. If your belt is cracked, frayed, or showing signs of wear, you'll need to replace it. Knowing the correct routing is critical to ensure proper operation and prevent component damage.
- Troubleshooting Noise: Squealing or chirping noises from the engine bay are often related to the serpentine belt. Understanding the layout can help you pinpoint the source of the problem.
- Accessing Other Components: Sometimes, removing the serpentine belt is necessary to access other parts of the engine, like the alternator or water pump.
- Component Inspection: Allows you to inspect the condition of pulleys, tensioners, and other components driven by the belt.
- Learning and Modification: For the modders and advanced DIYers, understanding the fundamental systems is key to making informed decisions about modifications or performance upgrades.
Key Specs and Main Parts of the 2013 Cruze 1.4L Serpentine System
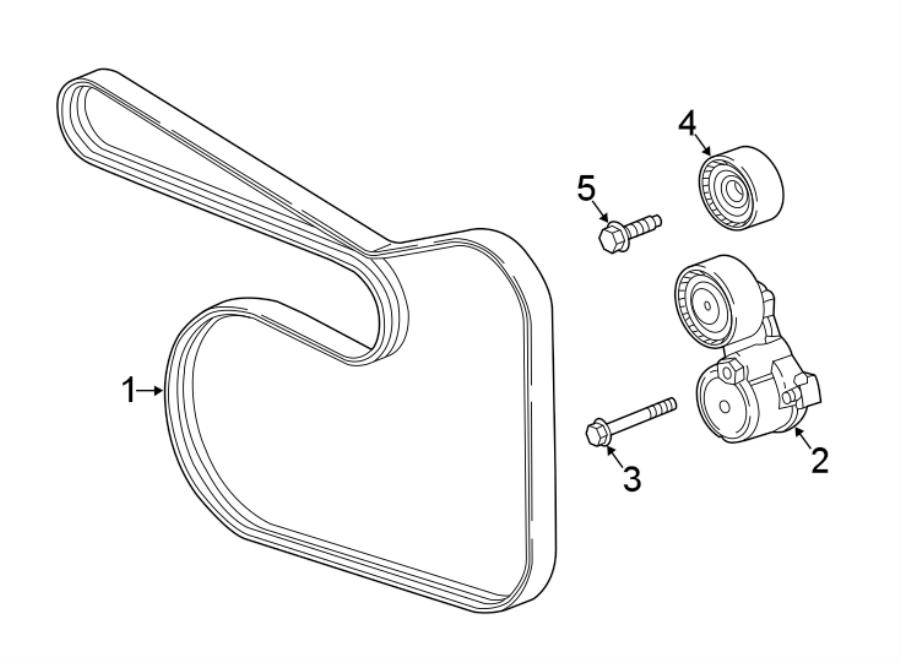
The 2013 Cruze 1.4L utilizes a single serpentine belt to drive the following components:
- Crankshaft Pulley (or Damper): This is the driving force of the entire system. It's connected directly to the engine's crankshaft.
- Alternator: Provides electrical power to the car's systems and charges the battery.
- Air Conditioning (A/C) Compressor: Compresses the refrigerant for the A/C system.
- Water Pump: Circulates coolant through the engine to regulate temperature.
- Tensioner Pulley: Maintains the correct tension on the belt. This is usually spring-loaded or manually adjustable. A failing tensioner is a common cause of belt noise and premature wear.
- Idler Pulley (optional): Some configurations might have an idler pulley, which simply guides the belt around certain areas to prevent interference or optimize its wrap angle on other pulleys.
Key Specs: Belt length is crucial. The exact length varies slightly depending on manufacturer but should be specified for the 2013 Chevy Cruze 1.4L. Using the wrong size belt will result in improper tension and potential component damage. It's usually around 81-82 inches (approximately 2057-2083 mm), but always verify with your vehicle's specifications or parts retailer.
Understanding the Serpentine Belt Diagram: Symbols and Conventions
The diagram you'll be using employs several visual cues. Here's a breakdown:
- Solid Lines: Represent the path of the serpentine belt. The thicker the line, the more prominent or important that section of the belt's path.
- Arrows: Indicate the direction of belt travel. Always pay close attention to these! Incorrect routing will lead to immediate failure.
- Pulleys: Pulleys are typically represented as circles. Some diagrams might show the actual pulley shape (e.g., grooved for the crankshaft pulley or smooth for the tensioner).
- Component Labels: Each pulley will be labeled with an abbreviation indicating the component it drives (e.g., ALT for alternator, A/C for A/C compressor, WP for water pump).
- Tensioner Representation: The tensioner is often shown with an arrow indicating the direction it moves to release tension for belt installation or removal.
The diagram might also include torque specifications for any bolts involved in removing or adjusting the tensioner. Always adhere to these specifications to prevent damage or loosening of fasteners.
How It Works: The Serpentine Belt System in Action
The serpentine belt system is a relatively simple but essential system. The crankshaft pulley, powered directly by the engine, spins, transferring rotational force to the serpentine belt. The belt, in turn, wraps around the pulleys of the other components – the alternator, A/C compressor, and water pump – causing them to rotate and perform their respective functions. The tensioner maintains the proper amount of tension on the belt, preventing slippage and ensuring efficient power transfer. Without the correct tension, the belt can slip, causing reduced performance of the driven components and generating noise.
The entire system relies on friction between the belt and the pulleys. Contamination (oil, coolant) on the belt can reduce friction and cause slippage.
Real-World Use: Basic Troubleshooting with the Diagram
Here are a few common issues and how the diagram can help:
- Squealing Noise: If you hear a squealing noise, especially when you first start the car or when the A/C is engaged, the belt might be slipping. Check the belt tensioner to ensure it's functioning correctly. Inspect the belt itself for wear, cracks, or glazing. The diagram will help you visually inspect the entire belt path for possible problems.
- Chirping Noise: A chirping noise often indicates a misalignment or a worn pulley. Use the diagram to systematically inspect each pulley for damage or excessive play.
- Battery Not Charging: If your battery isn't charging, the alternator might not be spinning properly. Check the serpentine belt to ensure it's properly routed and has sufficient tension. The diagram confirms that the belt is routed to the alternator.
- Overheating: If the water pump isn't spinning correctly, the engine can overheat. Verify the belt routing and tension, and inspect the water pump pulley for damage. Again, the diagram shows if the water pump driven by the belt.
Important Tip: Before replacing any components, always check the belt alignment with a straight edge. Misalignment can cause premature belt wear and component failure.
Safety Considerations: Handle with Care
Working on the serpentine belt system requires caution:
- Disconnect the Battery: Always disconnect the negative battery terminal before working on the engine to prevent electrical shock.
- Hot Engine: Never work on the serpentine belt system while the engine is hot. Allow it to cool down completely to avoid burns.
- Moving Parts: The serpentine belt system involves moving parts. Keep your hands, clothing, and tools clear of the belt and pulleys when the engine is running.
- Tensioner Spring: The tensioner is under spring tension. Use the correct tool to relieve the tension safely before removing the belt. Improper handling can result in injury.
- Sharp Edges: Be mindful of sharp edges on the engine components and tools. Wear gloves to protect your hands.
- Cooling Fan: Be aware of the electric cooling fan. It can turn on automatically, even when the engine is off, causing injury. Disconnecting the battery minimizes this risk.
Specifically, the tensioner can be dangerous. The spring is strong. Make sure you are using the correct tool (usually a serpentine belt tool with the correct socket size) to relieve the tension gradually and carefully. Don't just yank on it!
Remember, if you're uncomfortable with any aspect of the repair, it's always best to consult a qualified mechanic.
We have a detailed, printable serpentine belt diagram specifically for the 2013 Chevy Cruze 1.4L available for download. This will provide you with a clear visual reference to guide you through the process.