2013 Chevy Cruze 1.8 Serpentine Belt Diagram
For the experienced DIY mechanic tackling a 2013 Chevy Cruze with the 1.8L engine, understanding the serpentine belt system is crucial. This article provides a detailed breakdown of the serpentine belt diagram, empowering you to confidently perform maintenance, troubleshoot issues, and potentially save a significant amount of money on repairs. Whether you're replacing a worn belt, diagnosing a squealing noise, or simply expanding your automotive knowledge, this guide will be your go-to resource. We'll cover everything from the purpose of the diagram to real-world troubleshooting and safety precautions.
Purpose of the Serpentine Belt Diagram
The serpentine belt diagram is essentially a roadmap for your engine's accessory drive system. Its primary purpose is to visually depict the routing of the serpentine belt around various engine components. This is essential for several reasons:
- Belt Replacement: When replacing a worn or damaged serpentine belt, the diagram ensures you install the new belt correctly. An incorrectly routed belt can lead to component failure and further engine damage.
- Troubleshooting: If you're experiencing issues like a squealing belt or malfunctioning accessories (power steering, air conditioning, etc.), the diagram helps you identify the components driven by the belt and pinpoint potential problems.
- Component Identification: The diagram clearly identifies each pulley and its associated component, making it easier to understand how the accessory drive system functions.
- Learning and Understanding: Even if you're not actively working on your car, studying the diagram can deepen your understanding of how your engine operates and how various systems are interconnected.
Key Specs and Main Parts of the 2013 Cruze 1.8L Serpentine Belt System
The 2013 Chevy Cruze 1.8L engine utilizes a single serpentine belt to drive several crucial engine accessories. Key components include:
- Crankshaft Pulley (Damper): The crankshaft pulley, connected directly to the engine's crankshaft, is the driving force behind the entire serpentine belt system. Its rotation powers all the other accessories.
- Alternator: The alternator is responsible for charging the car's battery and providing electrical power to various systems. The serpentine belt drives the alternator's pulley.
- Air Conditioning (A/C) Compressor: The A/C compressor is a vital component of the air conditioning system. The serpentine belt turns the compressor's pulley, allowing it to compress refrigerant.
- Power Steering Pump: The power steering pump provides hydraulic pressure to assist with steering. Its pulley is driven by the serpentine belt.
- Water Pump: The water pump circulates coolant throughout the engine, preventing overheating. In the 2013 Cruze 1.8L, the water pump is driven by the serpentine belt.
- Idler Pulley(s): Idler pulleys are smooth pulleys that guide the serpentine belt and maintain proper tension. They do not drive any specific accessory.
- Tensioner Pulley: The tensioner pulley is a spring-loaded pulley that automatically maintains the correct tension on the serpentine belt. This is crucial for preventing slippage and ensuring optimal performance. A faulty tensioner is a common cause of serpentine belt issues.
- Serpentine Belt: The heart of the system, a long, continuous belt made of reinforced rubber, designed to withstand high temperatures and constant flexing.
Key Specs: It's important to use the correct belt length for your 2013 Cruze 1.8L. While belt lengths can vary slightly based on manufacturer, the typical belt length is approximately 82 inches. Always consult your owner's manual or a reputable auto parts store for the exact specification. Using an incorrect belt length can lead to improper tension and component damage.
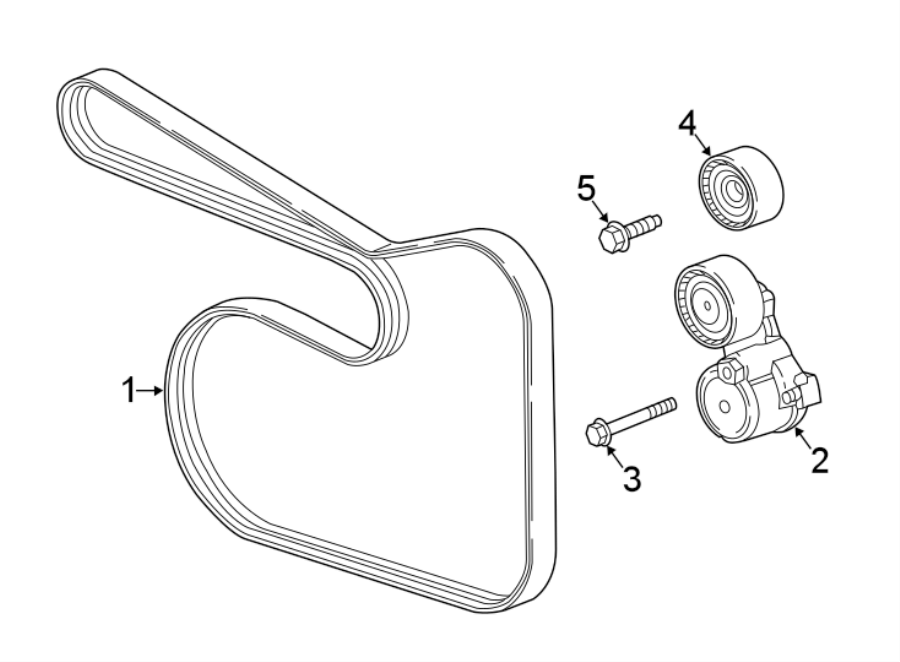
Understanding Serpentine Belt Diagram Symbols
Serpentine belt diagrams use various symbols to represent components and belt routing. Here's a breakdown of common symbols:
- Solid Lines: Solid lines typically represent the serpentine belt itself. The thickness of the line may indicate the belt's width.
- Dotted or Dashed Lines: These lines might indicate the path of the belt behind other components or within the engine bay for clarity.
- Circles: Circles represent pulleys. The diameter of the circle can give a relative indication of the pulley's size.
- Text Labels: Each pulley is labeled with an abbreviation or full name of the component it's connected to (e.g., ALT for Alternator, A/C for Air Conditioning Compressor, P/S for Power Steering).
- Arrows: Arrows indicate the direction of rotation for each pulley. This is crucial for understanding how the belt drives each component.
- Tensioner Symbol: The tensioner pulley is often represented with a special symbol, usually a spring or a curved arrow indicating its tensioning action.
Colors in diagrams are not standardized but can be used for emphasis or to differentiate between different parts of the system. In our downloadable diagram, different colors are used to highlight the main sections.
How the Serpentine Belt System Works
The serpentine belt system is a relatively simple yet elegant mechanism. The crankshaft pulley, powered by the engine's combustion, drives the serpentine belt in a circular motion. The belt, in turn, wraps around and engages the pulleys of the various engine accessories (alternator, A/C compressor, power steering pump, water pump). As the crankshaft turns, it transfers rotational energy to these accessories via the serpentine belt, causing them to function. The tensioner pulley maintains the proper amount of tension on the belt, ensuring that it doesn't slip or come off the pulleys. Without proper tension, the accessories won't function efficiently, and the belt will wear out prematurely.
Important Note: The routing of the belt is crucial. Each component relies on the correct direction of rotation to function properly. An incorrectly routed belt can cause serious damage.
Real-World Use: Basic Troubleshooting Tips
Here are some common serpentine belt-related issues and how the diagram can help you diagnose them:
- Squealing Noise: A squealing noise from the engine bay is often a sign of a slipping serpentine belt. Use the diagram to inspect the belt for cracks, wear, or glazing. Also, check the tensioner pulley to ensure it's functioning correctly. If the tensioner is weak or seized, it won't maintain proper belt tension.
- Accessory Malfunction: If your alternator, A/C compressor, or power steering pump isn't working correctly, the serpentine belt could be the culprit. Use the diagram to verify that the belt is properly routed around the pulley of the malfunctioning component. Also, check the belt for damage that could be preventing it from transferring power effectively.
- Belt Wear: Regularly inspect your serpentine belt for signs of wear, such as cracks, fraying, or missing chunks. The diagram helps you identify the belt's routing so you can thoroughly inspect it along its entire length.
- Belt Coming Off: If the serpentine belt repeatedly comes off the pulleys, there's likely a problem with alignment or tension. Use the diagram to check the alignment of all the pulleys. A misaligned pulley can cause the belt to run off track. Also, check the tensioner pulley for proper operation.
When diagnosing issues, pay close attention to the condition of the belt and the functionality of the tensioner. These are the most common points of failure in the serpentine belt system.
Safety Precautions
Working on the serpentine belt system can be hazardous if proper precautions are not taken. Here are some essential safety tips:
- Disconnect the Battery: Always disconnect the negative terminal of the battery before working on any electrical components of the engine, including the alternator.
- Engine Off and Cool: Never work on the serpentine belt system while the engine is running or hot. Allow the engine to cool completely before starting any repairs.
- Moving Parts: Be extremely careful around the serpentine belt and pulleys while the engine is running. These components can cause serious injury if you get your hands, clothing, or tools caught in them.
- Tensioner Tool: Use the correct tool to release the tension on the tensioner pulley when removing or installing the serpentine belt. Attempting to release the tension without the proper tool can be dangerous.
- Eye Protection: Wear safety glasses to protect your eyes from debris that may be dislodged during the repair process.
Highlight: The area around the crankshaft pulley is particularly risky due to its direct connection to the engine's rotating components. Exercise extreme caution when working near this area.
By following these safety precautions, you can minimize the risk of injury and ensure a safe working environment.
Understanding the serpentine belt system of your 2013 Chevy Cruze 1.8L is key to maintaining your vehicle. With the diagram, proper tools, and safety measures, you can confidently tackle common issues and save money on costly repairs.
We have a high-resolution PDF file of the 2013 Chevy Cruze 1.8L Serpentine Belt Diagram ready for you. Download it here.