2013 Chevy Equinox Serpentine Belt Diagram
Alright, let's dive into the serpentine belt diagram for a 2013 Chevy Equinox. Understanding this layout is crucial whether you're tackling a routine maintenance task, diagnosing a squealing noise, or even planning a more involved engine repair. Think of it as the roadmap for your engine accessories – power steering, air conditioning, alternator, and more all rely on this single belt.
Purpose of the Serpentine Belt Diagram
Why bother with a diagram at all? Well, consider the serpentine belt system as a complex network. When replacing a worn belt, installing a new component like an alternator, or diagnosing belt noise, a diagram is indispensable. It shows you the exact routing path the belt needs to follow. Incorrect routing can lead to accessory failure, engine damage, or even a snapped belt, leaving you stranded. The diagram is also helpful for understanding the relationship between the crankshaft pulley (the driver) and the various driven pulleys.
Furthermore, studying the diagram can help you understand how the system works. If you're replacing a pulley or suspect a seized component, visualizing the belt's path can illuminate potential problems and guide your troubleshooting.
Key Specs and Main Parts
The 2013 Equinox, depending on the engine, will have slightly different serpentine belt layouts. We'll focus on the more common 2.4L 4-cylinder and touch upon the 3.6L V6 where differences are significant.
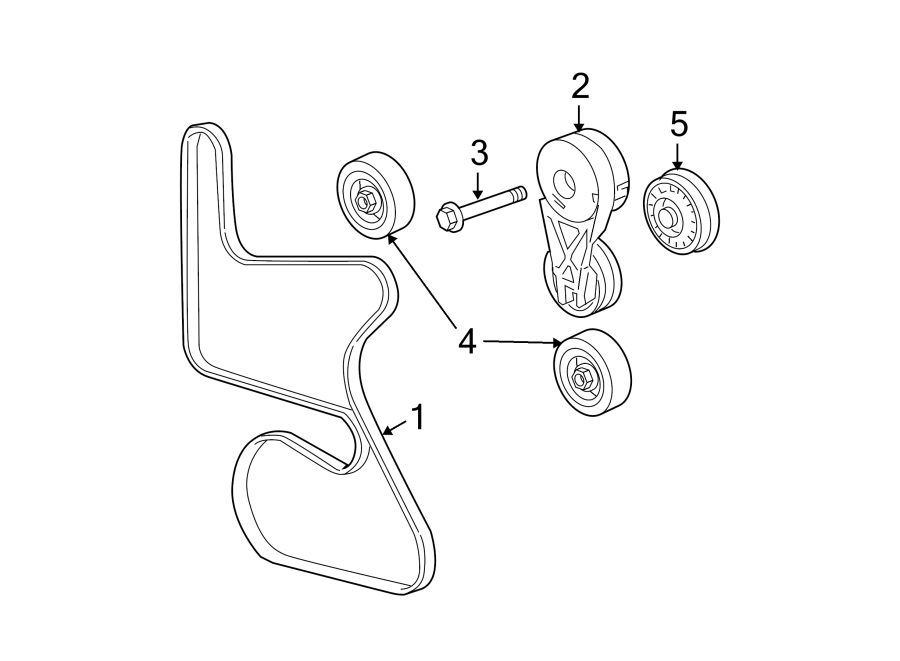
Key components found in both configurations include:
- Crankshaft Pulley (Crank Pulley): This is the driving force of the entire system. It's directly connected to the crankshaft and spins all the other components.
- Alternator Pulley: Charges the battery and powers the vehicle's electrical system.
- Power Steering Pump Pulley: Provides hydraulic pressure for power steering.
- Air Conditioning Compressor Pulley: Engages to power the air conditioning system.
- Tensioner Pulley: Maintains proper belt tension, preventing slippage and premature wear. This is spring-loaded and moves to accommodate belt stretch.
- Idler Pulley(s): Guide the belt around the system and provide proper wrap angle on other pulleys. They don't drive any accessories.
- Water Pump Pulley: Circulates coolant throughout the engine to prevent overheating.
Engine-Specific Variations:
- 2.4L 4-Cylinder: Typically features a simpler layout than the V6.
- 3.6L V6: May include additional idler pulleys or a slightly different routing path due to the engine's larger size and accessory placement.
Belt length is also a critical spec. The exact length will depend on your vehicle's options and engine. Refer to the diagram (which we can provide as a download) and your vehicle's service manual for the correct belt part number.
Understanding Serpentine Belt Diagram Symbols
Diagrams aren't just pictures; they use specific symbols to convey information efficiently.
- Solid Lines: Represent the belt itself. The thickness of the line doesn't usually signify anything, but its path is crucial.
- Pulleys: Usually represented as circles. Some diagrams might shade them differently to indicate the material (e.g., steel vs. plastic).
- Arrows: Indicate the direction of belt rotation. Follow these closely to ensure you're routing the belt correctly.
- Tensioner Pulley Symbol: Often shown with a spring symbol or a graphical representation of its spring-loaded arm. This indicates its function as a tensioning device.
- Component Labels: Abbreviations like "ALT" (Alternator), "P/S" (Power Steering), "A/C" (Air Conditioning), "CRANK" (Crankshaft), "IDL" (Idler), and "TENS" (Tensioner) are used to identify each pulley.
Colors aren't usually standardized in serpentine belt diagrams. Black and white is the most common, although some diagrams might use different colors to highlight specific sections or routing paths. Don't rely on color as a primary indicator; focus on the lines, arrows, and labels.
How It Works
The serpentine belt system is relatively straightforward in principle. The crankshaft pulley, driven by the engine, spins the belt. The belt, in turn, wraps around and spins all the other pulleys attached to various accessories. The tensioner pulley maintains the correct belt tension to prevent slippage and ensure efficient power transfer. A slipping belt leads to reduced performance of the accessories (e.g., weak power steering, poor air conditioning, or low alternator output). The idler pulleys guide the belt, providing the necessary "wrap" around the pulleys to prevent slippage.
The serpentine belt is typically made of a strong, flexible rubber compound. Over time, it can wear down, crack, or stretch. This is why regular inspection and eventual replacement are essential preventive maintenance.
Real-World Use: Troubleshooting Tips
Here are a few scenarios where your serpentine belt diagram becomes your best friend:
- Squealing Noise: A squealing belt often indicates slippage. Check the belt tension. If it's loose, the tensioner might be failing. Also, inspect the belt for wear, cracks, or glazing. If the squeal persists after adjusting tension or replacing the belt, suspect a misaligned pulley or a failing accessory bearing.
- Accessory Failure: If your power steering stops working, air conditioning fails, or the battery isn't charging, check the serpentine belt. A snapped belt is the obvious culprit, but a slipping belt can also cause intermittent accessory failure. Refer to the diagram to ensure the belt is properly routed around the affected accessory's pulley.
- Belt Replacement: Before removing the old belt, take a picture or carefully note its routing path. Use the diagram to confirm your notes. When installing the new belt, follow the diagram precisely. Incorrect routing will lead to problems. Use a wrench to relieve the tension on the tensioner pulley, allowing you to slip the belt on and off.
- Visual Inspection: Regularly inspect the belt for cracks, fraying, missing chunks, or signs of oil contamination. Any of these issues indicate the need for replacement. Also, check the pulleys for signs of damage or misalignment.
Safety Considerations
Working on the serpentine belt system involves potential risks. Always disconnect the negative battery cable before working on any electrical components, including the alternator. The alternator can generate a dangerous electrical shock if mishandled.
Be extremely careful when working around the rotating engine components. Never wear loose clothing or jewelry that could get caught in the belt or pulleys. Use appropriate tools to relieve tension on the tensioner pulley. Avoid using excessive force, as this could damage the tensioner or other components. Ensure the engine is cool before working on the system to avoid burns.
The tensioner pulley is under spring tension. When releasing the tensioner, be sure to control it carefully to prevent it from snapping back forcefully.
Finally, before starting the engine after replacing the belt, double-check the routing path against the diagram. A misrouted belt can cause serious damage.
We have the serpentine belt diagram readily available for download. This will be a valuable resource for your repairs. Remember to always consult your vehicle's service manual for specific instructions and torque specifications. Good luck!