2013 Chevy Silverado Radio Wiring Diagram Pdf
Welcome, fellow gearheads! Let's dive deep into the often-underappreciated, yet incredibly vital, world of automotive wiring diagrams. Specifically, we're focusing on the 2013 Chevy Silverado radio wiring diagram. This document is your secret weapon for diagnosing issues, upgrading components, or even just understanding how the audio system in your truck ticks.
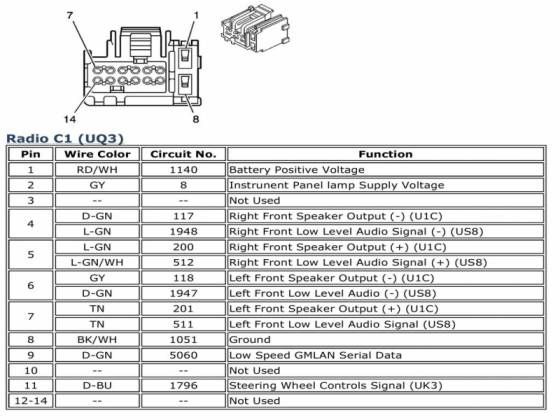
Purpose: Why You Need This Diagram
Imagine your Silverado's radio suddenly goes silent. Or perhaps you're tackling an aftermarket stereo install and need to tap into the correct wires without frying something. That’s where the wiring diagram comes in. It's not just a collection of lines and symbols; it's a roadmap of the electrical pathways powering your radio. With it, you can:
- Troubleshoot audio system problems: Identify shorts, opens, or faulty connections.
- Install aftermarket components: Safely connect new speakers, amplifiers, or head units.
- Repair damaged wiring: Locate and fix broken or frayed wires that are causing issues.
- Understand the system's architecture: Gain a deeper understanding of how the radio interacts with other vehicle systems.
Simply put, possessing this diagram can save you money on mechanic bills and prevent costly mistakes.
Key Specs and Main Parts of the 2013 Silverado Radio System
Before we dissect the diagram, let's understand the main components involved in the 2013 Silverado radio system. Note that trim levels (Work Truck, LT, LTZ, etc.) might have slight variations, but the core wiring principles remain consistent.
- Head Unit (Radio): The brains of the operation, controlling audio sources, volume, and display.
- Speakers: Typically, Silverado models have speakers in the front doors, rear doors (on crew cab models), and potentially tweeters in the A-pillars.
- Amplifier (if equipped): Higher trim levels might include a separate amplifier to boost the audio signal. This is usually located under the center console or behind the rear seat.
- Antenna: Receives radio signals.
- Wiring Harnesses: Bundles of wires that connect all the components together.
- Ground Points: Crucial for completing the electrical circuits. Poor grounding is a common cause of audio problems.
- Fuses: Protect the system from overloads. Always check the radio and amplifier fuses first when troubleshooting.
The diagram will illustrate how these components are interconnected, showing the wire gauges, colors, and connector locations.
Decoding the Symbols: A Guide to the Wiring Diagram Language
Wiring diagrams aren't written in plain English; they use a symbolic language. Understanding these symbols is critical. Here’s a breakdown:
- Lines: Represent wires. Thicker lines often indicate wires carrying higher current.
- Colors: Each wire color is represented by a code (e.g., RED, BLU, GRN). This helps you identify the correct wire in the harness.
- Circles with numbers: Represent connectors. The number usually corresponds to a specific connector in the vehicle.
- Rectangles: Typically represent components like the head unit, amplifier, or speakers.
- Ground Symbol: Indicates a connection to the vehicle's chassis, providing a return path for the electrical current. This looks like an upside down christmas tree, usually.
- Fuse Symbol: A wavy line within a rectangle, indicates a fuse location. You may see the amp rating next to the symbol (ex. "10A").
- Splice: Indicated where two or more wires are joined together.
Pay close attention to the legends and notes accompanying the diagram. These often provide crucial details about wire gauges, connector pinouts, and component locations.
How It Works: Tracing the Audio Signal
The 2013 Silverado radio system works by taking an input signal (from the radio tuner, CD player, auxiliary input, or USB), processing it through the head unit, amplifying it (either internally or via an external amplifier), and then sending it to the speakers. The wiring diagram visually represents this flow of electricity.
For example, let's trace the power supply to the head unit. The diagram will show a wire running from the battery, through a fuse, and then to the head unit's power input. Another wire will connect the head unit to a ground point. Without both power and ground, the head unit won't function. Similarly, the diagram shows the speaker wires coming from the head unit or the amplifier, going to each speaker terminal.
Understanding this basic signal flow empowers you to isolate problems. If a speaker isn't working, you can trace the wiring from the head unit (or amp) to the speaker, checking for breaks or shorts along the way. If there is an amplifier, the line outputs from the Head Unit are sent as signals to the Amplifier, then power is applied to the Amplifier to make it produce the audio signal that drives the speakers.
Real-World Use: Basic Troubleshooting Tips
Let’s put this knowledge to use. Here are a few common problems and how the wiring diagram can help:
- No Power to the Radio: Check the radio fuse first. If it's blown, replace it. If it blows again immediately, there's likely a short circuit in the wiring. Use the diagram to trace the power wire and look for damaged insulation or pinched wires. Also, make sure the ground wire has a solid connection to the chassis.
- One Speaker Not Working: Use the diagram to trace the speaker wires from the head unit (or amp) to the non-functioning speaker. Check for loose connections at both ends. Use a multimeter to check the speaker wire for continuity (a complete circuit). If there's no continuity, the wire is broken.
- Aftermarket Stereo Installation Issues: Double-check that you've connected all the wires correctly according to the diagram. Pay close attention to the power, ground, and speaker wires. If you're using a wiring adapter, ensure it's compatible with your Silverado's trim level.
- Humming or Buzzing Sounds: Often caused by a ground loop. Ensure all components are properly grounded to the same point on the chassis.
Important Tool Reminder: A multimeter is indispensable for troubleshooting electrical problems. Learn how to use it to check for voltage, continuity, and resistance. And always disconnect the negative terminal of the battery before working on the electrical system.
Safety First: Respecting Risky Components
Working with automotive electrical systems can be dangerous. Always disconnect the negative battery terminal before starting any work. This prevents accidental shorts and electrical shocks. Be especially cautious when working near the airbag system. Improper handling of airbag wiring can cause the airbags to deploy, resulting in serious injury.
Also, be aware of the constant battery voltage present in some wires, even with the ignition off. The wiring diagram will help you identify these wires. Avoid cutting or splicing into them without disconnecting the battery.
When soldering wires, use proper safety equipment, including eye protection and ventilation. And always double-check your work before reconnecting the battery.
Get Your Hands on the Diagram!
Now that you have a solid understanding of the 2013 Chevy Silverado radio wiring diagram, you're ready to put it to use. We have the complete PDF document available for download. This resource will provide you with the detailed information you need to tackle your next audio system project with confidence.