2013 Chrysler Town And Country 3.6 Serpentine Belt Diagram
The serpentine belt in your 2013 Chrysler Town & Country (equipped with the 3.6L Pentastar V6) is a critical component. It's the single belt responsible for driving multiple engine accessories. Understanding its routing and condition is essential for preventive maintenance, troubleshooting, and repairs. This article dives into the serpentine belt diagram for this specific vehicle, providing the knowledge you need to confidently work on this system.
Purpose of the Serpentine Belt Diagram
A serpentine belt diagram is more than just a picture; it's a road map for your engine's accessory drive system. It serves several crucial purposes:
- Correct Routing: Ensuring the belt is routed correctly around all pulleys is paramount. Incorrect routing can lead to accessory failure, belt slippage, and even engine damage. This is particularly important after replacing the belt or any related components.
- Troubleshooting: The diagram helps diagnose issues like squealing belts (often caused by misalignment) or accessory malfunctions. You can visually inspect the belt path and identify potential problem areas.
- Replacement Guide: The diagram provides a clear visual reference when replacing the serpentine belt. You can easily identify the tensioner pulley and the proper direction to release tension.
- Understanding Accessory Relationships: The diagram reveals which accessories are driven by the belt, giving you a better understanding of the engine's overall operation.
Key Specs and Main Parts
The 2013 Chrysler Town & Country 3.6L typically uses a serpentine belt with a specific length and rib count. While the exact length can vary slightly depending on the vehicle's options (like dual alternators), it's crucial to use the correct replacement belt. Refer to your owner's manual or a reputable auto parts store for the precise part number.
Key components in the serpentine belt system include:
- Crankshaft Pulley (Harmonic Balancer): The driving pulley, connected directly to the engine's crankshaft. It's often the largest pulley in the system.
- Alternator Pulley: Drives the alternator, which charges the battery and powers the electrical system.
- Power Steering Pump Pulley: Powers the power steering system, making steering easier.
- Air Conditioning Compressor Pulley: Drives the A/C compressor, responsible for cooling the vehicle's interior.
- Water Pump Pulley: Drives the water pump, which circulates coolant through the engine to prevent overheating.
- Idler Pulley(s): Smooth, bearing-equipped pulleys that guide the belt around the system and maintain proper tension. They don't drive any accessories.
- Tensioner Pulley: A spring-loaded pulley that automatically adjusts belt tension, compensating for wear and thermal expansion. This is *the* key to easy belt removal and installation.
Symbols in the Diagram
Serpentine belt diagrams utilize specific symbols to convey information:
- Solid Lines: Represent the belt itself. The path of the line shows how the belt wraps around each pulley.
- Arrows: Indicate the direction of belt travel. These arrows are crucial for proper routing.
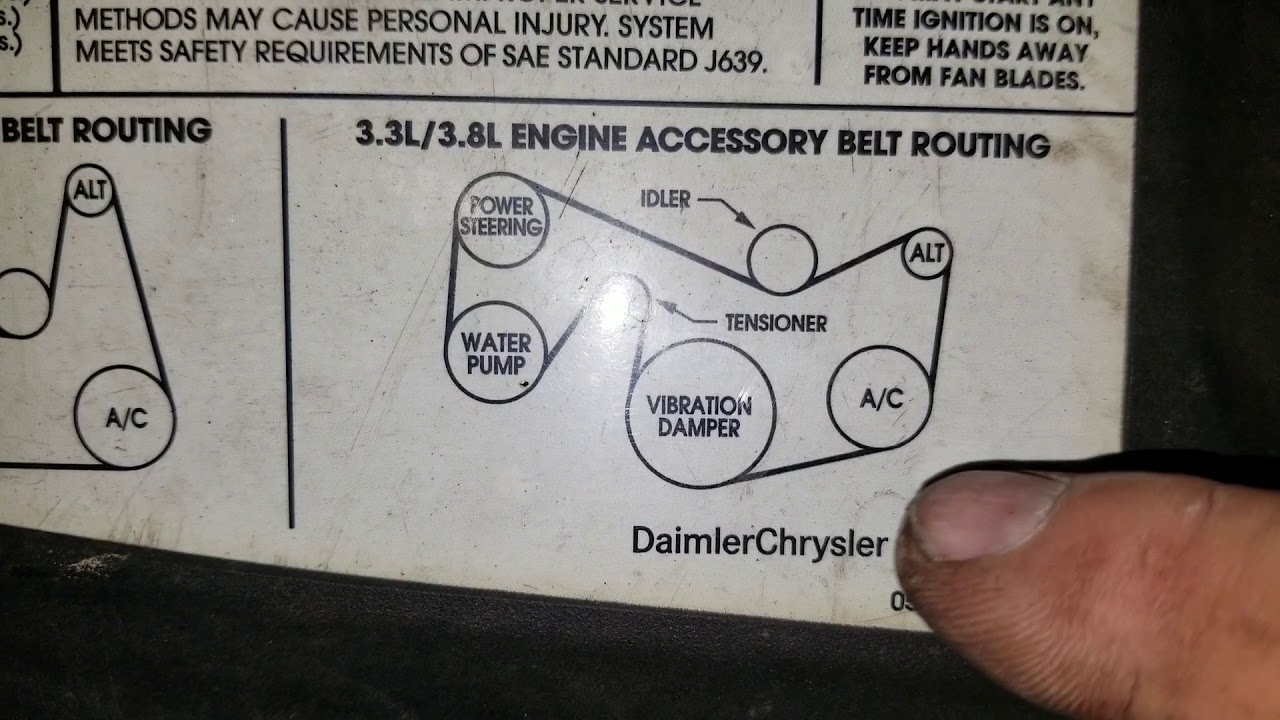
- Pulley Icons: Each pulley is represented by a circle. The diagram usually labels each pulley with an abbreviation indicating the accessory it drives (e.g., ALT for alternator, P/S for power steering).
- Tensioner Symbol: The tensioner pulley is often depicted with a small arrow indicating the direction to move it to release belt tension. This direction is critical for safe and easy belt replacement.
- Ribbed vs. Smooth Side Indication: Some diagrams may show which side of the belt (ribbed or smooth) contacts each pulley. This is essential for correct belt engagement.
How It Works
The serpentine belt system is relatively simple in principle. The crankshaft pulley, driven by the engine's rotation, transfers power to all the other accessory pulleys through the serpentine belt. The belt is designed to withstand high speeds and varying loads. The tensioner pulley maintains constant tension on the belt, preventing slippage and ensuring efficient power transfer. The tensioner is spring loaded to apply constant force.
When the engine is running, the crankshaft pulley spins, driving the belt. The belt, in turn, spins the pulleys of the alternator, power steering pump, A/C compressor, and water pump. Each accessory performs its respective function. The idler pulleys provide guidance and ensure proper belt wrap on the necessary pulleys. The tensioner constantly adjusts to maintain the optimal belt tension, compensating for belt stretch due to wear or temperature changes. Without the tensioner, the belt would become loose over time, leading to slippage and eventual accessory failure.
Real-World Use: Basic Troubleshooting Tips
Here are some common problems and how the serpentine belt diagram can help:
- Squealing Belt: A squealing belt is often caused by slippage. Check the belt for cracks, glazing, or wear. Use the diagram to ensure the belt is routed correctly. A misaligned pulley can also cause squealing, so inspect the pulleys for damage or wobble. You might need to apply a belt dressing in a pinch, but that's a temporary fix at best.
- Accessory Malfunction: If an accessory (e.g., alternator, power steering) is not functioning correctly, check the serpentine belt. A broken or slipped belt can prevent the accessory from spinning. The diagram will confirm if that failing accessory is even on this belt.
- Belt Breaks: A broken belt is a serious issue. It can lead to overheating (due to water pump failure) and electrical problems (due to alternator failure). Replace the belt immediately. Before installing the new belt, inspect all pulleys for damage or misalignment. Always use the diagram to ensure correct routing during installation.
When troubleshooting, always start with a visual inspection. Look for cracks, fraying, or missing ribs on the belt. Check the pulleys for damage, wobble, or excessive play. Pay close attention to the tensioner pulley; it should move smoothly and maintain consistent tension on the belt. A worn or seized tensioner can cause premature belt failure.
Safety Precautions
Working on the serpentine belt system involves certain risks. Here's how to stay safe:
- Disconnect the Battery: Before working on any electrical components (like the alternator), disconnect the negative battery terminal to prevent accidental shorts or electrical shocks.
- Engine Cooling: Never work on the engine while it's hot. Allow the engine to cool completely before beginning any repairs. Hot coolant and exhaust components can cause severe burns.
- Moving Parts: The serpentine belt system contains rapidly rotating parts. Keep your hands, clothing, and tools clear of the belt and pulleys while the engine is running. Never attempt to adjust the belt tension or route the belt while the engine is running.
- Tensioner Spring: The tensioner pulley is spring-loaded. Use the correct tools and techniques to release the tension safely. Improperly releasing the tensioner can cause injury or damage to the vehicle.
- Eye Protection: Wear safety glasses to protect your eyes from debris or flying objects.
The area around the crankshaft pulley and tensioner pulley are particularly dangerous. Ensure the engine is off and cooled down before working near these components.
By understanding the serpentine belt diagram and following these safety precautions, you can confidently diagnose and repair your 2013 Chrysler Town & Country's accessory drive system. Remember, if you're unsure about any aspect of the repair, consult a qualified mechanic.
We have a high-resolution version of the 2013 Chrysler Town & Country 3.6L Serpentine Belt Diagram available for download. This file provides a clear and detailed visual reference for your repairs and maintenance.