2013 Chrysler Town And Country Heater Hose Diagram
Alright, let's dive into the heating system of your 2013 Chrysler Town and Country. Specifically, we're going to dissect the heater hose diagram. This isn't just some pretty picture; it's your roadmap to understanding, diagnosing, and potentially fixing issues with your vehicle's heating system. Whether you're experiencing a chilly cabin on a winter morning, suspect a leak, or just want to understand how this system works, having a solid grasp of the heater hose layout is crucial. We've got the complete diagram available for download, but before you grab it, let’s make sure you know how to read it and use it effectively.
Purpose of Understanding the Heater Hose Diagram
The heater hose diagram serves several critical purposes:
- Repair and Maintenance: Identifying the correct hose for replacement. Incorrectly installed or routed hoses can cause significant engine damage.
- Troubleshooting: Locating leaks, blockages, or other malfunctions within the cooling system. Knowing the hose routing helps pinpoint the source of a problem.
- Understanding System Operation: Gaining a deeper understanding of how the engine cooling system and heater core interact to provide cabin heat.
- Preventive Maintenance: Regular inspection of heater hoses for signs of wear (cracks, bulges, softness) can prevent catastrophic failures, such as coolant leaks that lead to overheating.
- Modifications and Upgrades: If you're considering performance modifications or upgrades to the cooling system, understanding the original layout is paramount.
Key Specs and Main Parts
Before looking at the diagram, it's important to understand the core components involved. The 2013 Town and Country’s heating system is integrated with the engine's cooling system. Hot coolant from the engine is circulated through the heater core, which resembles a small radiator, located inside the vehicle's dashboard. A blower motor then forces air across the heater core, transferring heat into the cabin.
The key components related to the heater hoses include:
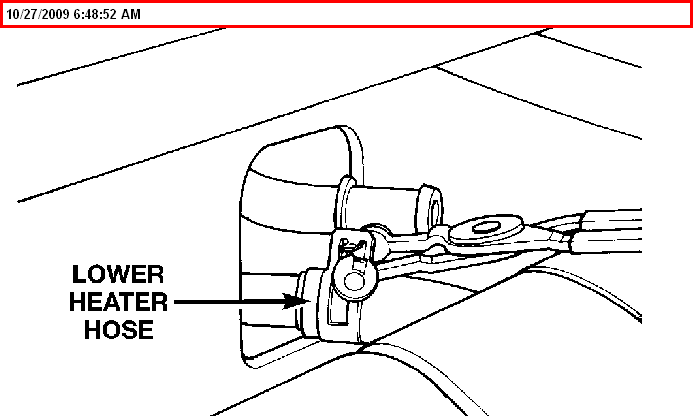
- Heater Hoses: These are flexible rubber or silicone hoses that carry coolant to and from the heater core. The 2013 Town and Country typically uses two main heater hoses: an inlet hose and an outlet hose.
- Heater Core: This is a small radiator located inside the dashboard. Hot coolant flows through it, and the blower motor blows air across it to heat the cabin.
- Water Pump: The water pump is responsible for circulating coolant throughout the engine and cooling system, including the heater core circuit.
- Thermostat: The thermostat regulates engine temperature by controlling the flow of coolant to the radiator and engine. It allows the engine to warm up quickly and maintains a consistent operating temperature.
- Engine Block: The heater hoses typically connect to fittings on the engine block, allowing coolant to be drawn from and returned to the engine.
- Hose Clamps: These clamps secure the heater hoses to the fittings on the engine, heater core, and other components. They are critical for preventing leaks.
Understanding the Symbols in the Diagram
The heater hose diagram isn't just a random collection of lines and shapes; it's a standardized representation of the system. Here's a breakdown of common symbols you'll encounter:
- Solid Lines: These generally represent the heater hoses themselves. Thicker lines may indicate larger diameter hoses.
- Dashed Lines: Often indicate vacuum lines or other related control lines, but in this context, they might also represent sections of hose that are less critical or partially obscured in the view.
- Arrows: Crucially important! Arrows indicate the direction of coolant flow through the hoses. Always double-check the flow direction when replacing hoses.
- Component Symbols: Rectangles or squares may represent the heater core. Other shapes might indicate the water pump, thermostat housing, or engine block.
- Labels: The diagram will be labeled with abbreviations like "Heater Core Inlet," "Heater Core Outlet," "Water Pump," and "Engine Block."
- Color Coding: While not always present, some diagrams use color coding to differentiate between different types of fluids or lines. For example, blue might represent coolant lines, while red could represent something else entirely. Refer to the diagram's legend if color coding is used.
How It Works: Coolant Flow Explained
The heating system taps into the engine's cooling system to provide warmth. Here's a simplified breakdown of how it works:
- The water pump circulates coolant throughout the engine, absorbing heat.
- Hot coolant is then routed through the heater core inlet hose to the heater core inside the dashboard.
- As coolant flows through the heater core, heat is transferred to the core's fins.
- The blower motor blows air across the heated fins, warming the air entering the cabin.
- The cooled coolant exits the heater core through the heater core outlet hose and returns to the engine, where it's reheated and the cycle repeats.
- The heater control valve, or blend door, regulates the amount of hot air that enters the cabin by controlling the flow of coolant to the heater core or by blending hot and cold air.
Real-World Use: Basic Troubleshooting
The heater hose diagram is invaluable for troubleshooting heating system problems. Here are a few scenarios:
- No Heat: If you're not getting any heat, check the heater hoses for kinks, blockages, or leaks. A blockage in either the inlet or outlet hose will prevent coolant from circulating through the heater core. Also, check the coolant level. Low coolant will definitely cause heating issues.
- Coolant Leak: Use the diagram to trace the heater hoses and identify the source of the leak. Pay close attention to hose connections and clamps. A visual inspection of the hoses themselves may reveal cracks or bulges.
- Overheating: While not directly caused by faulty heater hoses alone, a leak in the heater hose circuit can lead to coolant loss and subsequent engine overheating. Use the diagram to inspect the hoses and connections.
- Intermittent Heat: This could be a sign of air trapped in the cooling system. The diagram can help you identify the highest point in the heater hose circuit, where air tends to accumulate. Properly bleeding the system may resolve the issue.
Important: Before working on the cooling system, always let the engine cool down completely. Hot coolant is under pressure and can cause severe burns.
Safety Considerations
Working with the cooling system involves several safety risks:
- Hot Coolant: As mentioned above, hot coolant can cause severe burns. Always allow the engine to cool completely before opening the radiator cap or disconnecting any hoses.
- Pressurized System: The cooling system is pressurized, so slowly release the pressure before opening it. Never remove the radiator cap when the engine is hot.
- Chemical Exposure: Coolant is toxic and can be harmful if swallowed or if it comes into contact with skin or eyes. Wear gloves and eye protection when working with coolant. Clean up any spills immediately.
- Moving Parts: Keep your hands and clothing away from moving engine parts, such as the water pump pulley and fan, when the engine is running.
Risk of scalding! The entire system is pressurized and contains extremely hot liquids. Proceed with extreme caution.
Remember to properly dispose of used coolant. It's environmentally harmful and should be recycled or disposed of at a designated facility.
By understanding the 2013 Chrysler Town and Country heater hose diagram, you're well-equipped to tackle a variety of heating system issues. From simple hose replacements to complex troubleshooting, this diagram is your key to success. Don't forget to inspect the hoses regularly for any signs of wear and tear. Catching a problem early can save you time, money, and a whole lot of frustration.
You can download the detailed 2013 Chrysler Town and Country Heater Hose Diagram to get even more detail and start working on your car right now. Good luck!