2013 Chrysler Town And Country Serpentine Belt Diagram
Replacing a serpentine belt on your 2013 Chrysler Town & Country might seem daunting, but with the right information and a little elbow grease, it's a manageable DIY project. A crucial tool in this endeavor is the serpentine belt diagram. This article will act as your comprehensive guide to understanding that diagram, equipping you with the knowledge to tackle belt replacement, diagnose issues, and gain a deeper understanding of your minivan's engine accessory drive system.
Purpose of the Serpentine Belt Diagram
The serpentine belt diagram is essentially a roadmap for your engine's accessory drive. Its primary purpose is to show you the precise routing of the serpentine belt around the various pulleys connected to engine accessories. Why is this important? Here’s why:
- Correct Belt Installation: The most obvious use. If you're replacing the belt, the diagram ensures you route the new belt correctly. Incorrect routing can lead to serious engine damage.
- Troubleshooting: A slipping or squealing belt can be frustrating. The diagram allows you to visually inspect the belt's path, identify potential issues like misaligned pulleys, or spot signs of wear and tear on individual components.
- Understanding Accessory Drive: The diagram helps you understand the relationship between the crankshaft and the accessories it drives, such as the alternator, power steering pump, air conditioning compressor, and water pump.
- Preventative Maintenance: Familiarizing yourself with the diagram makes it easier to perform visual inspections, catching potential problems before they escalate into costly repairs.
- Diagnostic Aid: When other engine problems arise, understanding the belt system helps you eliminate it as a possible cause or contributor to the issue.
Key Specs and Main Parts (2013 Chrysler Town & Country)
Before diving into the diagram itself, let's identify the key components of the serpentine belt system on a 2013 Chrysler Town & Country, which uses a 3.6L Pentastar V6 engine. Keep in mind, specifications can subtly change between model years or even within the same year depending on trim, so consulting your owner's manual or a vehicle-specific repair database is always a good idea.
- Crankshaft Pulley: The driving force. Attached to the crankshaft, it transmits rotational power to the serpentine belt.
- Alternator Pulley: Drives the alternator, which charges the battery and powers electrical components.
- Power Steering Pump Pulley: Drives the power steering pump, providing hydraulic assistance for steering.
- Air Conditioning (A/C) Compressor Pulley: Drives the A/C compressor, responsible for cooling the cabin air.
- Water Pump Pulley: Drives the water pump, circulating coolant through the engine to regulate temperature.
- Idler Pulley(s): Smooth, bearing-mounted pulleys that guide the belt and maintain proper tension. They do not drive any accessories.
- Tensioner Pulley: This is a spring-loaded pulley that automatically maintains the correct tension on the serpentine belt. It's crucial for proper belt operation.
- Serpentine Belt: The rubber belt itself, responsible for transmitting power from the crankshaft to the various accessories.
Typical belt length for the 3.6L Pentastar V6 in the 2013 Town & Country is around 91-92 inches, but it's crucial to verify the correct part number for your specific vehicle based on the VIN. Refer to your owner’s manual or a reputable auto parts retailer for the precise specification.
Understanding Symbols in the Diagram
Serpentine belt diagrams aren't complex, but understanding the symbols they use is essential for proper interpretation.
- Lines: Solid lines typically represent the serpentine belt itself. The thicker the line, the more prominent or important the belt section. Dashed or dotted lines might indicate the belt's path behind other components.
- Pulleys: Pulleys are usually represented as circles. Sometimes they'll have an icon or abbreviation inside to indicate the component they're connected to (e.g., "ALT" for alternator, "P/S" for power steering).
- Arrows: Arrows indicate the direction of belt travel around the pulleys. This is extremely important for ensuring correct routing.
- Tensioner: The tensioner pulley is often depicted with a spring symbol or an arrow indicating its range of motion. Understanding the tensioner's location and how it works is key to belt removal and installation.
- Surface Indicators: Diagrams might indicate the smooth side or the ribbed side of the belt contacting a specific pulley. This is critical for proper function; ribbed sides engage with grooved pulleys, while smooth sides contact smooth pulleys or the back of grooved pulleys.
Colors are rarely used in most diagrams, but some may use different colors to highlight specific sections of the belt or to differentiate between various components.
How It Works: The Accessory Drive System
The accessory drive system is relatively straightforward. The crankshaft, driven by the engine's combustion process, spins the crankshaft pulley. This pulley, in turn, drives the serpentine belt, which wraps around all the other accessory pulleys. The rotation of the belt spins these pulleys, powering the respective accessories.
The tensioner plays a critical role in maintaining proper belt tension. If the belt is too loose, it will slip, leading to reduced performance of the accessories and potential damage. If the belt is too tight, it can put excessive strain on the bearings of the accessories and the tensioner itself, shortening their lifespan. The tensioner pulley is spring-loaded, providing constant pressure on the belt to compensate for wear and stretching over time. To release tension for belt removal, you'll typically use a wrench or socket to rotate the tensioner arm against its spring pressure. This will allow you to slacken the belt and slip it off the pulleys.
Real-World Use: Basic Troubleshooting
The serpentine belt diagram is invaluable for troubleshooting belt-related issues:
- Squealing Belt: A common issue. Check the diagram to ensure the belt is routed correctly and that the tensioner is functioning properly. Look for signs of belt wear (cracks, fraying, glazing) or pulley misalignment. If the squealing occurs only when accessories are heavily loaded (e.g., turning the steering wheel fully or running the A/C at maximum), the belt might be worn and unable to handle the increased load.
- Belt Slipping: If the belt is slipping, accessories won't operate efficiently. This can manifest as a dimming of headlights at idle (alternator not producing enough power), weak power steering, or poor A/C performance. Check the belt tension, look for oil or coolant contamination on the belt or pulleys (which reduces friction), and inspect the pulleys for damage or excessive wear.
- Belt Breaking: A broken belt is a serious issue, as it immediately disables all the driven accessories. Examine the broken belt for signs of wear, damage, or misalignment. Before installing a new belt, inspect all the pulleys to ensure they are free-spinning and properly aligned. A seized or damaged pulley can cause premature belt failure.
- Identifying Missing or Damaged Components: If you notice unusual noises or vibrations, the diagram helps you pinpoint the location of each component, making it easier to diagnose potential issues like a failing tensioner, a worn idler pulley, or a damaged accessory pulley.
When diagnosing a problem, remember to consider the entire system. A seemingly unrelated issue, such as a leaking power steering pump or a faulty alternator, can indirectly damage the serpentine belt.
Safety Precautions
Working on the serpentine belt system involves potential hazards. Always prioritize safety:
- Disconnect the Battery: Before working on any electrical components (especially the alternator), disconnect the negative battery terminal to prevent electrical shock.
- Hot Engine: Never work on the serpentine belt system when the engine is hot. Allow the engine to cool completely before proceeding.
- Moving Parts: The serpentine belt system contains rapidly rotating parts. Never place your hands, clothing, or tools near the belt or pulleys while the engine is running.
- Belt Tensioner: The belt tensioner is spring-loaded and can snap back forcefully. Use the appropriate tool (usually a wrench or socket) to carefully release the tension. Wear safety glasses to protect your eyes from flying debris.
- Sharp Edges: Some pulleys and components may have sharp edges. Wear gloves to protect your hands.
- Proper Tools: Use the correct tools for the job. Attempting to remove or install the belt with makeshift tools can damage the components or cause injury.
The alternator, in particular, can store a significant electrical charge even after the battery is disconnected. Exercise caution when working around it.
With the right tools, a 2013 Chrysler Town & Country serpentine belt diagram, and this guide, you'll be well-equipped to maintain and repair your vehicle's accessory drive system confidently and safely. This article is for informational purposes only, and consult a qualified mechanic when needed.
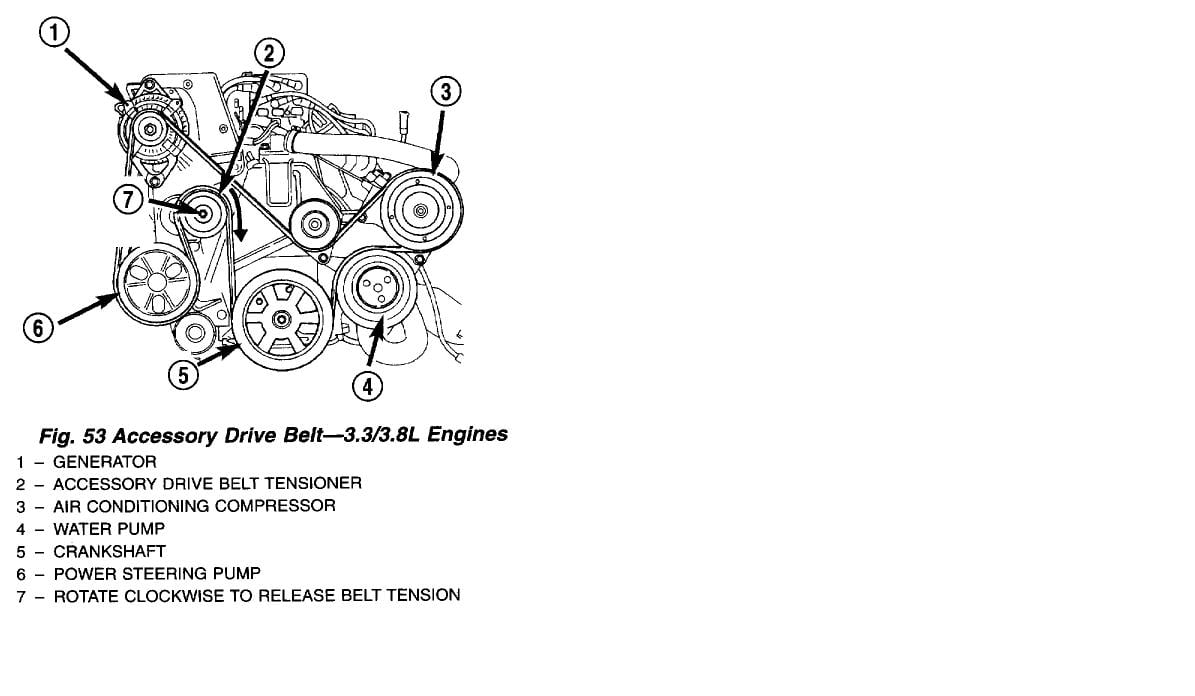
We have a copy of 2013 Chrysler Town And Country Serpentine Belt Diagram available for download. This diagram provides a visual representation of how the serpentine belt should be routed, helping you to avoid mistakes and ensure your vehicle runs smoothly.