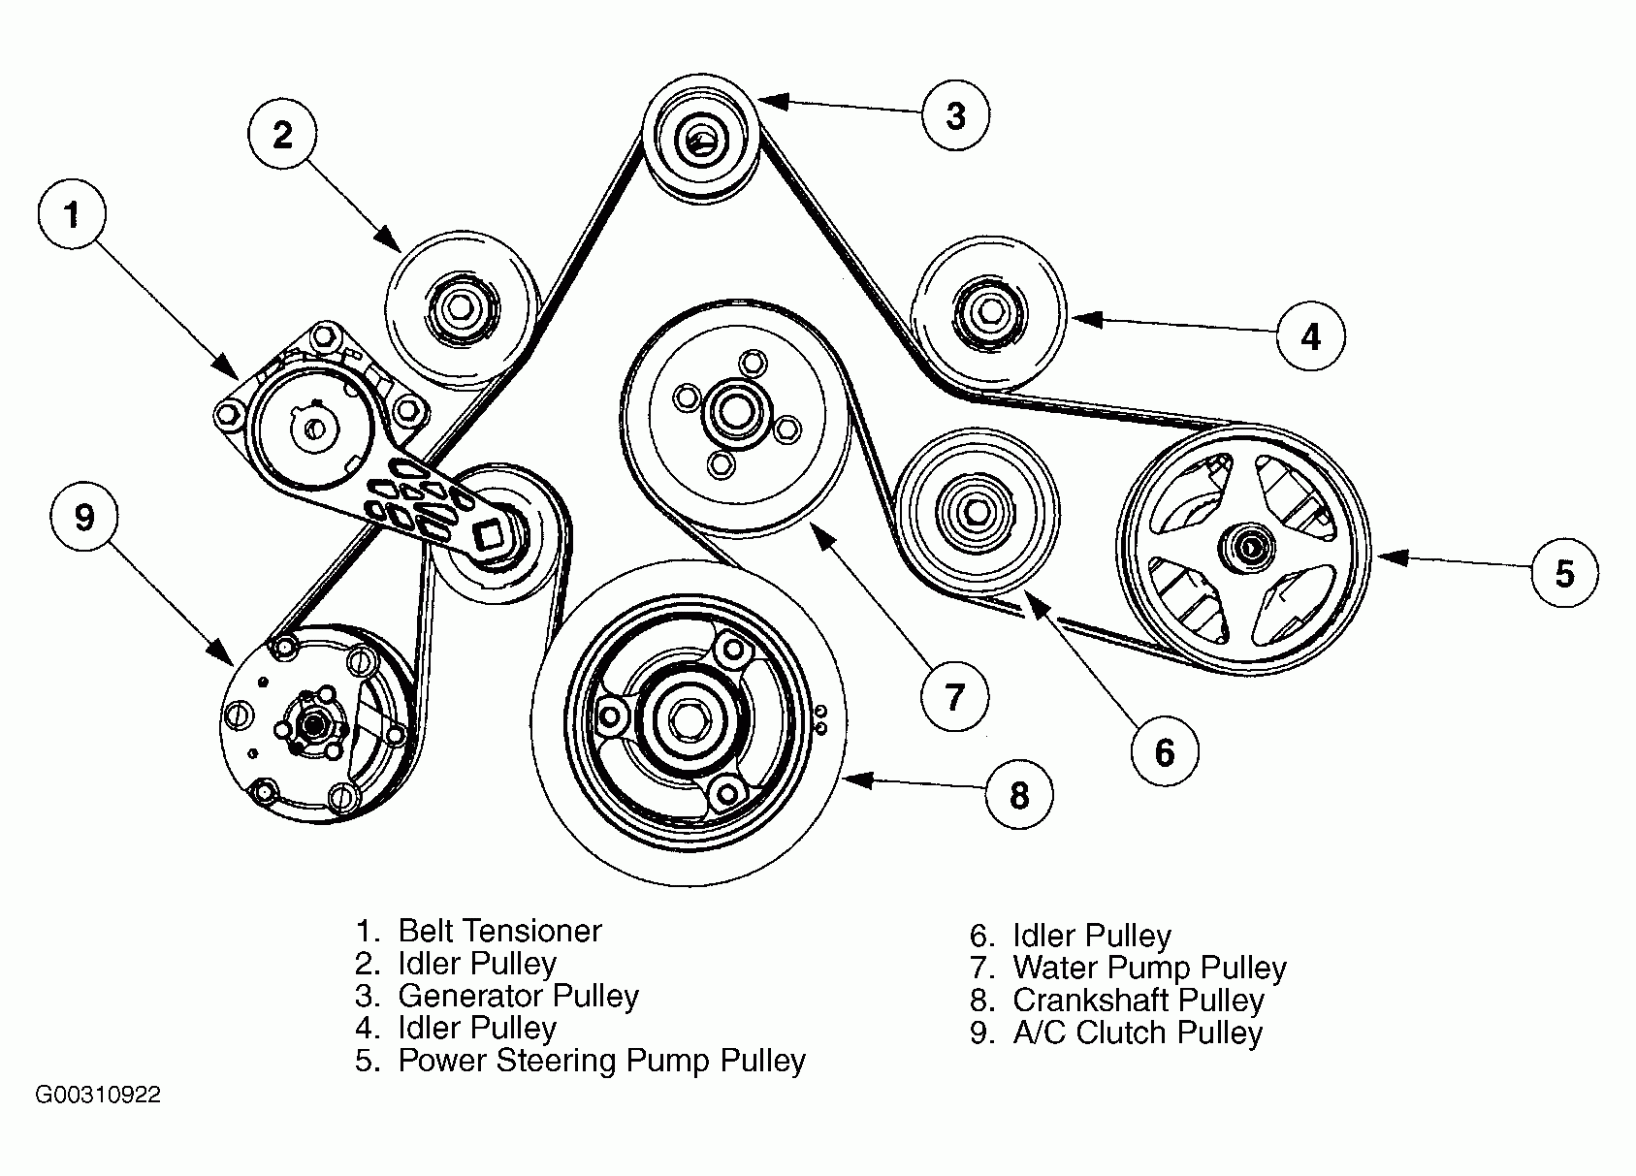
2013 Dodge Journey 2.4 Serpentine Belt Diagram
Alright, let's dive into the serpentine belt diagram for the 2013 Dodge Journey with the 2.4L engine. This guide is designed for you, the intermediate DIYer, who isn't afraid to get their hands dirty but appreciates having the right information before tackling a job. Whether you're replacing a worn belt, diagnosing a squealing noise, or just trying to understand how your engine's accessories are driven, understanding this diagram is crucial.
Purpose: Why You Need This Diagram
The serpentine belt diagram is essentially a roadmap for your engine's accessory drive system. It shows the path the serpentine belt takes around various pulleys, ensuring each component receives the necessary power to function correctly. Here's why it's indispensable:
- Belt Replacement: The most common use. Knowing the correct belt routing is essential for proper installation. An incorrectly routed belt can lead to component failure and engine damage.
- Troubleshooting Noises: A squealing or chirping noise often indicates a worn, cracked, or misaligned belt. The diagram helps you visually inspect the belt's path and identify potential issues.
- Component Diagnostics: If an accessory like the alternator or power steering pump isn't working, the diagram can help you trace the belt's path to ensure it's properly driving the component.
- General Understanding: For those of you who enjoy understanding how things work, the diagram provides a clear overview of the accessory drive system.
Key Specs and Main Parts
The 2013 Dodge Journey 2.4L utilizes a single serpentine belt to drive several key engine accessories. Here are the main components you'll find in the diagram:
- Crankshaft Pulley (Crank Pulley): This is the central pulley, driven directly by the engine's crankshaft. It's the primary power source for the serpentine belt.
- Alternator Pulley: Drives the alternator, which generates electricity to power the vehicle's electrical system and charge the battery.
- Power Steering Pump Pulley: Powers the power steering pump, providing hydraulic assistance to make steering easier.
- Air Conditioning Compressor Pulley: Drives the AC compressor, which circulates refrigerant in the air conditioning system.
- Tensioner Pulley (Automatic Tensioner): Maintains proper tension on the serpentine belt. It's spring-loaded and automatically adjusts for belt wear and thermal expansion. This is a critical component; a failing tensioner can cause belt slippage and damage to other components.
- Idler Pulley: A smooth pulley used to guide the belt and change its direction. It doesn't drive any specific accessory.
The serpentine belt itself is a multi-ribbed belt made of durable rubber composite. Specific belt dimensions (length and number of ribs) vary, so always verify the correct part number for your vehicle's VIN when purchasing a replacement.
Symbols: Deciphering the Diagram
Serpentine belt diagrams use standardized symbols to represent different components and their relationships. Understanding these symbols is crucial for accurate interpretation:
- Solid Lines: Represent the path of the serpentine belt itself. The thickness of the line may indicate the belt's physical width in some diagrams, but primarily it indicates the belt's route.
- Arrows: Indicate the direction of belt rotation around each pulley. This is vital for ensuring correct belt routing. Pay close attention to these arrows!
- Pulley Symbols: Pulleys are typically represented as circles. Text labels adjacent to the circles identify the component being driven (e.g., "ALT" for alternator, "P/S" for power steering).
- Tensioner Symbol: The tensioner pulley is often represented with a spring symbol attached, indicating its spring-loaded mechanism.
- Color Coding: While less common, some diagrams may use color coding to distinguish different sections of the belt path or different types of pulleys. Refer to the diagram's legend if color coding is used.
How It Works: The Accessory Drive System
The serpentine belt system is a relatively simple but ingenious design. The crankshaft pulley, driven by the engine, provides the rotational force. This force is transferred to the serpentine belt, which wraps around the various accessory pulleys. As the crankshaft rotates, the belt drives each accessory, powering the alternator, power steering pump, AC compressor, and other components. The tensioner pulley maintains constant tension on the belt, preventing slippage and ensuring efficient power transfer. The idler pulley simply guides the belt around the system to ensure adequate belt wrap on pulleys.
The key to a properly functioning system is correct belt tension. Too little tension results in belt slippage, leading to reduced accessory performance and potential overheating. Too much tension can overload the pulleys and bearings, causing premature wear and failure.
Real-World Use: Troubleshooting Tips
Here's how you can put this knowledge to practical use:
- Squealing Noise: A common symptom of a worn or slipping serpentine belt. Inspect the belt for cracks, glazing, or fraying. Check the tensioner pulley for proper operation. If the tensioner is weak or seized, replace it. Also, make sure none of the pulleys are loose or wobbly.
- Accessory Failure: If your alternator isn't charging, your power steering isn't working, or your AC isn't cooling, check the serpentine belt and its routing. Make sure the belt is properly engaged with the pulley of the malfunctioning component. A broken or completely slipped belt will obviously stop all accessories from working.
- Belt Replacement: Before removing the old belt, carefully note its routing. Take a picture or draw a diagram. Then, use a wrench or socket to relieve the tension on the tensioner pulley, allowing you to remove the old belt. Install the new belt, ensuring it's routed correctly according to the diagram. Slowly release the tensioner and double-check the belt's alignment on all pulleys.
- Visual Inspection: Regularly inspect the serpentine belt for signs of wear and tear. Look for cracks, fraying, missing chunks, or glazing (a shiny, hardened surface). Replace the belt at the first sign of damage.
Safety: Handle with Care
Working on the serpentine belt system can be dangerous if proper precautions aren't taken:
- Engine Off: Always work on the serpentine belt system with the engine off and the ignition key removed. This prevents accidental starting, which could cause serious injury.
- Cooling Fan: Be extremely careful around the cooling fan, especially electric fans. Even with the engine off, electric fans can cycle on automatically. Disconnect the fan's electrical connector before working in the area. The radiator can also be hot so make sure to give it time to cool off after the car has been running.
- Rotating Parts: Keep your hands, clothing, and tools clear of all rotating parts when the engine is running. The serpentine belt and pulleys can cause serious injury if they come into contact with anything.
- Eye Protection: Wear safety glasses to protect your eyes from debris.
- Battery Cables: Disconnecting the negative battery cable is a good idea to prevent accidental electrical shorts.
Important Note: The tensioner pulley stores significant spring force. When releasing the tensioner to remove or install the belt, use the correct tool and maintain a firm grip to prevent the tensioner from snapping back suddenly. Wear appropriate safety gear, including eye protection.
We've got a detailed serpentine belt diagram specific to the 2013 Dodge Journey with the 2.4L engine ready for you to download. Having that visual aid will be incredibly helpful as you work on your vehicle. It will allow you to see the precise routing of the belt and identify all the relevant components. Remember to always double-check the diagram against your specific engine configuration to ensure accuracy.