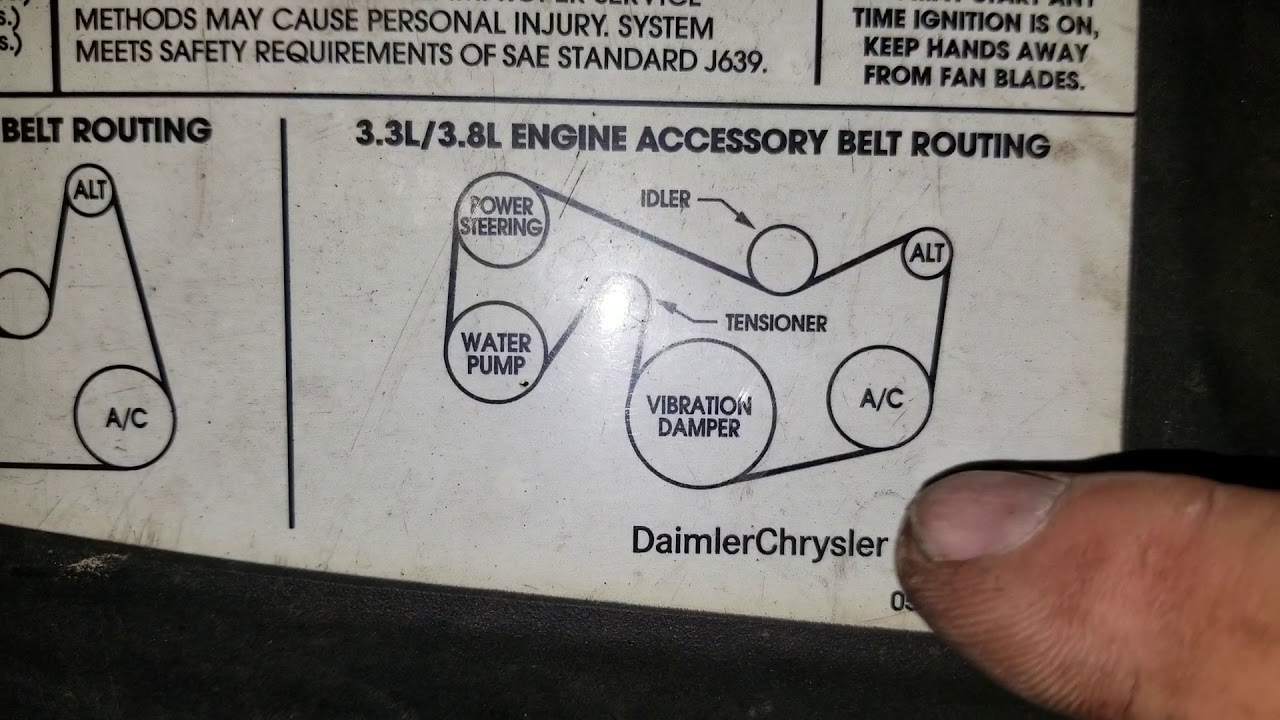
2013 Dodge Journey Serpentine Belt Diagram
Let's dive into the serpentine belt system of the 2013 Dodge Journey. This article will equip you with the knowledge to confidently identify, inspect, and even replace the serpentine belt and related components. Knowing the serpentine belt diagram is crucial for various reasons, from routine maintenance to emergency repairs. It's not just about fixing a squealing belt; it's about understanding the interconnectedness of vital engine accessories.
Purpose of Understanding the Serpentine Belt Diagram
Why bother learning about the serpentine belt diagram? Here's why it's an invaluable resource:
- Repair and Replacement: The primary reason is for replacing a worn or broken serpentine belt. The diagram provides the exact routing to ensure correct installation. Incorrect routing can lead to accessory malfunctions and potential engine damage.
- Troubleshooting: A squealing belt, power steering failure, or AC issues can often be traced back to the serpentine belt system. The diagram helps isolate the problem component.
- Preventive Maintenance: Regular inspection of the belt and pulleys, guided by the diagram, can prevent unexpected breakdowns.
- Understanding Engine Layout: Familiarity with the diagram enhances your overall understanding of the engine's accessory drive system and how different components interact.
- DIY Confidence: Armed with the right knowledge, you can confidently tackle serpentine belt-related tasks yourself, saving money on labor costs.
Key Specs and Main Parts
The 2013 Dodge Journey, depending on the engine (either a 2.4L four-cylinder or a 3.6L V6), will have a slightly different serpentine belt diagram and belt length. Always refer to the correct diagram for your specific engine. Here are the common components:
- Serpentine Belt: A continuous belt, typically made of rubber reinforced with cords, that transmits power from the crankshaft to various engine accessories.
- Crankshaft Pulley (Harmonic Balancer): Driven directly by the engine's crankshaft, this pulley is the power source for the entire serpentine belt system. It also acts as a harmonic balancer, reducing engine vibrations.
- Alternator Pulley: The alternator generates electrical power for the vehicle. The serpentine belt spins the alternator pulley to drive the alternator.
- Power Steering Pump Pulley: This pulley drives the power steering pump, providing hydraulic assistance for steering.
- Air Conditioning Compressor Pulley: Engaged and disengaged by the AC clutch, this pulley drives the AC compressor, responsible for cooling the vehicle's cabin.
- Water Pump Pulley: Circulates coolant throughout the engine to maintain optimal operating temperature.
- Tensioner Pulley: A spring-loaded pulley that maintains the correct tension on the serpentine belt. It's crucial for preventing belt slippage and premature wear. Often, the tensioner has a square hole for a wrench or socket, allowing you to relieve tension during belt removal and installation.
- Idler Pulley(s): Smooth, non-driven pulleys that guide the belt around the various components, ensuring proper wrap angle and preventing interference.
Key Specs: While specific dimensions vary, the serpentine belt's length and rib count are critical. Using the wrong belt will cause issues. Always verify the part number against your vehicle's specifications. The belt length will be measured in inches and sometimes millimeters. The rib count is simply the number of raised "ribs" on the inside of the belt that engage with the grooves on the pulleys.
Symbols and the Serpentine Belt Diagram
Understanding the symbols used in the diagram is essential for interpreting it correctly. Here's a breakdown:
- Solid Lines: Represent the path of the serpentine belt. The thicker the line, generally, the more "important" the belt segment is in transmitting power.
- Arrows: Indicate the direction of belt rotation. These arrows are crucial for understanding how the belt is routed around each pulley.
- Pulley Icons: Each pulley is represented by a circle. Some diagrams may label the pulley (e.g., ALT for alternator, P/S for power steering).
- Tensioner Indicator: The tensioner is often depicted with a spring symbol or an arrow indicating its direction of movement.
- Component Labels: Abbreviations such as "ALT" (Alternator), "P/S" (Power Steering), "A/C" (Air Conditioning), "CRANK" (Crankshaft), "WP" (Water Pump), "IDLER" (Idler Pulley), and "TENSIONER" will usually be printed adjacent to the specific pulleys.
Some diagrams might use color-coding, but this isn't standard. If colors are used, a legend will explain their meaning.
How It Works
The serpentine belt system is a cleverly designed power transmission system. The crankshaft, driven by the engine's combustion, spins the crankshaft pulley. This pulley then drives the serpentine belt, which, in turn, drives all the engine accessories. The tensioner pulley is the unsung hero, maintaining constant tension on the belt. Without proper tension, the belt would slip, reducing the efficiency of the accessories and potentially causing damage.
The routing of the belt is crucial. Each accessory requires a specific amount of torque to operate efficiently. The belt's path around each pulley determines the wrap angle (the amount of the pulley's circumference that the belt contacts). A larger wrap angle provides better grip and prevents slippage.
Real-World Use and Troubleshooting
Here are some common issues and troubleshooting tips based on the serpentine belt diagram:
- Squealing Noise: Often indicates a loose or worn belt. Check the tensioner and the condition of the belt. Look for cracks, fraying, or glazing.
- Power Steering Failure: If the power steering suddenly stops working, inspect the serpentine belt to ensure it's intact and properly routed around the power steering pump pulley.
- AC Not Working: Similar to power steering, a broken or slipping belt can prevent the AC compressor from functioning.
- Overheating: If the water pump isn't being driven properly due to a belt issue, the engine can overheat.
- Battery Not Charging: A failing alternator, caused by a slipping or broken belt, can prevent the battery from charging.
Troubleshooting Tips:
- Visual Inspection: Regularly inspect the belt for wear and tear. Look for cracks, fraying, missing ribs, or signs of oil contamination.
- Tensioner Check: Ensure the tensioner is moving freely and maintaining proper tension. A worn tensioner can cause belt slippage.
- Pulley Alignment: Misaligned pulleys can cause premature belt wear. Use a straightedge to check the alignment of the pulleys.
- Listen Carefully: Pay attention to any unusual noises coming from the engine compartment. Squealing, chirping, or rattling sounds can indicate a problem with the serpentine belt system.
Safety Considerations
Working on the serpentine belt system can be dangerous if proper precautions aren't taken:
- Disconnect the Battery: Always disconnect the negative battery cable before working on any electrical components, including the alternator.
- Hot Engine: Never work on the serpentine belt system while the engine is hot. Allow the engine to cool completely before proceeding.
- Moving Parts: Be extremely cautious around the serpentine belt and pulleys while the engine is running. Keep your hands and clothing clear of moving parts.
- Tensioner Spring: The tensioner spring can be very strong. Use the appropriate tools to safely relieve tension when removing or installing the belt.
- Eye Protection: Wear safety glasses to protect your eyes from debris.
The crankshaft pulley and the tensioner are particularly risky components due to their high rotational speed and spring tension, respectively. Always exercise extreme caution when working around these parts.
By understanding the serpentine belt diagram and following proper safety procedures, you can confidently maintain and repair this essential engine system.
We have the 2013 Dodge Journey Serpentine Belt Diagram file available for download. Understanding this diagram and system is essential for DIY maintenance and troubleshooting. Please reach out if you'd like to obtain a copy.