2013 Dodge Ram 1500 5.7 Hemi Serpentine Belt Diagram
Alright folks, let's dive into the serpentine belt system on the 2013 Dodge Ram 1500 with the 5.7L Hemi. This article is your go-to guide for understanding the belt routing, its components, and how to troubleshoot common issues. Whether you're planning a belt replacement, diagnosing a squealing noise, or just want to understand how your truck's accessories are driven, having a solid grasp of the serpentine belt system is essential.
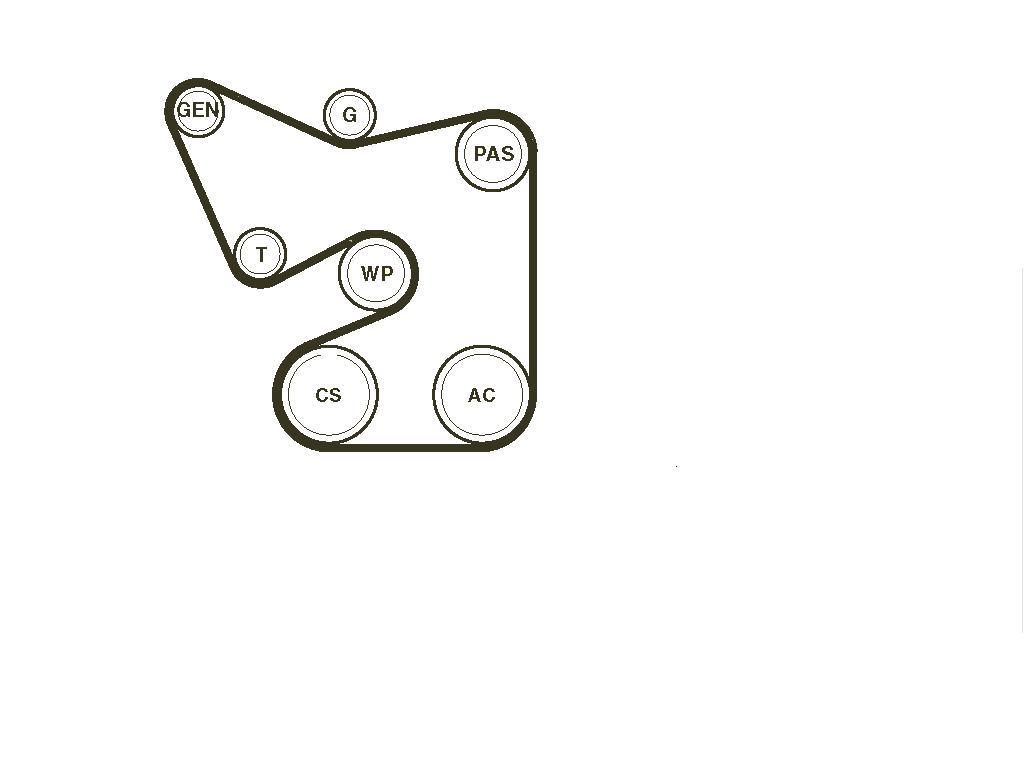
Purpose of a Serpentine Belt Diagram
The serpentine belt diagram is more than just a pretty picture; it's a critical reference tool. Why? Because it shows the exact routing of the serpentine belt around all the engine accessories. Without it, re-installing a belt after removal (or even confirming correct routing after someone else worked on it) is a guessing game. It allows you to:
- Properly Replace the Belt: Ensure correct installation and prevent premature wear or failure.
- Troubleshoot Noises: Identify potential issues by visually inspecting the belt's path and component alignment.
- Diagnose Accessory Problems: If an accessory isn't working (e.g., the A/C compressor), the diagram helps you trace the belt's path and determine if the belt is the cause.
- General Understanding: Become familiar with your engine's layout and how its accessories function.
Key Specs and Main Parts
The 2013 Ram 1500 5.7L Hemi serpentine belt system is a single-belt design, meaning one belt drives all the accessories. Here's a breakdown of the key components:
- Serpentine Belt: The heart of the system. A single, multi-ribbed belt made of rubber and reinforced fibers, designed for flexibility and durability.
- Crankshaft Pulley (Damper): Attached to the crankshaft, this pulley drives the entire system. It also incorporates a harmonic balancer to reduce engine vibrations.
- Alternator Pulley: The alternator generates electricity to power the vehicle's electrical system and charge the battery.
- Power Steering Pump Pulley: Provides hydraulic pressure to assist steering.
- A/C Compressor Pulley: Drives the air conditioning compressor.
- Water Pump Pulley: Circulates coolant throughout the engine to regulate temperature.
- Tensioner Pulley: A spring-loaded pulley that maintains constant tension on the belt, preventing slippage and ensuring proper accessory function. This is a critical component.
- Idler Pulley(s): Smooth pulleys that guide the belt and prevent it from rubbing against other components. Not all systems have them, but the 2013 Hemi system does have one.
Diagram Symbols Explained
Understanding the diagram's symbology is key to interpreting it correctly. Here’s what you need to know:
- Solid Line: Represents the belt's outer surface (the ribbed side) contacting the pulleys.
- Dotted Line (Sometimes): Occasionally used to represent the back side (smooth side) of the belt contacting an idler pulley.
- Arrows: Indicate the direction of belt travel. Always pay attention to these arrows.
- Component Labels: Abbreviations like "ALT" (alternator), "P/S" (power steering), "A/C" (air conditioning), "W/P" (water pump), "CRANK" (crankshaft), "TENSIONER" (tensioner), and "IDLER" are used to identify each pulley.
- Pulley Outline: Each pulley is depicted as a circle, often with a small representation of its ribbing.
How It Works
The system's operation is relatively straightforward. The crankshaft pulley, driven by the engine, provides the rotational force. The serpentine belt, wrapped around the crankshaft pulley and all the accessory pulleys, transmits this force to each accessory. The tensioner pulley keeps the belt tight, preventing slippage. Without proper tension, the accessories won't function correctly. A loose belt can cause squealing, reduced power steering assist, poor A/C performance, and overheating.
Real-World Use: Basic Troubleshooting
Let's say you hear a squealing noise coming from your engine. Here's how the diagram can help:
- Visual Inspection: Use the diagram to locate each pulley. Carefully inspect the belt for cracks, fraying, or glazing. A worn or damaged belt can slip and squeal.
- Tension Check: Locate the tensioner pulley. Is it moving freely? Is the belt visibly loose? A faulty tensioner can cause belt slippage and noise.
- Pulley Alignment: Using the diagram as a reference, visually check the alignment of each pulley. A misaligned pulley can cause the belt to rub against other components and create noise. A straight edge can assist with this check.
- Accessory Function: If the squealing only occurs when you turn on the A/C, the A/C compressor or its pulley might be the issue. The diagram helps you isolate the components involved.
- Belt Dressing: While a temporary fix, avoid using belt dressing. It masks the problem and can damage the belt in the long run. Address the root cause instead.
Safety: Risky Components
Working on the serpentine belt system involves several safety considerations:
- Engine Off: Always work with the engine off and the ignition key removed to prevent accidental starting.
- Hot Components: The engine and exhaust components can be extremely hot. Allow the engine to cool completely before working on the system.
- Moving Parts: Never put your hands or tools near the belt or pulleys while the engine is running. Serious injury can result.
- Battery Disconnect: Consider disconnecting the negative battery terminal to prevent electrical shorts.
- Tensioner Spring: The tensioner pulley is spring-loaded. Use the correct tools to release the tension and avoid injury.
Belt Replacement Tips
Replacing the belt is a fairly straightforward process but attention to detail is necessary. Here's a brief overview:
- Use the Correct Belt: Belts are measured and specific to application. Ensure you have the right belt length and rib count for the 2013 Ram 1500 5.7L Hemi.
- Release the Tension: Use a wrench or socket to rotate the tensioner pulley and release the belt tension. Most tensioners have a square receiver for a standard wrench.
- Remove the Old Belt: Carefully remove the old belt, noting its routing. Having the diagram handy is critical at this point.
- Install the New Belt: Route the new belt according to the diagram, making sure it's seated correctly in each pulley groove.
- Release the Tensioner: Slowly release the tensioner, allowing it to apply tension to the new belt.
- Double-Check Routing: Before starting the engine, double-check the belt routing to ensure it's correct. This is the most important step!
- Start and Observe: Start the engine and listen for any unusual noises. Visually inspect the belt to ensure it's running smoothly.
Conclusion
Understanding the serpentine belt system on your 2013 Dodge Ram 1500 5.7L Hemi is crucial for proper maintenance and troubleshooting. The diagram is your best friend for belt replacement, noise diagnosis, and accessory problem solving. Always prioritize safety and use the correct tools. With a little knowledge and patience, you can tackle many serpentine belt-related issues yourself.
We have a high-resolution version of the serpentine belt diagram available for download. This diagram provides clear details and markings for easy reference.