2013 Ford Escape 1.6 Serpentine Belt Diagram
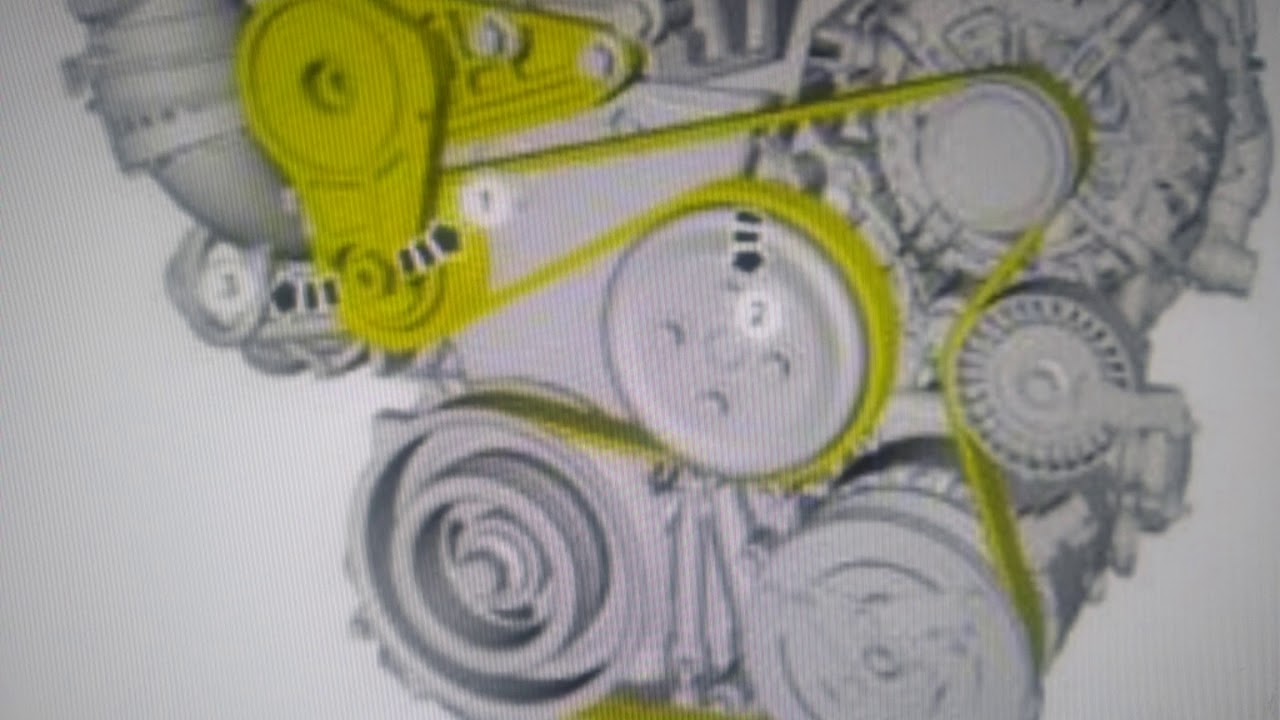
Alright, let's dive into the serpentine belt system for the 2013 Ford Escape with the 1.6L EcoBoost engine. Knowing this layout is crucial whether you're replacing a worn belt, diagnosing a squealing noise, or just understanding how your engine accessories are driven. This article will break down the diagram, its components, and how it all works together. We have a printable version of this diagram for you to download, just look for the link at the end of the article. Think of this as your deep-dive resource to get you wrenching with confidence.
Purpose of the Serpentine Belt Diagram
The serpentine belt diagram serves as a roadmap for your engine's accessory drive system. It's essential for several reasons:
- Belt Replacement: The most obvious use. Knowing the routing is critical to installing a new belt correctly. An incorrectly routed belt will lead to accessory malfunction and potential engine damage.
- Troubleshooting: A visual aid when diagnosing problems like squealing belts or non-functional accessories (like the A/C or power steering). The diagram helps isolate the issue.
- Preventative Maintenance: Inspecting the belt's condition and ensuring proper tension is easier when you understand the belt's path and the components it interacts with.
- General Understanding: Even if you're not actively working on your car, understanding the serpentine belt system enhances your overall automotive knowledge.
Key Specs and Main Parts of the 2013 Ford Escape 1.6L Serpentine Belt System
The 2013 Ford Escape 1.6L EcoBoost engine uses a single, long, multi-ribbed belt – the serpentine belt – to drive various engine accessories. Key components include:
- Crankshaft Pulley (Crank Pulley): The heart of the system. Connected directly to the crankshaft, it provides the driving force for the belt.
- Alternator Pulley: Driven by the serpentine belt, the alternator generates electrical power to charge the battery and run electrical components.
- Air Conditioning (A/C) Compressor Pulley: Engages when the A/C is turned on, compressing refrigerant in the A/C system.
- Water Pump Pulley: Circulates coolant throughout the engine to regulate temperature.
- Tensioner Pulley: This spring-loaded pulley maintains proper tension on the serpentine belt. Proper tension is crucial for optimal accessory performance and belt longevity.
- Idler Pulley: Smooth pulleys used to guide the belt around the various components and ensure proper wrap angle on the driven pulleys.
The order and arrangement of these components are specific to the 1.6L EcoBoost engine. Deviating from the proper routing will cause accessory failure.
Understanding the Serpentine Belt Diagram Symbols
Serpentine belt diagrams often use symbols to represent different components and aspects of the system. Here's a breakdown:
- Solid Lines: Represent the serpentine belt itself. The thickness of the line may vary slightly, but the solid line indicates the primary path of the belt.
- Arrows: Indicate the direction of belt rotation. This is crucial for proper installation. Ensure the belt travels in the direction indicated by the arrows on the diagram.
- Component Labels: Abbreviations or full names of the pulleys (e.g., ALT for Alternator, A/C for Air Conditioning Compressor).
- Pulley Icons: Simple drawings of pulleys, sometimes with ribbed surfaces to indicate the side that contacts the belt.
- Tensioner Symbol: The tensioner is usually indicated by a symbol that represents a spring or pivoting arm, often with an arrow indicating the direction of tension.
Note that color is rarely used in the diagrams themselves. If you find a colored diagram, the colors are most likely added for clarification and do not have a standardized meaning.
How the Serpentine Belt System Works
The serpentine belt system operates on a simple principle: rotational power transfer. The crankshaft pulley, directly connected to the engine's crankshaft, spins as the engine runs. The serpentine belt wraps around this pulley and transfers that rotational force to the other accessory pulleys. Because all accessories are driven by the same belt, each one receives power whenever the engine is running. The tensioner pulley plays a critical role in maintaining the correct amount of tension on the belt. Without proper tension, the belt can slip, leading to reduced accessory performance, belt squealing, and even belt failure. The tensioner uses a spring mechanism to automatically adjust for belt wear and engine speed fluctuations. The idler pulleys are strategically placed to maximize the wrap angle of the belt around the driven pulleys, which improves grip and prevents slippage. Wrap angle refers to the amount of the pulley's circumference that the belt contacts.
Real-World Use: Serpentine Belt Troubleshooting Tips
Here are some common issues you might encounter and how the diagram can help:
- Squealing Belt: This is often caused by a loose belt, a worn belt, or a misaligned pulley. The diagram helps you check the belt's routing and visually inspect the pulleys for damage or misalignment. Use a belt tension gauge to measure the belt tension against the manufacturer's specifications.
- Accessory Malfunction: If your A/C isn't working or your power steering is stiff, the problem could be a slipping or broken belt. The diagram confirms that the belt is routed correctly to the affected accessory and that the pulley is spinning when the engine is running.
- Belt Slippage: Visual inspection should show a shiny or glazed belt surface. Check the diagram to confirm all pulleys are aligned. Also, verify the tensioner is functioning correctly.
- Belt Jumping Off: If your belt keeps jumping off, suspect a misaligned pulley, a damaged tensioner, or a worn belt. The diagram helps identify the routing, so you can make sure it's not being improperly installed.
When troubleshooting, always start with a visual inspection. Look for cracks, fraying, or missing ribs on the belt. Check the tensioner for smooth operation and proper spring tension. And, of course, refer to the diagram to verify the correct belt routing.
Safety Precautions
Working on the serpentine belt system involves several safety considerations:
- Engine Off: Always ensure the engine is off and the key is removed from the ignition before working on the serpentine belt system. This prevents accidental starting of the engine.
- Cool Engine: Allow the engine to cool down before working on the belt. Exhaust manifolds and other engine components can be extremely hot.
- Proper Tools: Use the correct tools for the job, including a serpentine belt tool to release the tension on the tensioner pulley.
- Eye Protection: Wear safety glasses to protect your eyes from debris.
- Keep Fingers Clear: Be extremely careful to keep your fingers and hands clear of the belt and pulleys when the engine is running, even for a brief test. This is the most important precaution. Severe injury can result.
- Battery Disconnect: Consider disconnecting the negative terminal of the battery. This can prevent accidental electrical shorts while you work.
The tensioner itself stores a lot of spring energy and can snap back forcefully if released improperly. Use the appropriate tool and follow the manufacturer's instructions carefully when releasing tension.
Conclusion
Understanding the serpentine belt system is a valuable skill for any car owner. The diagram is your primary reference for repairs, troubleshooting, and preventative maintenance. By understanding the components, symbols, and operation of the system, you'll be better equipped to keep your 2013 Ford Escape 1.6L running smoothly.
And as promised, here's the link to download the 2013 Ford Escape 1.6L serpentine belt diagram for your convenience. [Download Diagram Here - Placeholder] (This is a placeholder link. In a real-world scenario, you would replace this with a link to the diagram file.)