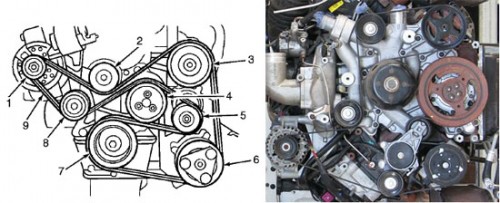
2013 Ford Explorer 2.0 Serpentine Belt Diagram
The serpentine belt in your 2013 Ford Explorer 2.0L EcoBoost engine is a critical component, responsible for powering several essential systems. Understanding its routing and function is crucial for DIY maintenance, troubleshooting, and even more complex repairs. This article serves as a detailed guide to the serpentine belt diagram for this specific model, empowering you to tackle potential issues with confidence. We'll cover the diagram's purpose, key components, symbols, operation, real-world use, and, most importantly, safety precautions.
Purpose of the Serpentine Belt Diagram
Why bother with a serpentine belt diagram? Several reasons. First and foremost, it's indispensable for proper belt replacement. Incorrect routing can lead to component failure, reduced performance, and even engine damage. Secondly, the diagram aids in diagnosing belt-related issues such as squealing, slipping, or component malfunctions. By understanding the belt's path, you can quickly identify potential problems. Finally, familiarizing yourself with the system can be a valuable learning experience, deepening your understanding of how your vehicle's engine operates.
Key Specs and Main Parts
Before diving into the diagram, let's review the key components involved in the serpentine belt system of your 2013 Ford Explorer 2.0L EcoBoost:
- Serpentine Belt: The main drive belt, usually made of reinforced rubber. It's designed to transmit rotational power from the crankshaft to various accessories. The length and number of ribs are crucial and specific to the application. Using the wrong belt can cause major issues.
- Crankshaft Pulley (Crank Pulley): Attached to the crankshaft and driven by the engine. It initiates the belt's movement, transferring power to the other pulleys.
- Alternator Pulley: Driven by the serpentine belt, the alternator generates electrical power for the vehicle's systems and recharges the battery.
- Power Steering Pump Pulley: The power steering pump provides hydraulic assistance to the steering system, making it easier to turn the wheel. Its pulley is driven by the serpentine belt.
- Air Conditioning Compressor Pulley: The A/C compressor is responsible for cooling the cabin air. Its pulley is engaged and disengaged by the A/C clutch.
- Idler Pulleys: Smooth, ungrooved pulleys that guide the belt and maintain proper tension. They don't drive any specific components. Their main job is to route the belt correctly and provide needed clearance.
- Tensioner Pulley: A spring-loaded pulley that automatically maintains the correct tension on the serpentine belt. This is crucial for optimal performance and belt longevity. A failing tensioner is a common cause of serpentine belt issues.
Understanding the Serpentine Belt Diagram Symbols
Serpentine belt diagrams use standard symbols to represent different components and belt routing. Here's a breakdown of what you might encounter:
- Solid Lines: Represent the path of the serpentine belt. The thickness of the line doesn't typically indicate anything specific.
- Arrows: Indicate the direction of belt rotation. Note that some pulleys rotate clockwise, while others rotate counter-clockwise.
- Component Symbols: Each component (alternator, power steering pump, etc.) is represented by a simplified symbol, often a circle or a stylized representation of the pulley. These are usually labeled with abbreviations (ALT, P/S, A/C, etc.)
- Text Labels: Clear text labels identifying each component.
- Diagram Orientation: Diagrams are often oriented to match the engine's position in the vehicle, allowing for easier visualization.
Color coding is less common in serpentine belt diagrams, but if present, different colors might be used to highlight specific sections of the belt path or to differentiate between the front and back of the belt. A legend would usually explain any color conventions used.
How It Works
The serpentine belt system works on the principle of rotational power transfer. The engine's crankshaft spins, rotating the crankshaft pulley. This pulley drives the serpentine belt, which then wraps around and rotates the pulleys of the various accessories (alternator, power steering pump, A/C compressor, etc.). The tensioner pulley ensures that the belt remains tight, preventing slippage and maintaining optimal performance. Without proper tension, the belt will slip, causing reduced output from the driven components and potentially leading to overheating or other issues. The belt's path is carefully designed to maximize the contact area with each pulley, ensuring efficient power transfer.
Real-World Use: Basic Troubleshooting
Here are some common problems related to the serpentine belt system and how the diagram can help you diagnose them:
- Squealing Noise: A common symptom, often caused by a loose or worn serpentine belt. Use the diagram to inspect the belt for cracks, glazing, or excessive wear. Also check the tensioner pulley for proper function. Is it bouncing? Is it locked up?
- Reduced Component Performance: If your battery isn't charging properly (alternator), steering is difficult (power steering pump), or the A/C isn't cooling effectively (A/C compressor), a slipping serpentine belt could be the culprit. Use the diagram to verify the belt's routing and tension.
- Belt Slippage: Look for signs of belt slippage, such as black dust around the pulleys or a burning rubber smell. The diagram will help you identify the source of the slippage and check the condition of the affected pulleys.
- Belt Breakage: A broken serpentine belt can leave you stranded. Use the diagram to understand the belt's routing before attempting a replacement. Make sure to inspect all pulleys for damage that could have caused the breakage.
- Overheating: While not directly driven by the serpentine belt, a failing alternator (driven by the belt) can cause the engine to overheat due to increased electrical load and fan speed reduction.
Troubleshooting Tip: Always visually inspect the serpentine belt and pulleys for wear, cracks, or damage before suspecting other issues. A seemingly minor crack in the belt can quickly lead to a complete failure.
Safety Precautions
Working on the serpentine belt system can be dangerous due to the proximity of moving parts and the potential for electrical shock. Here are some essential safety precautions:
- Disconnect the Battery: Before starting any work on the serpentine belt system, disconnect the negative battery terminal to prevent electrical shock and accidental starting.
- Allow Engine to Cool: Never work on the engine while it's hot. Allow it to cool down completely to avoid burns.
- Keep Hands and Clothing Clear: Ensure that your hands, hair, and clothing are clear of any moving parts when the engine is running. The serpentine belt can quickly pull in loose items, causing serious injury.
- Proper Tools: Use the correct tools for the job, including a serpentine belt tool for safely releasing the tension on the belt.
- Eye Protection: Wear safety glasses to protect your eyes from debris.
The tensioner pulley spring is under considerable tension. Use the proper tool to release the tension safely. Never attempt to release the tension without the proper tool, as this could result in serious injury.
Disclaimer: This guide is for informational purposes only and should not be considered a substitute for professional automotive advice. If you are not comfortable working on your vehicle, consult a qualified mechanic.
We have the specific serpentine belt diagram for your 2013 Ford Explorer 2.0L EcoBoost, which can be downloaded and printed for easy reference. This detailed resource will be invaluable for any maintenance or repair work you undertake on your vehicle's serpentine belt system. Good luck, and remember to prioritize safety!