2013 Ford Transit Connect Serpentine Belt Diagram
The serpentine belt on your 2013 Ford Transit Connect is a critical component responsible for driving numerous engine accessories. Knowing its layout, understanding its function, and having a readily accessible diagram is essential for preventative maintenance, troubleshooting, and repairs. This article will delve into the specifics of the 2013 Transit Connect's serpentine belt system, providing you with the knowledge and resources to tackle potential issues with confidence.
Purpose of Understanding the Serpentine Belt Diagram
Why bother with a serpentine belt diagram? Well, several compelling reasons exist. First, it's invaluable during repairs and replacements. When your belt snaps, slips, or shows excessive wear, a diagram helps you trace the belt's path accurately during reinstallation. Second, it aids in diagnosing accessory malfunctions. If your power steering isn't working, or your air conditioning is blowing warm, the diagram allows you to quickly identify which accessories are driven by the belt, narrowing down the possible causes. Finally, for the enthusiastic DIYer, understanding the system is simply good practice for general automotive knowledge. You'll gain a deeper appreciation for how your engine works.
Key Specs and Main Parts of the 2013 Ford Transit Connect Serpentine Belt System
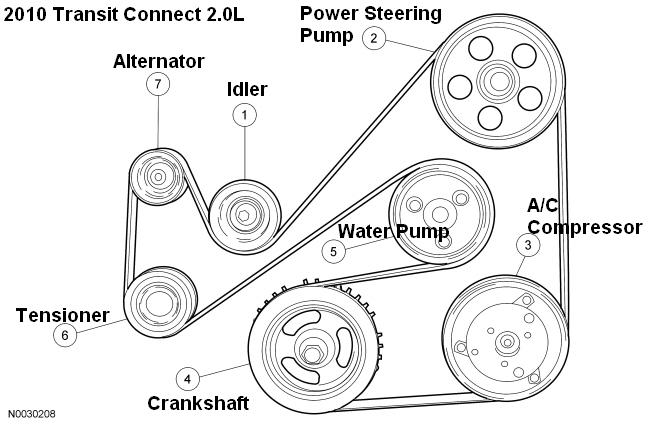
The 2013 Ford Transit Connect typically comes with a 2.0L Duratec I-4 engine or a 1.6L EcoBoost I-4 engine. While the general principle of the serpentine belt system remains the same, the specific routing and component placement might vary slightly depending on the engine. However, the core components remain consistent:
- Crankshaft Pulley (or Damper): This pulley, driven directly by the engine's crankshaft, is the driving force behind the entire serpentine belt system.
- Serpentine Belt: A single, continuous belt made of durable rubber and reinforced fibers, responsible for transferring rotational force from the crankshaft pulley to the other accessories.
- Alternator: Driven by the serpentine belt, the alternator generates electrical power to charge the battery and run the vehicle's electrical systems.
- Power Steering Pump: Provides hydraulic pressure to assist with steering, making it easier to turn the wheel.
- Air Conditioning Compressor: Compresses refrigerant to cool the cabin air.
- Idler Pulley(s): Smooth, bearing-mounted pulleys that guide the belt and maintain its proper tension and path. They don't drive any accessories.
- Tensioner Pulley: A spring-loaded pulley that automatically adjusts the belt tension, preventing slippage and ensuring optimal accessory performance. This is a *critical* component to identify.
The "serpentine" in serpentine belt refers to its snake-like path, weaving around all these pulleys. The exact length and rib count of the belt are crucial for proper fit and performance. Refer to your owner's manual or a reputable parts supplier for the correct belt specification for your specific engine.
Understanding Serpentine Belt Diagram Symbols
Serpentine belt diagrams utilize standardized symbols to convey information concisely. Here's a breakdown of common symbols you might encounter:
- Solid Lines: Represent the primary path of the serpentine belt as it wraps around the pulleys. The thickness of the line can sometimes indicate the belt's width (although this isn't always consistent).
- Dashed Lines: May indicate the back side of the belt, which is the smooth side that runs against some of the pulleys.
- Circles/Discs: Represent the pulleys themselves. The size of the circle is not indicative of the actual pulley size.
- Arrows: Indicate the direction of rotation of each pulley. This is crucial for understanding how the belt transfers power. An arrow pointing clockwise means the pulley rotates clockwise.
- Text Labels: Accompany each pulley to identify the component (e.g., "ALT" for alternator, "P/S" for power steering, "AC" for air conditioning compressor, "TENSIONER").
- Special Icons: Some diagrams use icons to represent specific features, such as the location of the belt tensioner release mechanism. Consult the diagram's legend or key to understand these symbols.
How the Serpentine Belt System Works
The crankshaft pulley, connected directly to the engine's rotating crankshaft, initiates the entire process. As the crankshaft spins, it drives the serpentine belt, which, in turn, transfers rotational energy to the various accessories. The tensioner pulley is vital for maintaining the correct amount of tension on the belt. Too little tension leads to slippage, resulting in reduced accessory performance (e.g., dim headlights from a slipping alternator). Too much tension can prematurely wear out the belt and the bearings in the accessory components. The idler pulleys simply guide the belt along the desired path, ensuring it doesn't rub against anything or deviate from its intended route.
Real-World Use: Troubleshooting Tips
Having the serpentine belt diagram at your disposal can significantly aid in troubleshooting accessory problems. Here are a few common scenarios:
- Squealing Noise: Often indicates a slipping belt. Check the belt for wear, cracks, or glazing. Inspect the tensioner pulley for proper function – it should maintain consistent tension. If the noise persists after replacing the belt and verifying the tensioner, suspect a misaligned pulley.
- Accessory Malfunction (e.g., No Power Steering): Use the diagram to confirm that the power steering pump is indeed driven by the serpentine belt. If it is, check the belt's condition. A broken or severely damaged belt will prevent the pump from operating.
- Belt Damage or Breakage: This is a serious issue. Inspect all pulleys for damage or misalignment. A sharp edge or protruding object can quickly destroy a new belt. Also, ensure the tensioner pulley is functioning correctly; a seized tensioner can cause excessive stress on the belt, leading to premature failure.
To check the tensioner pulley, locate it and attempt to rotate it using a wrench (refer to your service manual for the correct procedure). It should move smoothly against the spring tension. If it's stiff, jerky, or makes noise, it needs replacement.
Safety Precautions
Working on the serpentine belt system involves inherent risks. The engine should always be OFF and the key removed from the ignition before attempting any work. The serpentine belt system contains rotating parts that can cause serious injury. Pay close attention to the following:
- Hot Engine Components: Allow the engine to cool completely before working near the serpentine belt system. Exhaust manifolds and other engine parts can reach extremely high temperatures.
- Rotating Parts: Never place your hands or tools near the serpentine belt or pulleys while the engine is running.
- Spring-Loaded Tensioner: The tensioner pulley is spring-loaded and can snap back forcefully if released improperly. Use the correct tools and follow the manufacturer's instructions when releasing the tension. Always wear safety glasses.
- Battery Disconnection: Consider disconnecting the negative battery terminal to prevent accidental starting of the engine while working on the belt system.
Important Note: When replacing the serpentine belt, always route it correctly according to the diagram. An incorrectly routed belt can cause serious damage to the engine and accessories. If unsure, consult a qualified mechanic.
We have a high-resolution serpentine belt diagram available for download, specific to the 2013 Ford Transit Connect. This diagram will provide you with a clear visual representation of the belt routing and component locations, assisting you in your maintenance and repair endeavors.