2013 Gmc Terrain 3.6 Litre Idler Pulley Diagram
Alright, let's dive into the 2013 GMC Terrain's 3.6L engine and specifically, its idler pulley system. This component is often overlooked until it starts making noise or, worse, fails completely. Understanding the idler pulley diagram is crucial for diagnosing issues, performing preventative maintenance, and even tackling more extensive engine repairs. We're talking about keeping your engine running smoothly and preventing costly breakdowns.
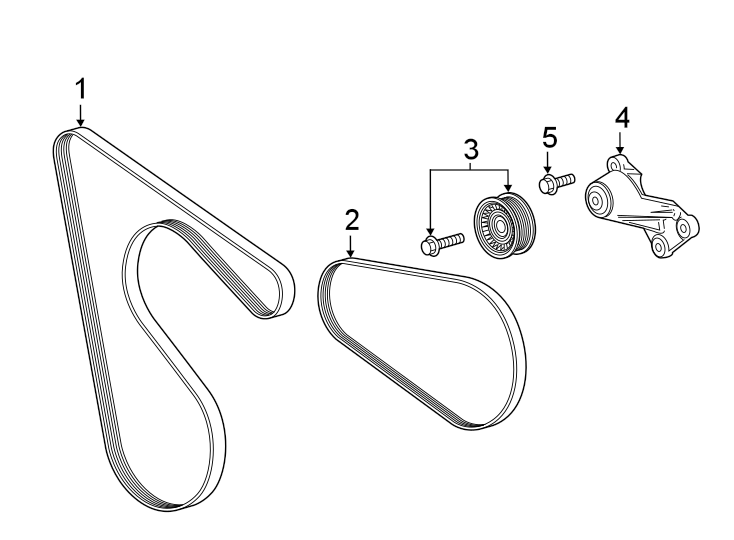
Purpose of the Idler Pulley Diagram
Why bother with a diagram? Simply put, it's your roadmap for the serpentine belt system. The diagram shows the routing of the belt, the locations of all pulleys (including the idler pulley), and the tensioner. This is invaluable when replacing the belt, diagnosing squealing noises, or suspecting pulley damage. Without a diagram, you're essentially guessing, and that can lead to misrouted belts, improper tension, and ultimately, damage to other components like the alternator, power steering pump, and AC compressor. It also helps with visually identifying parts and understanding their relationship to each other within the engine.
Key Specs and Main Parts of the Serpentine Belt System
For the 2013 GMC Terrain with the 3.6L V6 engine (specifically the LFX engine), the serpentine belt system is relatively straightforward but contains several critical components:
- Crankshaft Pulley (Harmonic Balancer): This is the main driver, connected directly to the engine's crankshaft. It provides the rotational power to the belt.
- Water Pump Pulley: Drives the water pump, essential for coolant circulation and engine temperature regulation.
- Alternator Pulley: Powers the alternator, which charges the battery and supplies electricity to the vehicle's electrical system.
- Power Steering Pump Pulley: Drives the power steering pump, assisting with steering.
- AC Compressor Pulley: Engages and drives the AC compressor when air conditioning is needed.
- Tensioner Pulley: This pulley is spring-loaded and maintains proper tension on the serpentine belt. It's crucial for preventing belt slippage and ensuring all accessories are driven efficiently. Failure to replace the tensioner when doing a belt change often leads to premature belt failure and further damage.
- Idler Pulley: The focus of our discussion. The idler pulley, or pulleys if equipped with more than one, is a smooth pulley that provides routing guidance and support for the serpentine belt. It helps the belt navigate around other components and maintain the correct wrap angle on driven pulleys.
Key Specs (Typical): While specific dimensions vary slightly depending on the manufacturer, typical specifications for the idler pulley on this engine include:
- Diameter: ~70-80mm
- Width: ~25-30mm
- Bore (Bearing): ~17mm (typically)
- Material: Typically made of steel or high-strength plastic.
It's crucial to verify the exact specifications with your vehicle's service manual or parts supplier before purchasing a replacement.
Understanding the Diagram's Symbols
A good diagram uses visual cues to convey information quickly and accurately. Here’s a breakdown of common symbols you might encounter:
- Solid Lines: Usually represent the path of the serpentine belt. The thickness of the line might indicate the belt's relative position (e.g., thicker lines for the belt's outer surface).
- Dotted Lines: Can represent the belt's hidden path (e.g., behind another component).
- Arrows: Indicate the direction of belt rotation around each pulley. This is crucial for correct belt installation.
- Pulley Symbols: Each pulley will have a symbol, sometimes a simple circle, sometimes with a slightly more detailed representation showing the groove(s) for the belt. Driven pulleys (e.g., alternator, water pump) might be labeled with their function.
- Tensioner Symbol: Often shows the tensioner arm and its spring-loaded action.
- Labels: Abbreviations are used to identify the pulleys (e.g., ALT for alternator, P/S for power steering, AC for air conditioning, WP for water pump, IDL for idler).
How the Serpentine Belt System Works
The serpentine belt system is driven by the crankshaft pulley. As the engine rotates, the crankshaft pulley spins, transferring that rotational force to the serpentine belt. The belt, in turn, wraps around and drives the various accessory pulleys (alternator, water pump, etc.). The idler pulley provides support and redirects the belt to ensure optimal contact angles on these driven pulleys. The tensioner pulley automatically adjusts to compensate for belt wear and thermal expansion, maintaining the proper tension for efficient power transfer. Without proper tension, the belt will slip, leading to reduced performance of the accessories and potential damage.
Real-World Use: Basic Troubleshooting Tips
Knowing the idler pulley diagram is extremely helpful for troubleshooting:
- Squealing Noises: A common symptom is a squealing noise, especially when the engine is first started or under load. This can be caused by a worn or glazed belt, a failing tensioner, or a bad bearing in one of the pulleys (including the idler pulley). Use a stethoscope (or a long screwdriver placed against your ear – carefully!) to pinpoint the source of the noise. Spin each pulley by hand (engine off, of course!) to check for roughness or play in the bearing.
- Belt Slippage: If the belt is slipping, you might notice dimming headlights (alternator not charging properly), hard steering (power steering pump not working well), or poor AC performance (AC compressor not engaging fully). Check the belt tension and condition. Look for cracks, fraying, or missing chunks.
- Pulley Wobble: Visually inspect the idler pulley (and other pulleys) for any wobble or runout while the engine is running. This indicates a bent pulley or a failing bearing.
- Belt Jumping Off: If the belt keeps jumping off, it could be due to a misaligned pulley, a worn tensioner, or a damaged belt. Ensure all pulleys are properly aligned using a straight edge.
- Visual Inspection: Always start with a visual inspection. Look for signs of wear, damage, or misalignment. Also, check the condition of the belt for cracks, fraying, or glazing.
Diagnosing Idler Pulley Issues Specifically:
- Spin the Idler Pulley by Hand (Engine OFF): A healthy idler pulley should spin freely and quietly. If it feels rough, gritty, or makes noise, the bearing is likely failing.
- Check for Play: Try to wiggle the idler pulley. Excessive play indicates a worn bearing or mounting.
- Inspect the Belt Contact Surface: Look for signs of wear or damage on the pulley's surface that contacts the belt. A damaged surface can cause belt wear and noise.
Safety Precautions
Working on the serpentine belt system can be dangerous. Here are some crucial safety tips:
- Disconnect the Negative Battery Terminal: This prevents accidental starting of the engine while you're working.
- Never Work on a Hot Engine: Allow the engine to cool completely before working on the belt system.
- Keep Hands and Clothing Away from Moving Parts: Even with the engine off, the belt can be under tension. Be careful when releasing the tensioner.
- Wear Safety Glasses: Protect your eyes from debris.
- Be Aware of the Radiator Fan: Even with the engine off, the radiator fan can sometimes cycle on. Be extremely cautious around it. These fans can cause serious injury!
- Use the Correct Tools: Using the wrong tools can damage components and increase the risk of injury. Use a serpentine belt tool for removing the belt from the tensioner.
Diagram Download
Now you're equipped with the basic knowledge to understand and use the 2013 GMC Terrain 3.6L engine idler pulley diagram. Remember, this article provides general guidance. Always refer to your vehicle's specific service manual for detailed instructions and torque specifications. The most accurate information is always located in your service manual.
And because we want to make this as easy as possible for you, we have the 2013 GMC Terrain 3.6L Serpentine Belt Diagram available for download. You can Download the Diagram Here. Good luck with your repairs!