2013 Hyundai Sonata Serpentine Belt Diagram
For the DIY mechanic tackling a 2013 Hyundai Sonata, understanding the serpentine belt system is crucial. Whether you're replacing a worn belt, diagnosing a squealing noise, or just trying to understand your car's engine bay, a reliable serpentine belt diagram is an invaluable resource. This article will provide a comprehensive guide to the 2013 Hyundai Sonata serpentine belt diagram, covering its purpose, key components, symbols, operation, troubleshooting, and safety considerations. We even have the diagram available for download!
Purpose of the Serpentine Belt Diagram
The serpentine belt diagram serves several important purposes:
- Repair and Replacement: The most common use is for replacing a worn or broken serpentine belt. The diagram shows the correct routing of the new belt around all the pulleys, ensuring proper operation. Incorrect routing can lead to component damage and premature belt failure.
- Troubleshooting: A diagram helps diagnose issues like belt squealing or component failure. By visually inspecting the belt's path and identifying the driven components, you can narrow down the source of the problem.
- Maintenance and Inspection: Regularly inspecting the serpentine belt for wear and tear is crucial. The diagram aids in identifying all the components that need to be checked.
- Understanding the Engine: For those who enjoy understanding how their car works, the diagram provides a clear visual representation of the belt-driven accessories and their layout.
Key Specs and Main Parts
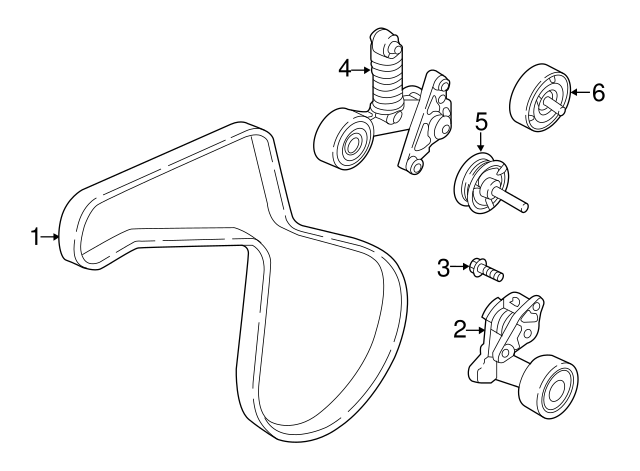
The serpentine belt system in the 2013 Hyundai Sonata (both 2.0L and 2.4L engines) consists of the following main components:
- Serpentine Belt: The key component. This is a single, continuous belt responsible for driving multiple engine accessories. It's typically made of a durable rubber compound reinforced with cords.
- Crankshaft Pulley (Damper): This pulley is attached to the crankshaft and provides the rotational power to drive the serpentine belt. It usually has a harmonic balancer to reduce engine vibrations.
- Alternator Pulley: The alternator, responsible for charging the battery and powering the electrical system, is driven by the serpentine belt via the alternator pulley.
- Power Steering Pump Pulley: The power steering pump, which provides hydraulic assistance for steering, is also driven by the serpentine belt.
- Air Conditioning (A/C) Compressor Pulley: The A/C compressor, which circulates refrigerant to cool the cabin, is another component driven by the serpentine belt.
- Idler Pulleys: These pulleys are smooth and used to guide the belt around the other components and maintain proper tension and routing.
- Tensioner Pulley: This spring-loaded pulley automatically adjusts the tension on the serpentine belt as it stretches over time. Maintaining proper tension is critical for optimal performance and preventing belt slippage.
- Water Pump Pulley: The water pump circulates coolant through the engine to prevent overheating. On some engines, the water pump is driven by the serpentine belt; on others, it may be driven by the timing belt. For the 2013 Sonata, it is driven by the serpentine belt.
Diagram Symbols Explained
Understanding the symbols in the serpentine belt diagram is essential for accurate interpretation.
- Solid Lines: Represent the path of the serpentine belt itself. The bold solid line indicates the outer surface of the belt.
- Dotted Lines (or Dashed Lines): May be used to indicate the belt's path on the *underside* of a pulley or when the belt is routed behind another component, signifying that it is not directly visible.
- Arrows: Indicate the direction of rotation of each pulley. Make sure to pay close attention to these when routing the belt.
- Component Icons: Simplified drawings of each component (alternator, A/C compressor, etc.) are used to identify them. These icons are usually labeled with abbreviations.
- Abbreviations: Common abbreviations include: ALT (Alternator), P/S (Power Steering), A/C (Air Conditioning), CRANK (Crankshaft), IDLER (Idler Pulley), TENS (Tensioner Pulley), W/P (Water Pump).
Color coding is not commonly used in serpentine belt diagrams. If color is present, it will typically be used to highlight the belt's path for easier visualization.
How It Works
The serpentine belt system is a relatively simple yet crucial system. The crankshaft pulley, powered by the engine's rotation, drives the serpentine belt. As the belt rotates, it transfers power to all the driven accessories: the alternator, power steering pump, A/C compressor, water pump, and potentially others. The tensioner pulley maintains the correct amount of tension on the belt to prevent slippage and ensure efficient power transfer. Without a properly functioning serpentine belt system, these accessories would not operate, leading to a range of problems, from a dead battery to engine overheating and loss of power steering.
Real-World Use: Basic Troubleshooting
Here are some common serpentine belt-related issues and how the diagram can help you diagnose them:
- Squealing Noise: A squealing noise, especially when the engine is first started or under load, is often caused by a slipping serpentine belt. The diagram can help you identify the tensioner pulley. A weak tensioner can allow the belt to slip. Also, check the condition of the belt itself for cracks, glazing, or missing ribs.
- Battery Not Charging: If the alternator pulley isn't turning due to a broken or slipping belt, the battery won't be charged. Use the diagram to confirm the belt is properly routed around the alternator pulley and that the pulley is spinning freely.
- Loss of Power Steering: If the power steering pump pulley isn't turning, you'll experience a sudden loss of power steering. Again, the diagram confirms the belt routing to the power steering pump.
- Overheating: If the water pump isn't circulating coolant, the engine can overheat. Verify the belt is correctly routed and driving the water pump pulley.
- Visual Inspection: Use the diagram to visually inspect the belt for signs of wear, such as cracks, fraying, or missing ribs. Look for signs of misalignment, like excessive wear on one side of the belt. Also inspect all the pulleys for damage or wobbling.
Safety Considerations
Working on the serpentine belt system can be dangerous. Always follow these safety precautions:
- Disconnect the Battery: Before working on the serpentine belt, disconnect the negative terminal of the battery to prevent accidental electrical shocks.
- Hot Engine: Never work on the serpentine belt system when the engine is hot. Allow the engine to cool down completely before starting any work.
- Moving Parts: Never put your hands or tools near the serpentine belt or pulleys while the engine is running. These are rapidly moving parts that can cause serious injury.
- Proper Tools: Use the correct tools for the job, including a serpentine belt tool to release the tension on the tensioner pulley. Using the wrong tool can damage the components or cause injury.
- Eye Protection: Always wear safety glasses to protect your eyes from debris.
- Clothing: Avoid wearing loose clothing or jewelry that could get caught in the serpentine belt or pulleys.
The crankshaft pulley and the area around the engine cooling fan are particularly dangerous due to their proximity to the running engine and the potential for clothing or tools to be caught.
Download the Diagram
We have the 2013 Hyundai Sonata serpentine belt diagram available for download to make your repair even easier. This downloadable diagram provides a clear and concise reference for proper belt routing and component identification.