2013 Mitsubishi Outlander Serpentine Belt Diagram
Alright, let's dive into the serpentine belt diagram for your 2013 Mitsubishi Outlander. This isn't just a piece of paper; it's your roadmap for keeping your engine running smoothly. Whether you're replacing a worn belt, diagnosing a squealing noise, or simply trying to understand your engine's layout better, understanding this diagram is crucial.
Purpose of the Serpentine Belt Diagram
The serpentine belt diagram is essential for several reasons:
- Replacement: When your serpentine belt snaps or shows signs of wear (cracks, fraying), you'll need to replace it. The diagram shows you the correct routing of the new belt. Incorrect routing can lead to component damage or even engine failure.
- Troubleshooting: A slipping or squealing belt can indicate problems with the belt itself, the tensioner, or any of the driven components (alternator, power steering pump, etc.). The diagram helps you pinpoint the source of the noise or slippage.
- Maintenance: Understanding the belt's path allows you to inspect all related components during routine maintenance, catching potential issues before they become major problems.
- Education: For DIY enthusiasts and car modders, understanding the serpentine belt system is simply part of knowing your vehicle inside and out.
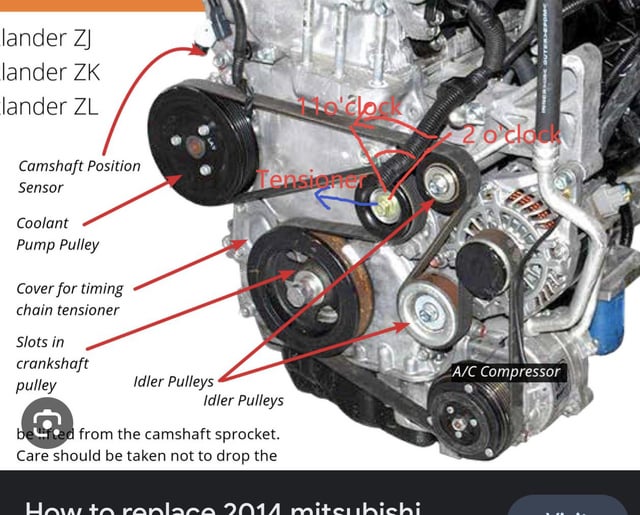
Key Specs and Main Parts of the Serpentine Belt System
Before we get into the diagram itself, let's cover the main components involved:
- Serpentine Belt: This is the long, single belt that snakes around various pulleys. It's usually made of rubber and reinforced with cords for strength. It transmits power from the crankshaft pulley to other engine accessories.
- Crankshaft Pulley (or Damper): This is the pulley connected directly to the engine's crankshaft. It's the driving force behind the entire serpentine belt system.
- Alternator Pulley: The alternator generates electricity to power your car's electrical system and charge the battery. The serpentine belt spins the alternator.
- Power Steering Pump Pulley: This pulley drives the power steering pump, which provides hydraulic assistance to make steering easier.
- Air Conditioning Compressor Pulley: This pulley drives the A/C compressor, responsible for cooling the cabin air.
- Idler Pulley(s): These are smooth pulleys that help guide the belt and maintain proper tension. They don't drive any specific component. The 2013 Outlander has at least one idler.
- Tensioner Pulley: This is a spring-loaded pulley that automatically adjusts to maintain the correct tension on the serpentine belt. This is a critical component. A failing tensioner can cause belt slippage or even belt failure.
Specific to the 2013 Mitsubishi Outlander, you'll want to verify your engine type (2.0L or 2.4L) as the belt routing can differ slightly. The belt length will also vary depending on your specific configuration (with or without AC, etc.). The exact part number for your belt will be listed in your owner's manual or available at your local auto parts store.
Understanding the Diagram Symbols
Serpentine belt diagrams typically use specific symbols and conventions to convey information clearly. Here's a breakdown:
- Solid Lines: Represent the main path of the serpentine belt. Usually shows the outer surface of the belt touching the pulley.
- Dotted Lines: Dotted or dashed lines are less common, but if used, they might indicate the inner surface of the belt against the pulley. This is useful in showing how the belt wraps around complex pulleys.
- Arrows: Show the direction of belt rotation on each pulley. Pay close attention to these! It's easy to misinterpret the routing without considering the direction of rotation.
- Component Labels: Each pulley will be labeled with its corresponding component (e.g., ALT for alternator, P/S for power steering, A/C for air conditioning).
- Tensioner Indicator: The tensioner is usually depicted with a spring symbol to indicate its spring-loaded mechanism. Sometimes an arrow will indicate the direction the tensioner moves to release tension for belt removal.
- Ribbed vs. Smooth Pulleys: The diagram might (or might not) indicate whether a pulley is ribbed (grooved) or smooth. The ribbed side of the belt always runs against a ribbed pulley. The smooth side of the belt goes to a smooth pulley.
Colors are rarely used, but if they are, they are simply used to highlight particular portions of the belt path. Don't rely on color coding.
How the Serpentine Belt System Works
The serpentine belt system is a relatively simple, yet ingenious design. The engine's crankshaft turns, which in turn rotates the crankshaft pulley. The serpentine belt is wrapped tightly around the crankshaft pulley and the pulleys of other engine accessories. As the crankshaft pulley rotates, it drives the serpentine belt, which then spins the other pulleys, powering the alternator, power steering pump, A/C compressor, and sometimes other components like the water pump (though the water pump is typically driven by the timing belt on the Outlander).
The tensioner pulley is crucial because it maintains the correct amount of tension on the belt. Too little tension, and the belt will slip, reducing the efficiency of the accessories and potentially causing damage. Too much tension, and the belt and the components it drives will wear out prematurely.
Real-World Use: Basic Troubleshooting Tips
Here are some common issues you might encounter and how the serpentine belt diagram can help:
- Squealing Noise: A squealing noise, especially when starting the engine or turning the steering wheel, is a common sign of a slipping serpentine belt. Use the diagram to inspect the belt for wear and tear. Also, check the tensioner to ensure it's functioning correctly.
- Cracked or Frayed Belt: Visually inspect the belt for cracks, fraying, or missing chunks. If you find any of these issues, replace the belt immediately. The diagram helps you ensure you're routing the new belt correctly.
- Accessory Failure: If your alternator isn't charging the battery, your power steering isn't working, or your A/C isn't cooling, the serpentine belt could be the culprit. Use the diagram to verify that the belt is properly routed and that the pulleys are spinning when the engine is running.
- Tensioner Problems: A noisy or wobbly tensioner can indicate a failing bearing or spring. Replacing the tensioner is usually a straightforward process, and the diagram will help you locate it and understand its orientation.
Safety Precautions
Working on the serpentine belt system can be dangerous if you don't take proper precautions:
- Disconnect the Battery: Always disconnect the negative battery cable before working on any electrical components, including the alternator. This prevents accidental shorts and electrical shocks.
- Engine Off and Cool: Never work on the serpentine belt system while the engine is running or hot. Wait for the engine to cool down completely to avoid burns.
- Keep Fingers Clear: Be extremely careful when working near the pulleys and belts. Keep your fingers, hair, and clothing away from moving parts.
- Proper Tools: Use the correct tools for the job. A serpentine belt tool can make removing and installing the belt much easier and safer.
- Tensioner Spring: The tensioner spring can be very strong. Use caution when releasing the tension on the belt to avoid injury.
Also be aware that the alternator has a high-voltage output. Even with the battery disconnected, residual voltage can be present. Avoid touching the terminals of the alternator.
By understanding the serpentine belt diagram and following proper safety procedures, you can confidently maintain and repair your 2013 Mitsubishi Outlander's serpentine belt system.
We have the serpentine belt diagram available for download. It contains all the detailed information you need for proper belt routing and component identification. This diagram will be invaluable for any maintenance or repair work you plan to undertake.