2013 Nissan Altima 2.5 Serpentine Belt Diagram
The serpentine belt diagram for a 2013 Nissan Altima 2.5L engine is an invaluable resource for any DIY mechanic or experienced car owner. This diagram is essentially a roadmap for the serpentine belt, illustrating its path around various engine components. Understanding this diagram is crucial for tasks ranging from simple belt replacements to diagnosing more complex engine issues. This article will break down the intricacies of the diagram, empowering you to tackle belt-related repairs and maintenance with confidence.
Purpose of the Serpentine Belt Diagram
Why is this diagram so important? Simply put, the serpentine belt drives numerous vital engine components. If the belt breaks or slips, it can lead to catastrophic failures. The serpentine belt diagram is used for the following:
- Belt Replacement: The most common use. The diagram ensures you route the new belt correctly, avoiding incorrect installations that can damage components.
- Troubleshooting: If you're experiencing squealing noises, a dead battery, or other issues, the diagram helps you visually inspect the belt's condition and identify potential problems with pulleys or accessories.
- Component Diagnosis: When an accessory like the power steering pump or alternator malfunctions, the diagram helps isolate the issue and check belt routing to that specific component.
- Preventative Maintenance: Regularly comparing your belt's routing to the diagram helps spot deviations caused by wear, incorrect repairs, or accidental dislodgement.
- Learning Engine Layout: For those new to working on the 2.5L Altima engine, the diagram provides a visual overview of component placement and their relation to the serpentine belt.
Key Specs and Main Parts of the Serpentine System
The 2013 Nissan Altima 2.5L engine utilizes a single serpentine belt to drive several accessories. Understanding the function of these accessories is key to understanding the entire system:
- Crankshaft Pulley (Crank Pulley): This pulley is directly connected to the engine's crankshaft and provides the rotational force that drives the serpentine belt.
- Alternator: Driven by the serpentine belt, the alternator generates electrical power to charge the battery and run electrical systems.
- Air Conditioning Compressor (A/C Compressor): The A/C compressor, also belt-driven, circulates refrigerant to provide cooling for the vehicle's cabin.
- Power Steering Pump: This pump uses hydraulic pressure, supplied by the serpentine belt, to assist with steering.
- Idler Pulley(s): Smooth, unpowered pulleys that guide the belt and maintain proper tension. They ensure the belt has sufficient wrap around the other pulleys.
- Tensioner Pulley: A spring-loaded pulley that maintains constant tension on the serpentine belt, preventing slippage and ensuring proper operation of the accessories. This is *critical* for proper operation.
- Serpentine Belt: The rubber belt itself, designed with multiple ribs (the "serpentine" aspect) for increased grip and power transfer.
Key Specs: While specific belt length varies slightly by manufacturer, the typical serpentine belt length for the 2013 Nissan Altima 2.5L is around 84 inches. It's always best to use the belt specified for your vehicle based on the VIN to ensure perfect fitment and proper tension.
Understanding the Symbols in the Diagram
Serpentine belt diagrams use various symbols and line styles to convey information concisely. Here's a breakdown:
- Solid Lines: Indicate the path of the front of the serpentine belt. This is the side with the ribs that engage with the pulleys.
- Dashed Lines: Usually indicate the back of the serpentine belt. The back doesn't directly contact the pulleys but shows the belt's overall path behind components.
- Arrows: Indicate the direction of rotation for each pulley. This is vital for ensuring the belt is routed correctly. Pay close attention to which side of the belt (ribbed or smooth) comes in contact with each pulley based on these arrows.
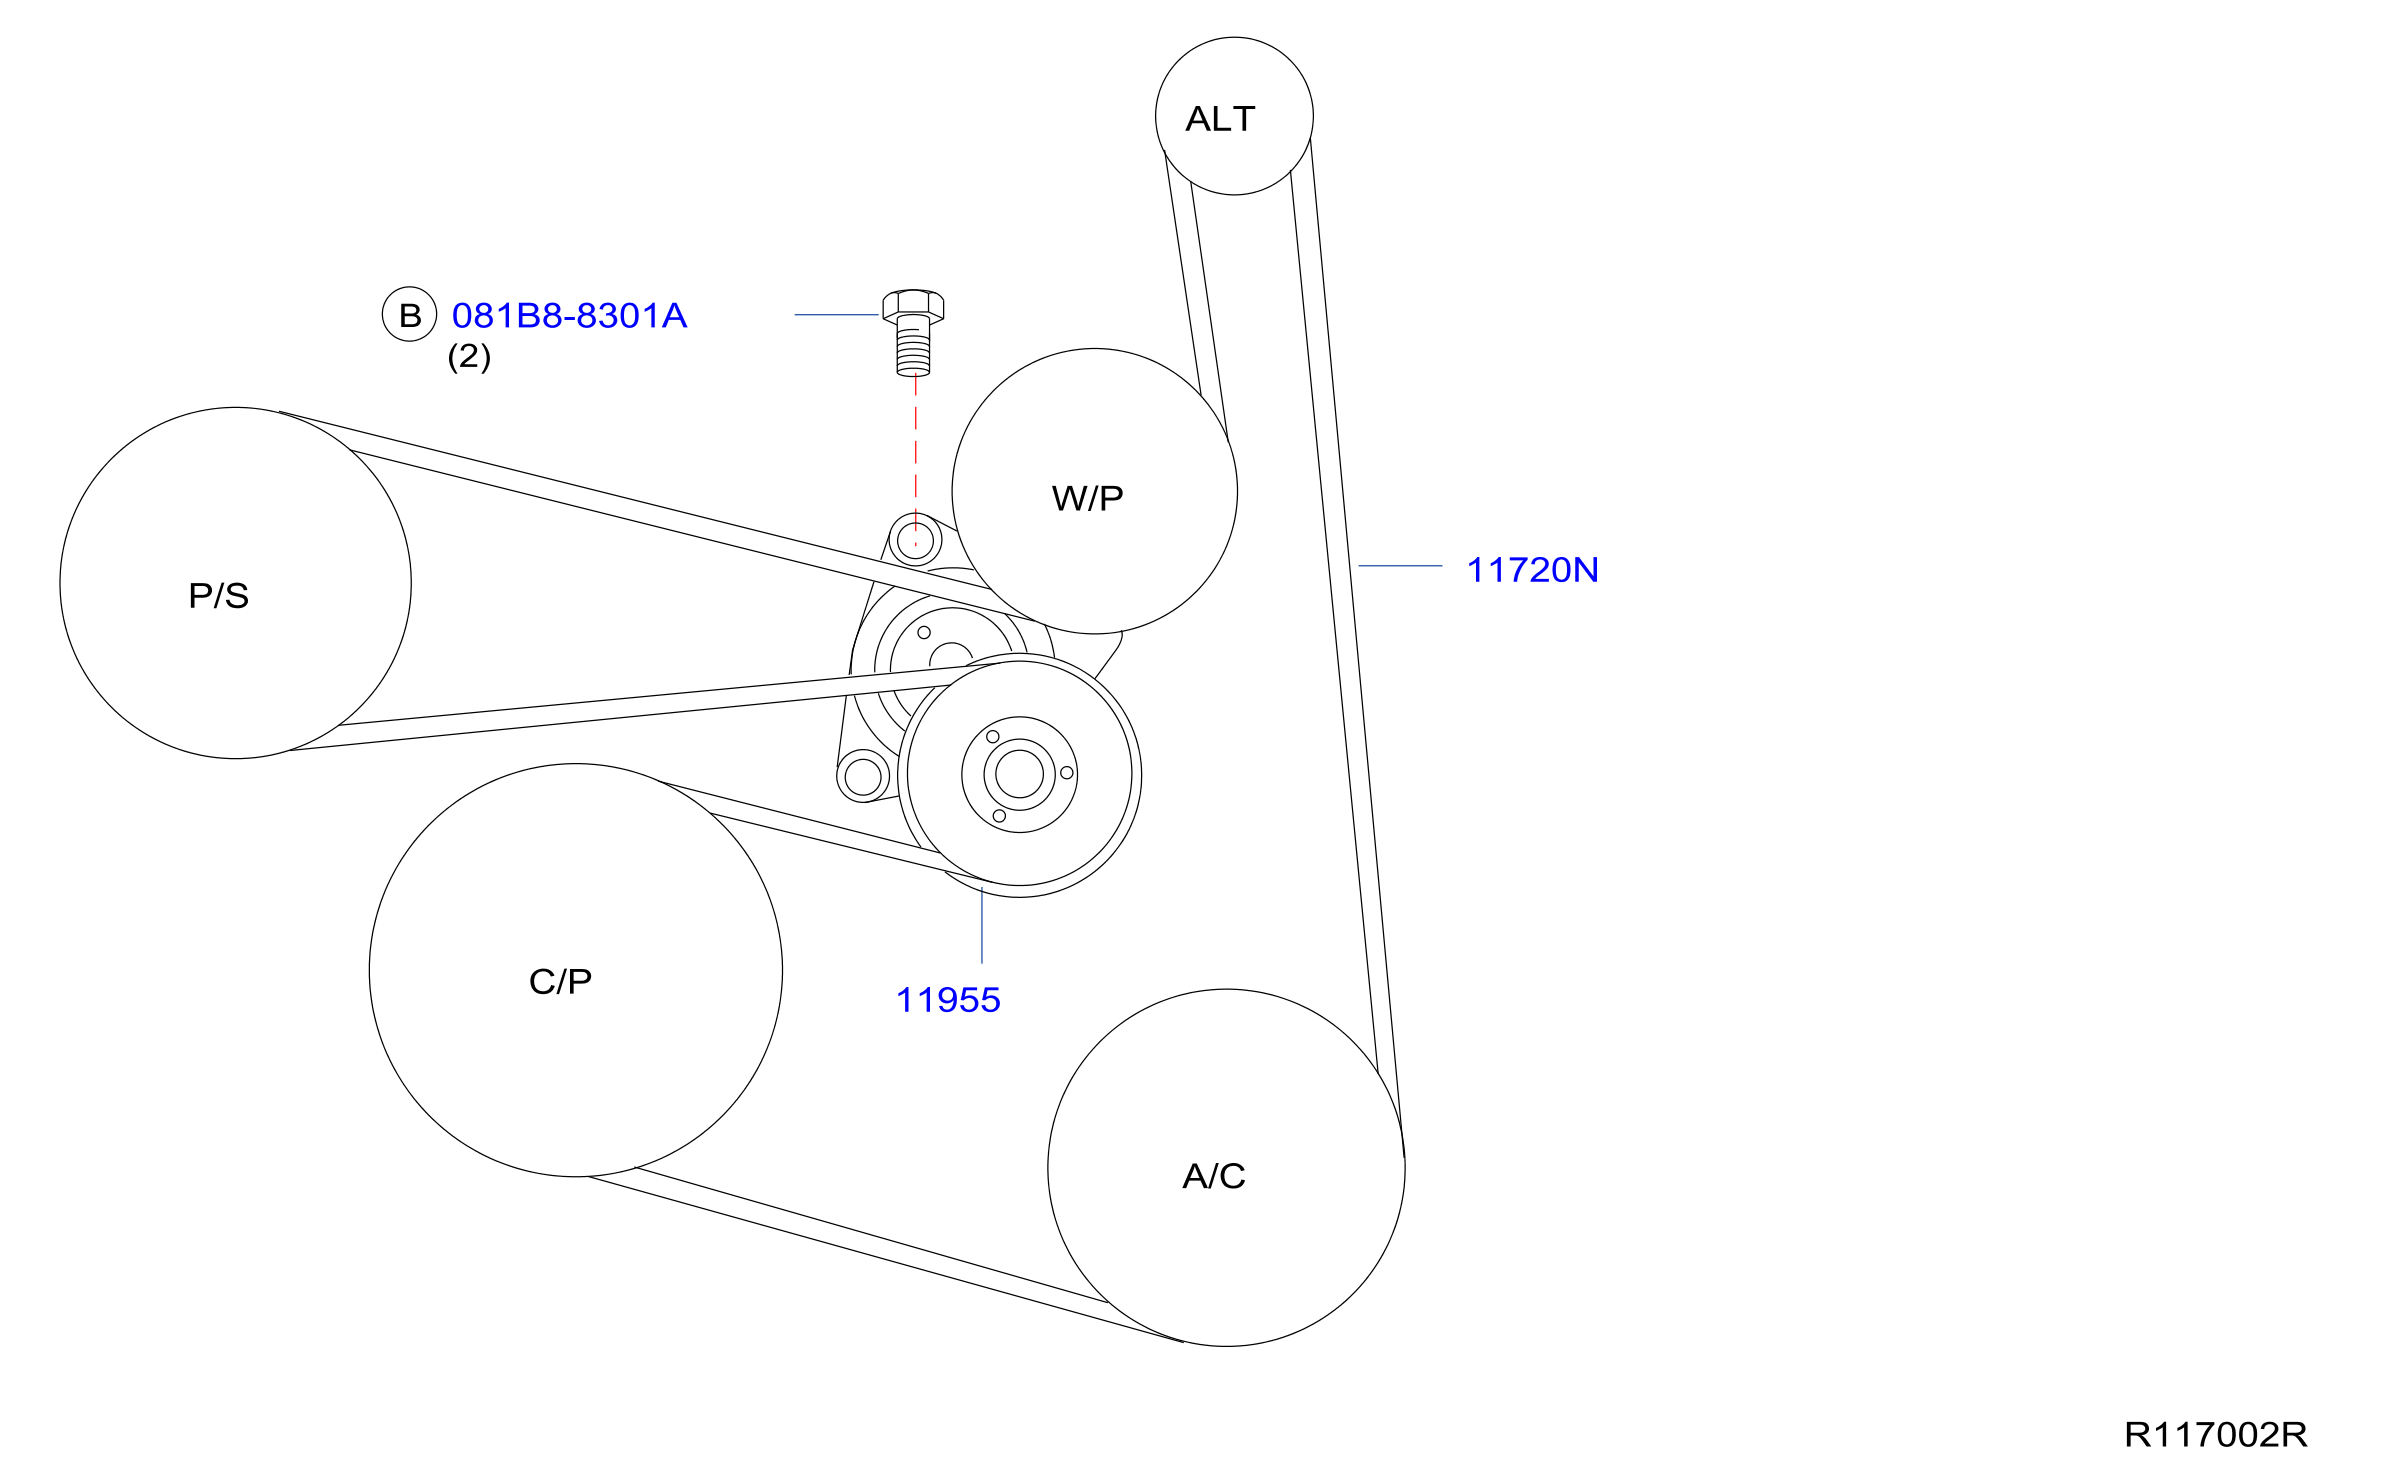
- Pulley Symbols: Represent the different pulleys. They're often labeled with abbreviations (ALT for Alternator, A/C for Air Conditioning, etc.)
- Tensioner Symbol: The tensioner pulley is usually marked with a spring symbol or an arrow indicating the direction of tension release.
How the Serpentine Belt System Works
The serpentine belt system operates on a simple principle: the engine's rotational force is transferred to various accessories via the belt. The crankshaft pulley, driven by the engine, spins the serpentine belt. The belt, in turn, wraps around the pulleys of the alternator, A/C compressor, power steering pump, and idler/tensioner pulleys. As the crankshaft pulley rotates, it drives all these accessories simultaneously. The tensioner pulley maintains consistent pressure on the belt, ensuring proper grip and preventing slippage, which is crucial for the accessories to function correctly.
Real-World Use: Basic Troubleshooting
The serpentine belt diagram is your first line of defense when troubleshooting belt-related issues. Here are a few common scenarios:
- Squealing Noise: Often indicates a slipping belt. Check the belt tension. Use the diagram to visually inspect the belt for cracks, glazing, or fraying. If the belt is worn, replace it. If the belt is in good condition, the tensioner may be weak and need replacing. Also, check for pulley misalignment, which can cause excessive belt wear and noise.
- Dead Battery: Could indicate a faulty alternator. Use the diagram to verify the belt is properly routed around the alternator pulley and that the belt is not slipping. A slipping belt won't properly drive the alternator, preventing it from charging the battery.
- Loss of Power Steering: Check the belt routing to the power steering pump. A broken or slipping belt will prevent the pump from generating hydraulic pressure, making steering difficult.
- A/C Not Working: Verify the belt is properly routed around the A/C compressor pulley. A slipping belt here means the compressor won't function, and the A/C won't cool.
Important Note: Before replacing any components, *always* visually inspect the serpentine belt diagram to ensure you understand the routing and can reinstall the new belt correctly.
Safety Considerations
Working on the serpentine belt system can be hazardous. Here are some critical safety precautions:
- Disconnect the Negative Battery Terminal: Always disconnect the negative battery terminal before working on any electrical components or around the engine. This prevents accidental electrical shorts.
- Engine Off and Cool: Never work on the serpentine belt system with the engine running or hot. Wait for the engine to cool completely to avoid burns.
- Beware of Moving Parts: The serpentine belt and pulleys are fast-moving parts when the engine is running. Keep hands and clothing clear to prevent injury.
- Tensioner Spring: The tensioner pulley has a strong spring. Use the correct tool (usually a serpentine belt tool) to release the tension safely. Improper release can cause injury or damage the tensioner.
- Sharp Edges: Be careful around the engine components, as they may have sharp edges. Wear gloves to protect your hands.
- Eye Protection: Wear safety glasses to protect your eyes from debris.
Working around the crankshaft pulley and alternator are particularly risky. The crankshaft pulley spins at engine speed and can cause serious injury if contacted. The alternator, while generally not dangerous when the engine is off and the battery disconnected, contains electrical components that can be damaged by improper handling. Always refer to the service manual for specific instructions and safety precautions.
By understanding the serpentine belt diagram and following proper safety procedures, you can confidently perform belt replacements and troubleshoot related issues on your 2013 Nissan Altima 2.5L. Remember to always double-check your work and consult a professional mechanic if you are unsure about any step in the process.
We have a high-resolution, printable PDF file of the 2013 Nissan Altima 2.5 Serpentine Belt Diagram. It's a handy resource to have in your garage. This way you can download the diagram to view on your computer or print out for easy reference while you're working on your car.