2013 Nissan Sentra Fuse Box Diagram
The 2013 Nissan Sentra, like any modern vehicle, relies heavily on a network of electrical circuits protected by fuses and relays. Understanding your Sentra's fuse box diagram is crucial for troubleshooting electrical issues, performing aftermarket modifications, and general vehicle maintenance. This guide will walk you through the key components, symbols, and functions associated with the 2013 Sentra fuse box, empowering you to tackle electrical repairs with confidence.
Purpose of Understanding the Fuse Box Diagram
Why bother learning about fuse boxes? The answer is simple: efficiency and cost savings. A blown fuse is a common electrical problem, and being able to diagnose and replace it yourself can save you a trip to the mechanic and prevent potentially more significant electrical damage. Knowing your fuse box layout allows you to:
- Quickly identify and replace blown fuses: This is the most common use.
- Diagnose electrical problems: If a specific circuit isn't working, the fuse box diagram can pinpoint the responsible fuse.
- Install aftermarket accessories safely: Correctly tapping into the electrical system for adding things like a dashcam or aftermarket lighting requires knowing which circuits are appropriate.
- Perform basic electrical troubleshooting: Understanding the system layout is the first step in solving electrical problems.
- Prevent further damage: Replacing a blown fuse with the correct amperage prevents potential fires and damage to other electrical components.
Key Specs and Main Parts of the Fuse Box
The 2013 Nissan Sentra typically has two main fuse box locations:
- Interior Fuse Box: Usually located under the dashboard on the driver's side. Access may require removing a small panel. This box primarily houses fuses for interior systems like the radio, interior lights, power windows, and the cigarette lighter (power outlet).
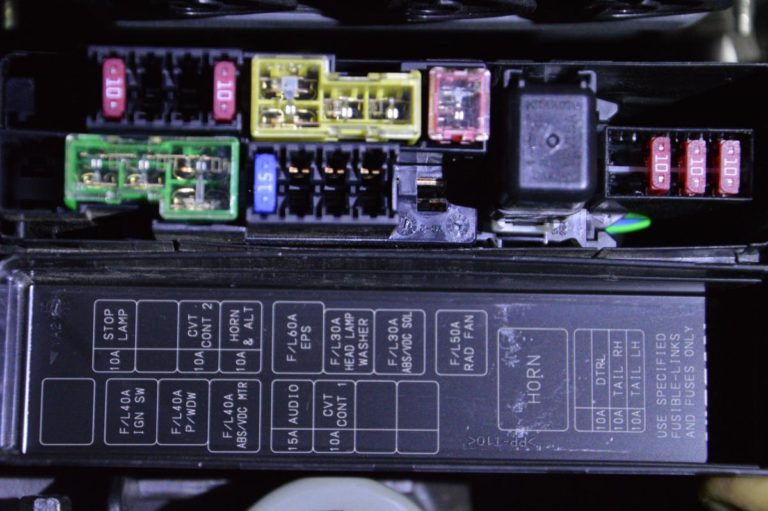
- Engine Compartment Fuse Box: Situated in the engine bay, often near the battery. This box contains fuses and relays for essential engine functions, headlights, air conditioning, and other critical systems.
Main Parts:
- Fuses: These are the sacrificial elements designed to protect the circuit from overcurrent. They come in various amperages (measured in amps, denoted by 'A'), each suited for a specific circuit. Common types in the Sentra include blade fuses (ATO/ATC), mini blade fuses, and occasionally, cartridge fuses. Never replace a fuse with one of a higher amperage rating. This could bypass the safety mechanism and cause a fire.
- Relays: These are electrically operated switches that control higher-current circuits, like the headlights or fuel pump. Relays use a small control circuit to activate a larger power circuit.
- Fuse Puller: A small plastic tool (often integrated into the fuse box cover) used to safely remove fuses without damaging them or your fingers.
- Wiring Harnesses: The bundles of wires that connect the fuse box to the various electrical components throughout the vehicle.
- Bus Bars: Conductive strips within the fuse box that distribute power to the fuses and relays.
Decoding Fuse Box Symbols
Fuse box diagrams use standardized symbols to represent different circuits and components. Understanding these symbols is essential for interpreting the diagram correctly.
- Lines: Lines represent wires connecting the fuses and relays to the various electrical components. Thicker lines usually indicate wires that carry more current.
- Colors: Wire colors are often indicated, either directly on the diagram or in a legend. Common colors include red (power), black (ground), and various colors for specific circuits.
- Icons: Icons represent the component being protected by the fuse. Common icons include:
- Lightbulb: Headlights, taillights, interior lights
- Fan: Radiator fan, blower motor
- Steering wheel: Power steering
- Radio symbol: Audio system
- Square with a wavy line: Heated seats or mirrors
- Numbers/Letters: Each fuse and relay is labeled with a number or letter, corresponding to its position on the diagram and in the fuse box.
- Ampere Rating (A): The amperage rating is usually printed next to the fuse location on the diagram and sometimes directly on the fuse itself.
A typical fuse box diagram will resemble a grid, with each fuse and relay clearly labeled and its corresponding circuit identified. Look for a legend or key on the diagram that explains the symbols and abbreviations used.
How the Fuse Box Works
The fuse box is essentially a central distribution point for electrical power. The battery provides the initial power source. This power is then distributed through the wiring harnesses to the fuse box. Each circuit within the vehicle is protected by a fuse of the appropriate amperage. When an overcurrent occurs (e.g., due to a short circuit or a faulty component), the fuse's internal filament melts, breaking the circuit and preventing damage to the wiring and other components.
Relays act as remote-controlled switches. They allow a low-current circuit (e.g., the switch on your dashboard) to control a high-current circuit (e.g., the headlights). When the control circuit is activated (e.g., you turn on the headlights), the relay closes the contacts in the power circuit, allowing current to flow to the headlights.
Real-World Use: Basic Troubleshooting
Here's a basic troubleshooting scenario:
- Symptom: Your car radio suddenly stops working.
- Check the Fuse Box: Consult the fuse box diagram to identify the fuse responsible for the radio (usually labeled "Radio," "Audio," or similar).
- Inspect the Fuse: Use a fuse puller to remove the fuse. Examine the fuse filament. If the filament is broken or blackened, the fuse is blown.
- Replace the Fuse: Replace the blown fuse with a new fuse of the exact same amperage.
- Test: Turn on the radio. If it works, the problem is solved. If the fuse blows again immediately, there's likely a short circuit in the radio's wiring or within the radio itself. Further diagnostics are needed.
Common Problems & Tips:
- Fuse keeps blowing: This indicates a short circuit or excessive current draw in the circuit. Do not replace the fuse with a higher amperage one. Find the source of the short before replacing the fuse.
- Intermittent problems: Sometimes, a fuse may be loose in its socket, causing intermittent issues. Ensure all fuses are firmly seated.
- Consult the Owner's Manual: Your owner's manual contains the fuse box diagram and provides detailed information about the location and function of each fuse.
- Use a Multimeter: A multimeter can be used to test for continuity across a fuse to confirm whether it's blown.
Safety Considerations
Working with electrical systems can be dangerous. Always disconnect the negative terminal of the battery before working on the fuse box. This will prevent accidental short circuits and potential electrical shocks.
Risky Components:
- High-Amperage Fuses: Fuses with high amperage ratings (e.g., those protecting the main electrical system) can carry a significant amount of current. Avoid touching the terminals of these fuses while the battery is connected.
- Relays Controlling High-Current Circuits: Be cautious when working with relays that control high-current circuits like the fuel pump or headlights. Incorrectly wiring these relays can cause damage or even fire.
- ECM/PCM Fuses: These fuses protect the Engine Control Module (ECM) or Powertrain Control Module (PCM), the brains of the car. Improper handling could damage these sensitive components.
Important Safety Tips:
- Wear Safety Glasses: Protect your eyes from potential sparks or debris.
- Use Insulated Tools: Use tools with insulated handles to prevent electrical shocks.
- Work in a Well-Lit Area: Proper lighting will help you see what you're doing and avoid mistakes.
- If unsure, seek professional help: If you are not comfortable working on the electrical system, consult a qualified mechanic.
Understanding the 2013 Nissan Sentra fuse box diagram is an invaluable skill for any car owner. By following the information provided in this guide, you can confidently diagnose and repair common electrical issues, saving time and money.
We have a copy of the 2013 Nissan Sentra fuse box diagram available for download. Having this readily accessible will greatly assist you in your troubleshooting and repair endeavors. Contact us for access.