2013 Nissan Sentra Serpentine Belt Diagram
So, you're tackling a serpentine belt replacement or maybe just diving deeper into understanding your 2013 Nissan Sentra's engine bay? Excellent! The serpentine belt diagram is your roadmap to success. It's not just a pretty picture; it's crucial for proper belt routing, diagnosing issues, and ensuring all your accessories are spinning happily. Let's break it down.
Purpose: Why You Need This Diagram
The serpentine belt is the unsung hero of your engine, powering vital components. Without it, you're going nowhere fast. The diagram serves several critical purposes:
- Replacement: This is the most common use. A worn or broken belt needs replacing, and the diagram ensures you route the new belt correctly. A misrouted belt can cause serious damage.
- Troubleshooting: Squealing noises, especially after wet weather, can indicate a slipping or misaligned belt. The diagram helps you visually inspect the routing and identify potential issues with pulleys or tensioners.
- Education: Even if you're not planning a replacement, understanding the belt's path and the components it drives gives you a better understanding of your engine's operation.
- Preventative Maintenance: Periodically inspecting the belt and pulleys, guided by the diagram, allows you to catch wear and tear before it leads to a breakdown.
Key Specs and Main Parts
The 2013 Nissan Sentra, depending on the trim level, typically has a 1.8L engine. The serpentine belt itself will have a specific length and rib count. While these can vary, a common belt specification is a 6PKxxxx (where xxxx is the length in millimeters). Always verify the correct part number for your specific vehicle using your VIN.
Here are the key components the serpentine belt drives:
- Crankshaft Pulley: This is the heart of the system, driven directly by the engine. It transfers rotational force to the serpentine belt.
- Alternator: Generates electricity to power your car's electrical system and charge the battery.
- Water Pump: Circulates coolant through the engine to regulate temperature.
- Air Conditioning Compressor: Compresses refrigerant for the air conditioning system.
- Power Steering Pump: Provides hydraulic assistance for steering.
- Tensioner Pulley: Maintains the correct tension on the serpentine belt. This is usually spring-loaded and self-adjusting.
- Idler Pulley(s): Guide the belt around the various components and help maintain optimal wrap angle on the driven pulleys.
Symbols: Deciphering the Diagram
Serpentine belt diagrams usually employ a standard set of symbols:
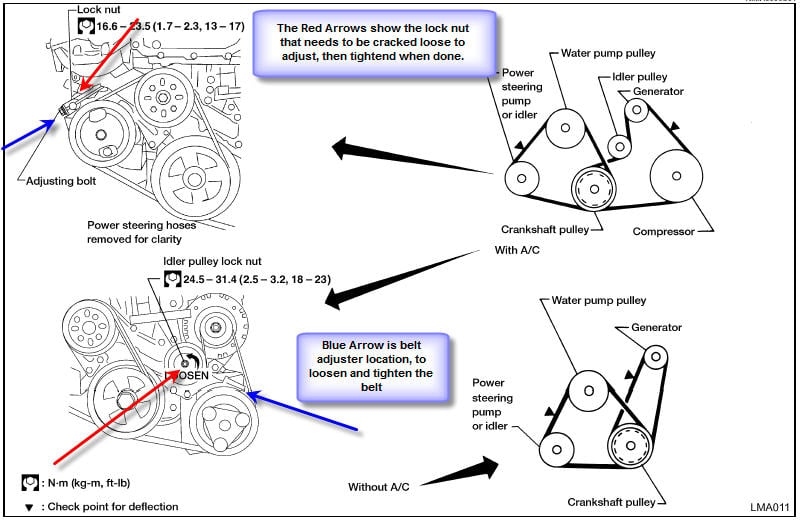
- Solid Lines: Represent the path of the front (ribbed) side of the belt. This is the side that makes contact with the grooved pulleys of the alternator, water pump, AC compressor, power steering pump, and crankshaft.
- Dashed Lines: Represent the path of the back (smooth) side of the belt. This side typically makes contact with the idler pulley and the tensioner pulley.
- Arrows: Indicate the direction of rotation for each pulley. Pay close attention to these, as they confirm the belt is routed correctly.
- Component Icons: Simplified drawings of each component (alternator, water pump, etc.) are used for clarity. These are usually labeled with abbreviations (ALT, WP, AC, PS).
- Tensioner Symbol: The tensioner pulley often has a unique symbol, sometimes resembling a spring or a pulley with an arrow indicating its movement range.
Colors aren't usually standardized on these diagrams, but if present, they might be used to highlight specific sections of the belt path for extra clarity. Always refer to the legend if colors are used.
How It Works
The crankshaft pulley, directly connected to the engine's crankshaft, is the driving force behind the entire system. As the engine spins, the crankshaft pulley rotates, transferring its rotational energy to the serpentine belt. The belt, in turn, wraps around and drives the other pulleys connected to the alternator, water pump, AC compressor, and power steering pump. The tensioner pulley, a critical component, maintains the proper tension on the belt, preventing slippage and ensuring efficient power transfer to all accessories. Without adequate tension, the belt can slip, causing squealing noises, reduced performance from the accessories, and ultimately, potential damage to the engine.
The idler pulley(s) play a crucial role in guiding the belt around the engine, ensuring proper contact (wrap angle) with the driven pulleys. Without sufficient wrap angle, the belt may slip, especially under load. These pulleys are typically smooth and unpowered.
Real-World Use: Basic Troubleshooting
Here are a few common issues and how the serpentine belt diagram can help:
- Squealing Noise: A common sign of a slipping belt. Check the diagram to ensure the belt is routed correctly and that the tensioner is functioning properly. Look for signs of wear, cracks, or glazing on the belt.
- Battery Light On: Could indicate a failing alternator, but first, verify the serpentine belt is properly driving the alternator pulley. A loose or broken belt will prevent the alternator from charging the battery. Use the diagram to confirm the routing.
- Overheating: If the water pump isn't circulating coolant, the engine can overheat. A broken or slipping serpentine belt is a prime suspect. The diagram will show you if the belt is properly connected to the water pump pulley.
- No Power Steering: Obvious, right? If the power steering pump isn't getting power, you'll notice. Again, check the belt and its routing to the power steering pump.
Safety: Risky Components
Working on the serpentine belt system involves inherent risks:
- Moving Parts: The engine must be off and the key removed before working on the serpentine belt system. Even a momentary start of the engine can cause serious injury.
- Hot Engine: Allow the engine to cool completely before working on the belt. Contact with hot engine components can cause burns.
- Tensioner Spring: The tensioner pulley is spring-loaded and can snap back with considerable force. Use the correct tools (usually a wrench or socket on the tensioner arm) to relieve the tension safely. Never try to pry the tensioner back without the proper tool.
- Sharp Edges: Be mindful of sharp edges on pulleys, brackets, and other engine components. Wear gloves to protect your hands.
Before starting any work, disconnect the negative battery terminal. This prevents accidental starting of the engine and reduces the risk of electrical shock.
Understanding the serpentine belt diagram for your 2013 Nissan Sentra is a valuable skill for any DIY mechanic. It empowers you to diagnose problems, perform routine maintenance, and potentially save money on repairs. With careful observation and the right tools, you can confidently tackle serpentine belt-related tasks.
We have the full, high-resolution diagram available for download. It includes all the details discussed above and will be an invaluable resource for your project. Download it and keep it handy!