
2013 Silverado Serpentine Belt Diagram
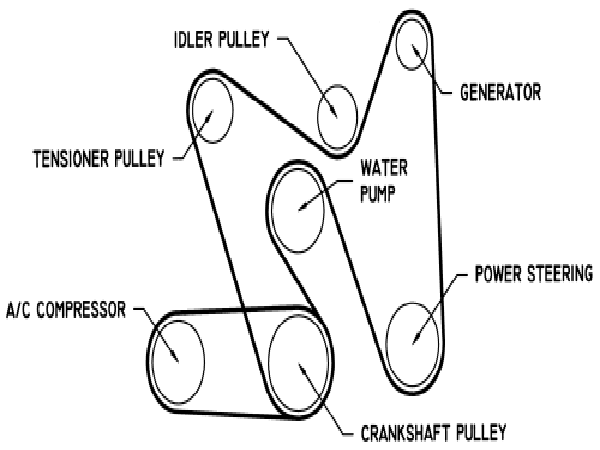
The serpentine belt on your 2013 Silverado is a critical component responsible for powering several essential accessories. Understanding its configuration, routing, and potential issues is crucial for DIY maintenance, repairs, and even just general vehicle awareness. This article provides a comprehensive breakdown of the 2013 Silverado serpentine belt diagram, equipping you with the knowledge to tackle related tasks with confidence.
Purpose of Understanding the Serpentine Belt Diagram
Why bother learning about the serpentine belt diagram? Several reasons make it invaluable:
- Belt Replacement: The most obvious reason. When your belt cracks, frays, or shows signs of wear, you'll need to replace it. The diagram ensures you route the new belt correctly. An incorrectly routed belt will lead to accessory failure and potentially engine damage.
- Troubleshooting: A squealing or slipping belt is a common symptom. The diagram helps you identify the components driven by the belt and narrow down the source of the noise or problem.
- Accessory Replacement: Replacing components like the alternator, power steering pump, or AC compressor often requires removing the serpentine belt. The diagram is essential for proper reinstallation.
- Preventative Maintenance: Regularly inspecting the belt and its routing allows you to identify potential issues early, preventing costly breakdowns.
- General Vehicle Knowledge: Understanding how your vehicle's systems work empowers you as a car owner and improves your ability to communicate with mechanics.
Key Specs and Main Parts in the 2013 Silverado Serpentine Belt System
The 2013 Silverado came with various engine options, primarily the 4.3L V6 (LU3), 4.8L V8 (LY2), 5.3L V8 (LMG/LC9/LY5), and the 6.2L V8 (L9H/L94). Each engine may have a slightly different belt routing, so it's crucial to identify your specific engine before attempting any work.
Main Components:
- Serpentine Belt: The main drive belt, typically made of reinforced rubber. Its length and width vary depending on the engine and accessory configuration.
- Crankshaft Pulley (Harmonic Balancer): Driven directly by the engine, providing the rotational force for the entire system.
- Alternator Pulley: Powers the alternator to charge the battery and run the electrical system.
- Power Steering Pump Pulley: Powers the power steering system for assisted steering.
- Air Conditioning (AC) Compressor Pulley: Powers the AC compressor to cool the cabin.
- Idler Pulleys: Smooth, non-powered pulleys that guide the belt and maintain proper tension. They often have bearings that can wear out and cause noise.
- Tensioner Pulley: A spring-loaded pulley that automatically adjusts belt tension, ensuring optimal performance and preventing slippage. The tensioner is a critical component.
- Water Pump Pulley: (Depending on engine configuration) Drives the water pump, which circulates coolant through the engine to prevent overheating.
Key Specs: While exact belt dimensions vary by engine, knowing your engine code is essential for ordering the correct replacement belt. Look for the engine code on the vehicle identification sticker (often located on the driver's side door jamb) or in your owner's manual. Once you have the engine code, you can easily find the correct belt part number at any auto parts store.
Understanding Serpentine Belt Diagram Symbols
Serpentine belt diagrams use a standardized set of symbols to represent the components and routing of the belt. Here's a breakdown:
- Solid Lines: Represent the front (grooved) side of the serpentine belt. This is the side that makes contact with the pulleys.
- Dashed Lines: Represent the back (smooth) side of the serpentine belt. This side typically contacts idler pulleys and the tensioner pulley.
- Circles: Represent pulleys. The size of the circle doesn't necessarily indicate the pulley's actual size.
- Labels: Each pulley is labeled with its function, such as "ALT" for alternator, "P/S" for power steering, "A/C" for air conditioning, "CRANK" for crankshaft, "IDLER," or "TENSIONER."
- Arrows: Indicate the direction of belt rotation. Follow these arrows carefully when routing the belt.
- Tensioner Symbol: The tensioner is often represented by a pulley with a spring symbol indicating its spring-loaded action.
Color Coding: While not always present, some diagrams use color coding to highlight specific sections or features. Consult the specific diagram for your vehicle to understand its color scheme. Usually, red or orange color used to alert or show the most important components of the serpentine belt system.
How the Serpentine Belt System Works
The serpentine belt system is a cleverly designed setup that efficiently transfers power from the engine to various accessories. The crankshaft pulley, driven directly by the engine, provides the rotational force. The serpentine belt wraps around this pulley and then snakes through the other pulleys, driving each accessory. The tensioner pulley maintains constant tension on the belt, preventing slippage and ensuring optimal performance. Because of the constant tension, special tools might be required for removal and installation.
The "serpentine" name comes from the belt's winding path, which allows it to drive multiple accessories with a single belt. This design is more compact and efficient than older systems that used multiple belts.
Real-World Use: Serpentine Belt Troubleshooting
Here are some common problems and how the serpentine belt diagram can help:
- Squealing Belt: This is often caused by a loose belt, a glazed belt surface, or a failing pulley bearing. Check the tensioner to ensure it's applying adequate pressure. Inspect the belt for cracks, glazing, or missing ribs. Spin each pulley by hand to check for bearing noise or roughness. Refer to the diagram to identify all pulleys in the system.
- Slipping Belt: A slipping belt can cause reduced performance of the accessories, such as weak power steering or poor AC cooling. Look for signs of belt wear, such as missing ribs or a stretched belt. Verify the tensioner is functioning correctly.
- Belt Breaking: A broken belt is a serious problem that will disable several essential vehicle systems. Inspect the belt regularly for wear and tear. Replace the belt proactively based on mileage or visual inspection.
- Accessory Failure: If an accessory stops working, such as the alternator failing to charge the battery, the serpentine belt diagram can help you verify that the belt is properly routed and driving the affected accessory.
Basic Troubleshooting Steps:
- Visual Inspection: Start by visually inspecting the belt for cracks, fraying, glazing, or missing ribs. Also, look for signs of misalignment or pulley damage.
- Tensioner Check: Verify the tensioner is moving freely and applying adequate tension. A worn tensioner spring can cause belt slippage.
- Pulley Inspection: Spin each pulley by hand to check for bearing noise, roughness, or wobble. Replace any pulleys that are damaged or noisy.
- Belt Alignment: Use a straight edge or laser alignment tool to ensure all pulleys are properly aligned. Misalignment can cause premature belt wear and noise.
Safety Considerations
Working on the serpentine belt system can be hazardous. Always disconnect the negative battery cable before starting any work. Be extremely cautious when working around the engine, as it may be hot. Keep your hands and clothing away from moving parts. The most dangerous component is the tensioner; it is spring loaded and can cause injury if released improperly. Use appropriate tools and techniques to relieve tension on the belt before attempting to remove it.
Warning: Do not start the engine with the serpentine belt removed. This can damage the engine and other components. Always reinstall the belt correctly before starting the engine.
With this comprehensive understanding of the 2013 Silverado serpentine belt diagram, you're well-equipped to tackle common maintenance and repair tasks. Remember safety is paramount, and if you're unsure about any procedure, it's always best to consult a qualified mechanic.
We have a high-resolution, printable file of the 2013 Silverado serpentine belt diagram available for download. Contact us for access to the file, and be sure to specify your engine type to ensure you receive the correct diagram.