2013 Subaru Outback Serpentine Belt Diagram
The serpentine belt, also known as an accessory drive belt or a multi-vee belt, is a critical component in your 2013 Subaru Outback. Understanding its layout and condition is essential for routine maintenance, troubleshooting, and avoiding costly repairs. This article will serve as your comprehensive guide to the 2013 Subaru Outback serpentine belt diagram, enabling you to diagnose issues and perform basic maintenance with confidence.
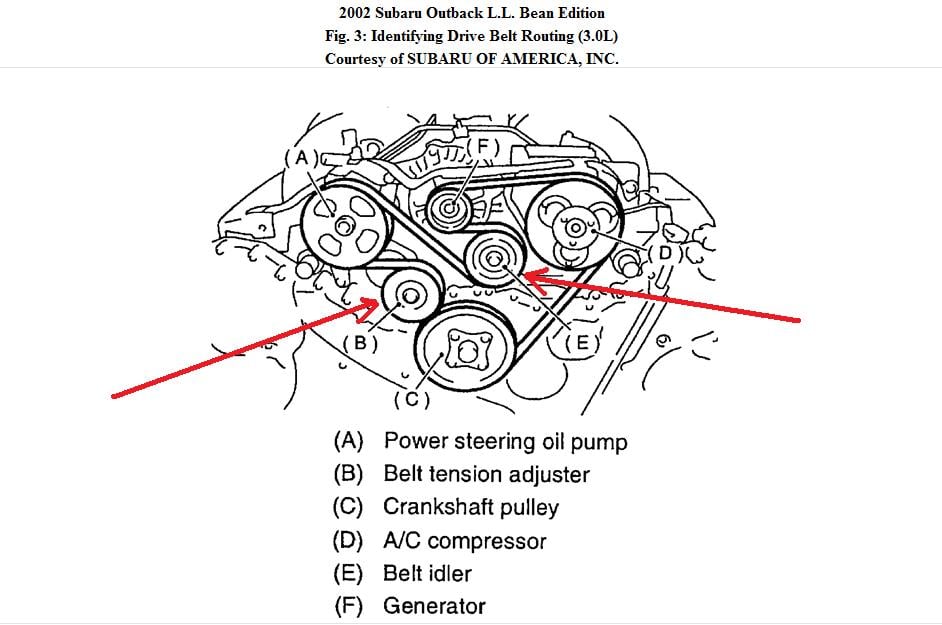
Purpose of the Serpentine Belt Diagram
A serpentine belt diagram is more than just a visual aid; it's a roadmap for the accessory drive system. Its purpose is multifaceted:
- Replacement Guide: The diagram clearly shows the belt's routing, vital when replacing a worn or broken belt. Improper routing can lead to component damage and system failure.
- Troubleshooting: By referencing the diagram, you can identify potential issues. For instance, a squealing belt might be due to a failing idler pulley or tensioner, both of which are clearly indicated on the diagram.
- Preventative Maintenance: Regularly inspecting the belt's condition and verifying proper alignment with the diagram allows for proactive maintenance, preventing unexpected breakdowns.
- Understanding the System: Even if you're not planning to perform the work yourself, understanding the layout of the serpentine belt system gives you a better grasp of your vehicle's mechanics and allows you to communicate more effectively with your mechanic.
Key Specs and Main Parts
The 2013 Subaru Outback typically uses a single serpentine belt to drive several key engine accessories. While the exact belt length may vary slightly depending on the specific engine (2.5L or 3.6L), it's crucial to use the correct replacement belt specified for your vehicle. Consult your owner's manual or a reputable parts supplier to confirm the correct part number.
Here are the main components typically found in the 2013 Subaru Outback's serpentine belt system, all identifiable in the diagram:
- Crankshaft Pulley: This pulley is connected directly to the engine's crankshaft and provides the rotational power that drives the belt.
- Alternator Pulley: The alternator generates electricity to power the vehicle's electrical system and charge the battery. The serpentine belt drives the alternator.
- Power Steering Pump Pulley: This pulley drives the power steering pump, which provides hydraulic assistance for steering.
- Air Conditioning Compressor Pulley: The A/C compressor circulates refrigerant to cool the cabin. The serpentine belt powers this compressor.
- Idler Pulley(s): These pulleys provide additional belt routing and support, preventing belt vibration and ensuring proper tension distribution. They have no internal working components other than a bearing.
- Tensioner Pulley: The tensioner pulley maintains the correct tension on the serpentine belt. It typically incorporates a spring-loaded arm or hydraulic mechanism. A properly functioning tensioner is critical to belt life and accessory performance.
Symbols and Diagram Conventions
Serpentine belt diagrams use specific conventions to convey information clearly. Understanding these conventions is essential for accurate interpretation:
- Solid Lines: Represent the path of the serpentine belt itself. The thickness of the line can sometimes indicate the belt's relative position (e.g., a thicker line might represent the belt on the visible side of the pulley).
- Dotted or Dashed Lines: Often used to indicate the belt's path behind other components or pulleys, providing a complete visual representation of the routing.
- Arrows: Show the direction of belt rotation around each pulley. This is crucial for ensuring proper routing during replacement.
- Icons: Symbols may represent each component, such as an alternator icon or an A/C compressor icon. These symbols are often labeled with abbreviations (e.g., ALT for alternator, A/C for air conditioning).
- Color Coding (Sometimes): While less common, some diagrams might use color coding to differentiate sections of the belt or highlight specific components. Consult the diagram's key or legend for interpretation.
How It Works
The serpentine belt system is a closed-loop system driven by the engine's crankshaft. The crankshaft pulley acts as the primary driver, transferring rotational energy to the serpentine belt. This belt then wraps around and drives the pulleys of the various engine accessories, such as the alternator, power steering pump, and A/C compressor.
The tensioner pulley plays a crucial role in maintaining the correct belt tension. Insufficient tension can lead to belt slippage, resulting in reduced accessory performance (e.g., weak alternator output, poor power steering). Excessive tension, on the other hand, can prematurely wear the belt and strain the accessory bearings.
The idler pulleys guide and support the belt, ensuring proper alignment and preventing excessive vibration. Without idler pulleys, the belt might rub against other components or become misaligned, leading to premature wear and potential failure.
Real-World Use: Basic Troubleshooting Tips
Here are some common issues related to the serpentine belt system and how the diagram can help you troubleshoot them:
- Squealing Belt: A squealing belt is often caused by slippage due to insufficient tension or a worn belt. Check the tensioner pulley's operation. If it's moving excessively or making noise, it may need replacement. Also, inspect the belt for cracks, glazing, or missing ribs. The diagram helps you quickly locate the tensioner and idler pulleys for inspection.
- Accessory Failure: If an accessory (e.g., alternator, power steering pump) stops working, first confirm that the serpentine belt is intact and properly routed. The diagram ensures you haven't missed a critical routing point. Also, check if the accessory pulley is spinning freely. A seized pulley can cause the belt to break or slip.
- Belt Damage: Regularly inspect the belt for signs of wear, such as cracks, fraying, or missing ribs. Use the diagram to ensure the belt is properly aligned and not rubbing against any other components. Misalignment can cause rapid belt wear.
- Battery Light On: Check the routing of the serpentine belt to the alternator. A loose or broken belt might not be adequately turning the alternator, thus causing a low charge output.
Safety Considerations
Working on the serpentine belt system involves inherent risks. Always disconnect the negative battery terminal before starting any work to prevent electrical shock. Be extremely cautious around the rotating engine components. Never put your hands or tools near the belt or pulleys while the engine is running.
The tensioner pulley stores a significant amount of spring tension. When releasing the tensioner to remove the belt, use the correct tools and techniques to avoid injury. Refer to your service manual for specific instructions. It is usually recommended to use a serpentine belt tool when releasing the tension on the belt.
Certain engine components, especially the exhaust manifold, can become extremely hot. Allow the engine to cool completely before working in the engine bay to prevent burns.
Remember to always wear appropriate safety gear, including eye protection and gloves, when working on your vehicle.
We have the 2013 Subaru Outback serpentine belt diagram available for download. This detailed diagram will provide you with a visual reference for belt routing, component identification, and troubleshooting. Using this resource alongside this article will empower you to confidently tackle serpentine belt-related maintenance and repairs on your Subaru Outback.