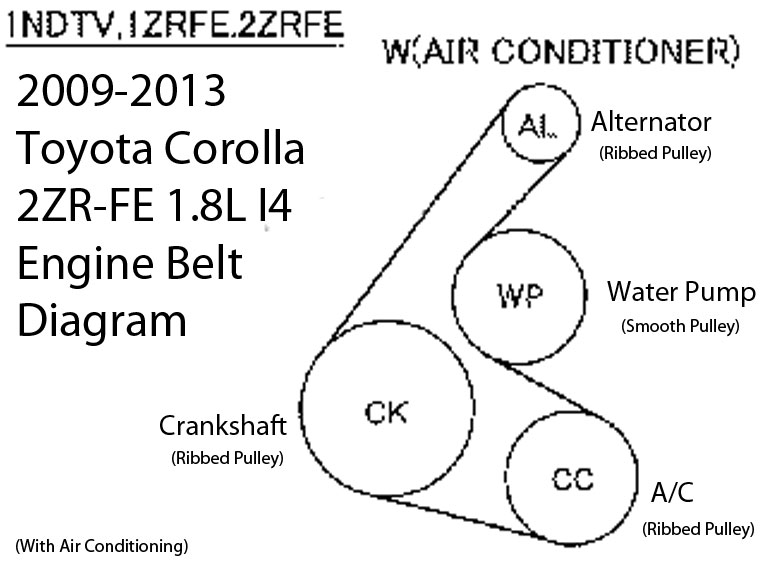
2013 Toyota Corolla Serpentine Belt Diagram
Let's dive into the serpentine belt system of the 2013 Toyota Corolla. This guide is for those of you who like to get your hands dirty, whether you're tackling a routine maintenance task, diagnosing a squealing belt, or just expanding your automotive knowledge. We'll break down the serpentine belt diagram for this model year, covering its purpose, key components, and practical troubleshooting tips.
Purpose of the Serpentine Belt Diagram
The serpentine belt diagram is your roadmap to understanding the drive belt system of your 2013 Corolla. It's indispensable for:
- Replacement: Replacing a worn or broken belt requires knowing the exact routing. Installing it incorrectly can lead to serious damage.
- Diagnosis: Identifying which accessory is causing a problem (e.g., alternator not charging, power steering not working) often starts with visually inspecting the belt and its path.
- Maintenance: Understanding the belt's routing helps in properly inspecting it for wear, cracks, or glazing.
- Learning: Familiarizing yourself with the engine's layout and accessory drive system.
Essentially, the diagram provides a clear visual representation of how the serpentine belt weaves its way around various engine components. It eliminates guesswork and ensures proper installation and troubleshooting.
Key Specs and Main Parts
The 2013 Corolla uses a single serpentine belt to drive multiple accessories. Here are the critical components involved:
- Crankshaft Pulley (or Damper): This is the primary driver, connected directly to the engine's crankshaft. The belt wraps around this pulley, transferring the engine's rotational force to the other accessories.
- Alternator Pulley: The alternator generates electricity to power the car's electrical system and charge the battery. The belt drives the alternator pulley.
- Power Steering Pump Pulley: This pulley drives the power steering pump, which provides hydraulic assistance to make steering easier.
- Air Conditioning Compressor Pulley: This pulley drives the AC compressor, which circulates refrigerant to cool the cabin.
- Water Pump Pulley: Some 2013 Corolla engines (depending on specific sub-model) may have the water pump driven by the serpentine belt. The water pump circulates coolant to regulate engine temperature. However, many Corollas use an electric water pump and therefore will not have it as part of the serpentine belt system. Always consult the correct diagram for your engine!
- Tensioner Pulley: This spring-loaded pulley applies the necessary tension to the belt, ensuring proper grip and preventing slippage. It’s critical for the system's operation.
- Idler Pulley: Some diagrams include idler pulleys. These are smooth pulleys that guide the belt's path around other components or provide additional wrap on other pulleys.
The belt itself is typically made of reinforced rubber, designed to withstand high temperatures and constant flexing. The specific belt length and width will vary depending on the engine configuration. Refer to your vehicle's repair manual or parts catalog to determine the correct belt for your 2013 Corolla.
Symbols and Diagram Interpretation
Understanding the symbols on the diagram is crucial for correct interpretation. Here’s a breakdown of common symbols:
- Solid Lines: These indicate the direct path of the serpentine belt. Follow them precisely when installing or inspecting the belt.
- Dashed Lines: These typically represent the hidden portion of the belt, indicating where it runs behind other components.
- Arrows: Arrows show the direction of belt rotation. This helps understand how each pulley drives the next.
- Component Icons: Each component (alternator, power steering pump, etc.) is usually represented by a simplified icon.
- Pulley Labels: Each pulley is labeled with its function (e.g., "ALT" for alternator, "P/S" for power steering).
- Tensioner Direction: The diagram will also show the direction the tensioner moves when releasing tension for belt removal/installation. This usually involves inserting a wrench or socket into the tensioner and rotating it against the spring pressure.
The diagram may also use color coding in some versions, though this isn't universal. A specific color might highlight the main belt path or differentiate between different belt sections. Always refer to the legend or key accompanying the diagram to understand the color coding.
How It Works
The serpentine belt system works by transferring the rotational energy from the engine's crankshaft to various accessories. The crankshaft pulley, being directly connected to the engine, spins whenever the engine is running. The serpentine belt, wrapped tightly around this pulley, is driven by its rotation.
As the crankshaft pulley turns, it forces the serpentine belt to move. This, in turn, rotates the pulleys of the other accessories (alternator, power steering pump, AC compressor, etc.). The tensioner pulley maintains the correct belt tension, preventing slippage and ensuring efficient power transfer.
If the belt is loose or worn, it can slip on the pulleys, leading to reduced performance or failure of the accessories. For example, a slipping alternator belt can cause the battery not to charge properly, while a slipping power steering belt can make steering difficult.
Real-World Use – Basic Troubleshooting
Here are some basic troubleshooting tips using the serpentine belt diagram:
- Squealing Noise: A common symptom of a loose or worn belt. Check the belt tension and look for signs of wear (cracks, glazing) on the belt itself. Use the diagram to ensure the belt is correctly routed and the tensioner is functioning properly.
- Accessory Failure: If your alternator, power steering, or AC isn't working, inspect the belt for breaks or slippage. Use the diagram to verify that the belt is correctly routed around the pulley for the malfunctioning accessory.
- Belt Wear: Regularly inspect the belt for cracks, fraying, or glazing (a shiny, hardened surface). Replace the belt if any of these conditions are present. The diagram helps you identify all the sections of the belt that need inspection.
- Tensioner Inspection: Check the tensioner for smooth operation. It should move freely (within its design range) and maintain consistent tension on the belt. A faulty tensioner can cause belt slippage or premature wear.
Always consult your vehicle's repair manual for specific troubleshooting procedures and torque specifications.
Safety Considerations
Working around the serpentine belt system involves potential hazards. Remember these safety precautions:
- Engine Off: Always work on the serpentine belt system with the engine OFF and the key removed from the ignition.
- Cool Engine: Allow the engine to cool down completely before working on the system. Components can get extremely hot.
- Battery Disconnect: Consider disconnecting the negative battery terminal to prevent accidental starting.
- Moving Parts: Be extremely careful around moving parts. Keep your hands and clothing clear of the belt and pulleys when the engine is running. The tensioner pulley can snap with considerable force if released improperly.
- Proper Tools: Use the correct tools for the job, including a belt tensioner tool for releasing belt tension.
Never attempt to adjust or repair the serpentine belt system while the engine is running.
We have a copy of the 2013 Toyota Corolla Serpentine Belt Diagram available for you to download. Having this diagram on hand will undoubtedly assist you in diagnosing and rectifying any issues with your serpentine belt system. Remember to always prioritize safety, consult the diagram for correct routing, and don't hesitate to seek professional assistance if needed.