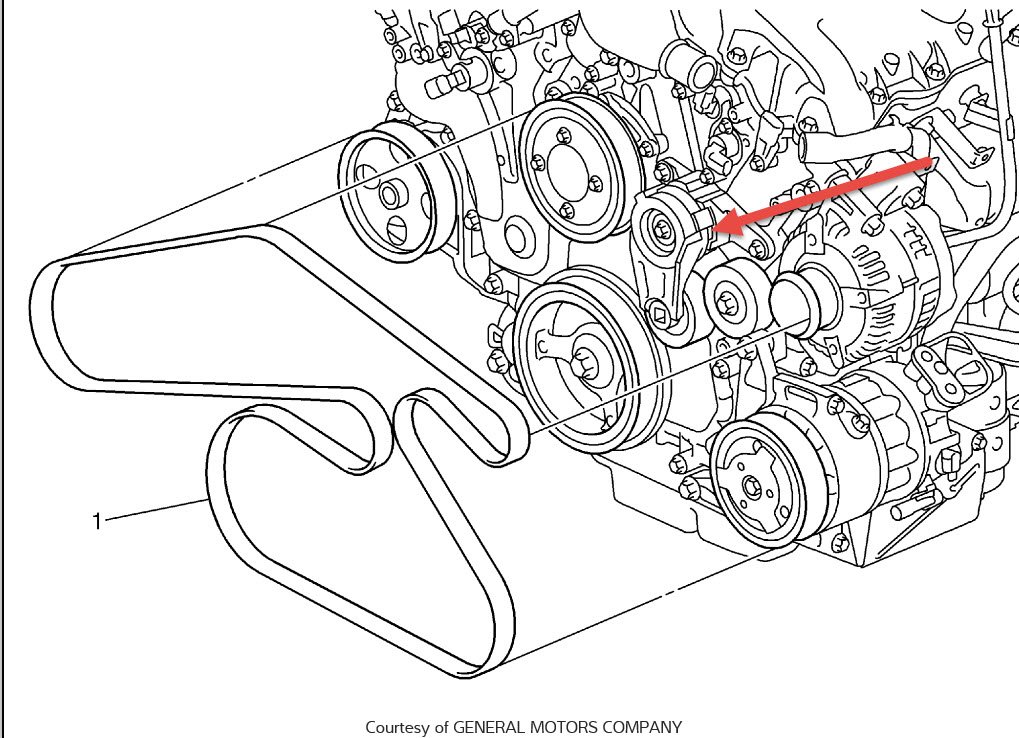
2014 Chevy Captiva Serpentine Belt Diagram
The serpentine belt in your 2014 Chevrolet Captiva is a critical component, responsible for driving several vital engine accessories. Having access to and understanding the serpentine belt diagram is invaluable for maintenance, troubleshooting, and repairs. This article will break down the 2014 Captiva serpentine belt diagram, equipping you with the knowledge to confidently tackle related tasks.
Purpose of the Serpentine Belt Diagram
Why should you care about a serpentine belt diagram? Several reasons:
- Repair and Replacement: The most common reason. When the belt breaks or shows signs of wear, you need to know the correct routing for the new belt. An incorrect installation can lead to accessory failure or even engine damage.
- Troubleshooting: Squealing noises often indicate a worn, loose, or misaligned serpentine belt. The diagram helps you visually inspect the belt's path and identify potential issues like seized pulleys.
- Preventive Maintenance: Regularly inspecting the belt for cracks, fraying, or glazing is crucial. Knowing the belt's routing makes this inspection easier and more thorough.
- Understanding Engine Layout: For the mechanically inclined, understanding the serpentine belt system provides a better grasp of how the engine accessories are driven and interrelated.
Key Specs and Main Parts
Before diving into the diagram itself, let's define the key components of the serpentine belt system on a 2014 Chevy Captiva. This will help you identify them on the diagram and in the engine bay.
- Serpentine Belt: The heart of the system. This single, long belt transmits power from the crankshaft to various accessories.
- Crankshaft Pulley (or Damper): Attached to the crankshaft, this pulley is the driving force of the system. Its rotation, driven by the engine, turns the serpentine belt.
- Alternator Pulley: The alternator generates electrical power for the vehicle. The serpentine belt drives the alternator to keep the battery charged and power electrical systems.
- Power Steering Pump Pulley: This pulley drives the power steering pump, which provides hydraulic assistance to make steering easier.
- Air Conditioning Compressor Pulley: The A/C compressor circulates refrigerant to cool the cabin. The serpentine belt powers this compressor.
- Idler Pulley(s): Smooth, non-driven pulleys that guide the serpentine belt and maintain proper tension and routing. They help prevent belt slippage and ensure optimal contact with the driven pulleys.
- Tensioner Pulley: A spring-loaded pulley that automatically adjusts the belt tension. Maintaining proper tension is vital for the system's performance and belt longevity. A worn tensioner can cause belt slippage, noise, and premature belt failure.
The 2014 Captiva typically uses a 6-rib or 7-rib serpentine belt depending on the engine (2.4L or 3.0L). The belt length will also vary depending on the engine and the presence of specific accessories. Always refer to the diagram or the manufacturer's specifications when replacing the belt.
Symbols and Diagram Interpretation
Serpentine belt diagrams use specific symbols to represent different components and their relationships. Understanding these symbols is crucial for accurate interpretation.
- Solid Lines: Typically represent the serpentine belt itself. The line indicates the belt's path as it wraps around the pulleys.
- Dotted Lines: May represent the *slack* side of the belt, or a path behind other components. Sometimes, they indicate alternative routing depending on vehicle options.
- Circles: Represent pulleys. The size and markings within the circle may indicate the type of pulley (e.g., ribbed for driven pulleys, smooth for idler pulleys).
- Arrows: Show the direction of rotation of the pulleys and the belt's movement. Pay close attention to these arrows to ensure proper belt routing. Incorrect routing will cause accessories to turn in the wrong direction or not turn at all.
- Component Labels: Each pulley will be labeled with an abbreviation identifying the component it drives (e.g., ALT for alternator, P/S for power steering, A/C for air conditioning, CRANK for crankshaft, TENSIONER, IDLER).
Color-coding, while not always present, can be used to differentiate between different belt paths or to highlight specific components. If the diagram is color-coded, a legend will explain the meaning of each color.
How It Works
The serpentine belt system is relatively simple in principle. The crankshaft pulley, driven by the engine's rotation, imparts rotational force to the serpentine belt. The belt then wraps around and drives the other pulleys, each connected to a specific accessory.
The tensioner pulley plays a critical role in maintaining proper belt tension. It automatically adjusts for belt stretch and wear, ensuring that the belt remains tight enough to prevent slippage and maintain efficient power transfer to the accessories. Without proper tension, the belt will slip, resulting in reduced accessory performance (e.g., weak A/C, poor power steering) and a squealing noise.
The idler pulleys, strategically placed, guide the belt along the optimal path, maximizing contact area with the driven pulleys and preventing the belt from rubbing against other components.
Real-World Use: Basic Troubleshooting Tips
Here are some practical troubleshooting tips using the serpentine belt diagram:
- Squealing Noise: A common symptom of a slipping belt. Check the belt tensioner. If the tensioner arm is bouncing excessively, the tensioner may be failing. Also inspect the belt for glazing (a shiny, hardened surface) indicating slippage. Look at each of the pulleys as well and ensure they spin freely. A frozen or failing pulley can cause a belt to squeal even when a tensioner is still functional.
- Cracked or Frayed Belt: Indicates wear and tear. Replace the belt immediately. Refer to the diagram to ensure correct routing.
- Accessory Malfunction: If a specific accessory (e.g., alternator, A/C compressor) is not functioning properly, check the serpentine belt to ensure it is properly routed and tensioned. A broken or slipping belt can prevent the accessory from being driven.
- Visual Inspection: Use the diagram as a guide to visually inspect the entire belt path. Look for signs of misalignment, rubbing, or damage. Compare the actual belt routing to the diagram to ensure it is correct.
Safety Considerations
Working on the serpentine belt system can be dangerous. Observe the following precautions:
- Disconnect the Battery: Disconnect the negative battery terminal before working on the system to prevent accidental electrical shocks.
- Engine Temperature: Ensure the engine is cool before working on the serpentine belt. Hot engine components can cause burns.
- Moving Parts: Keep hands and tools clear of the serpentine belt and pulleys while the engine is running. *A spinning serpentine belt can cause serious injury.*
- Spring-Loaded Tensioner: The tensioner pulley is spring-loaded and can snap back forcefully when released. Use the correct tools to relieve tension and prevent injury.
- Eye Protection: Wear safety glasses to protect your eyes from debris.
The alternator is a high-voltage component even after the engine is turned off. Allow time for the capacitors to discharge before handling any electrical connections.
We have the 2014 Chevy Captiva Serpentine Belt Diagram available for download. This detailed diagram will be an invaluable resource when working on your vehicle's serpentine belt system.