
2014 Chevy Cruze Cooling System Diagram
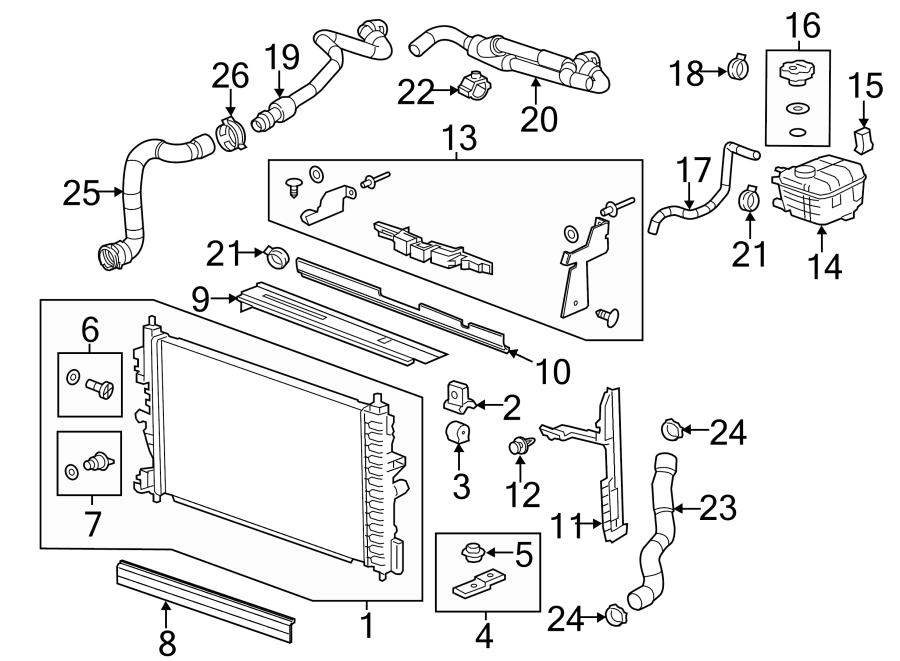
Welcome, fellow gearheads! Today, we're diving deep into the circulatory system of your 2014 Chevy Cruze: the cooling system. Understanding how this system works is crucial for keeping your engine running smoothly, preventing catastrophic damage, and even improving its lifespan. This article provides a comprehensive guide, allowing you to understand the cooling system diagram, diagnose common issues, and confidently tackle related repairs or modifications.
Why a Cooling System Diagram Matters
Think of a cooling system diagram as a roadmap for your engine's thermal management. It's not just some abstract drawing; it's a vital tool for several reasons:
- Troubleshooting: When your Cruze overheats, a diagram helps you trace the flow of coolant and pinpoint potential blockages, leaks, or faulty components.
- Repairs: Replacing a water pump, thermostat, or radiator hose becomes significantly easier when you understand their location and relationship to other parts.
- Modifications: If you're considering upgrades like a larger radiator or an auxiliary cooler, a diagram provides the foundation for planning and executing the modifications safely and effectively.
- Preventive Maintenance: Knowing the system's layout enables you to perform more thorough inspections, catching potential problems before they lead to breakdowns.
- Education: Simply understanding how the cooling system functions enhances your overall automotive knowledge.
Key Specs and Main Parts of the 2014 Cruze Cooling System
Let's break down the core components and their roles in the 2014 Chevy Cruze's cooling system. We'll primarily focus on the 1.4L turbo engine, as it's the most common configuration, but many principles apply to other engine variants as well.
- Engine Block: The heart of the matter. Coolant passages are cast directly into the engine block to absorb heat generated by combustion.
- Radiator: A heat exchanger that dissipates heat from the coolant into the atmosphere. It consists of a core with fins to maximize surface area, and tanks on either side to hold the coolant. Coolant flows through the radiator core.
- Radiator Cap: Maintains system pressure and releases excess pressure to the overflow tank. The pressure increases the boiling point of the coolant, preventing it from boiling over at higher temperatures. Typical pressure rating is around 15-18 PSI.
- Thermostat: A temperature-sensitive valve that regulates coolant flow to the radiator. It remains closed when the engine is cold, allowing it to warm up quickly. Once the engine reaches operating temperature (typically around 195-220°F or 90-104°C), the thermostat opens, allowing coolant to circulate through the radiator.
- Water Pump: A centrifugal pump driven by the engine's serpentine belt. It circulates coolant throughout the system. A failing water pump is a common cause of overheating.
- Coolant Reservoir (Overflow Tank): An expansion tank that allows coolant to expand as it heats up and contract as it cools down. This prevents air from entering the system.
- Hoses: Flexible conduits that connect various components, carrying coolant throughout the system. Upper and lower radiator hoses are the most prominent.
- Cooling Fan: An electric fan that draws air through the radiator when the vehicle is stationary or moving slowly. It's controlled by the engine control unit (ECU) based on coolant temperature.
- Coolant Temperature Sensor (CTS): A sensor that monitors coolant temperature and sends this information to the ECU. The ECU uses this information to control the cooling fan, adjust fuel injection, and display the temperature gauge on the instrument panel.
Decoding the Symbols in the Cooling System Diagram
A cooling system diagram uses a standardized set of symbols to represent different components and fluid paths. Understanding these symbols is essential for interpreting the diagram correctly.
- Solid Lines: Typically represent coolant hoses or pipes. Thicker lines often indicate main coolant flow paths.
- Dotted Lines: May indicate vacuum lines, signal wires, or auxiliary circuits within the cooling system.
- Arrows: Indicate the direction of coolant flow.
- Rectangles: Usually represent components like the radiator, coolant reservoir, or engine block.
- Circles: May represent sensors, valves, or the water pump.
- Color Coding (if present): Some diagrams use color coding to distinguish between different types of fluid or components. For instance, blue might represent cool coolant entering the engine, while red might represent hot coolant exiting the engine.
How the 2014 Cruze Cooling System Works
The cooling system operates in a closed loop, constantly circulating coolant to remove heat from the engine. Here's a simplified breakdown:
- The water pump draws coolant from the radiator and pushes it through the engine block's coolant passages.
- As the coolant flows through the engine, it absorbs heat generated by combustion.
- The heated coolant exits the engine and flows to the thermostat.
- If the engine is cold, the thermostat remains closed, diverting coolant back to the water pump to bypass the radiator. This allows the engine to warm up quickly.
- Once the engine reaches operating temperature, the thermostat opens, allowing coolant to flow to the radiator.
- In the radiator, heat is dissipated from the coolant to the surrounding air. The cooling fan assists in this process when needed.
- The cooled coolant then returns to the water pump to repeat the cycle.
- The coolant reservoir accommodates changes in coolant volume due to temperature fluctuations, preventing air from entering the system.
Real-World Use: Basic Troubleshooting Tips
Armed with your diagram and knowledge of the cooling system, you can tackle some basic troubleshooting. Here are a few common scenarios:
- Overheating:
- Check coolant level in the reservoir.
- Inspect radiator hoses for leaks or kinks.
- Ensure the cooling fan is operating when the engine is hot.
- Feel the upper and lower radiator hoses. If one is hot and the other is cold, the thermostat might be stuck closed.
- Look for coolant leaks around the water pump, thermostat housing, and radiator.
- Coolant Leaks:
- Identify the source of the leak. Common locations include hose connections, the water pump, the radiator, and the thermostat housing.
- Check the condition of the hoses. Look for cracks, bulges, or softness.
- Consider using a coolant system pressure tester to help locate leaks.
- Low Coolant Level:
- Check for leaks.
- If no leaks are found, the coolant may be leaking internally, such as through a head gasket. This can be a serious issue.
Safety First: Highlighting Risky Components
Working on a cooling system can be dangerous if you're not careful. Here are some key safety precautions:
- Never open the radiator cap when the engine is hot. The system is pressurized, and hot coolant can spray out, causing severe burns. Allow the engine to cool completely before opening the cap.
- Be careful when working around the cooling fan. It can turn on unexpectedly, even when the engine is off. Disconnect the battery if you need to work near the fan.
- Dispose of used coolant properly. Coolant is toxic and should not be poured down the drain or onto the ground. Contact your local recycling center or auto parts store for disposal options.
- Wear safety glasses and gloves to protect yourself from coolant splashes and sharp edges.
Important Note: When replacing coolant, always use the correct type recommended for your 2014 Chevy Cruze. Using the wrong coolant can damage the system and void your warranty. Dex-Cool is typically specified.
Downloading the Diagram
You've made it this far! Now you're ready to put your newfound knowledge to the test. To help you even further, we have a downloadable PDF file of the 2014 Chevy Cruze cooling system diagram ready for you to use. Simply click the link [ Hypothetical download link to the diagram ]. This diagram will be an invaluable asset as you tackle any cooling system-related projects.
Disclaimer: This guide is intended for informational purposes only and should not be considered a substitute for professional mechanical advice. Always consult a qualified mechanic if you're unsure about any repair or modification.