2014 Chevy Cruze Heater Hose Diagram
For the seasoned DIYer tackling coolant system maintenance or repairs on a 2014 Chevy Cruze, understanding the heater hose diagram is paramount. It’s your roadmap to navigating the complex network of hoses that deliver vital heat to your cabin, prevent engine overheating, and ensure optimal performance. This article will delve into the specifics of the 2014 Cruze heater hose diagram, covering its purpose, key components, how it works, and practical troubleshooting tips.
Purpose of the Heater Hose Diagram
The heater hose diagram serves several crucial purposes:
- Repair and Replacement: Identifying the correct hoses for replacement after damage (cracking, leaking, or deterioration) is the primary use. Using the wrong hose could lead to improper fitment, leaks, and potential engine damage.
- Troubleshooting: Diagnosing coolant leaks or heater malfunctions becomes much easier with a visual reference. The diagram shows the routing of coolant and helps pinpoint potential problem areas.
- Understanding the System: Even if you're not experiencing problems, studying the diagram allows you to comprehend the coolant flow through the engine and heating system, fostering a deeper understanding of your vehicle's operation.
- Preventive Maintenance: Knowing the location and routing of these hoses facilitates inspections for wear and tear during routine maintenance checks. Early detection can prevent catastrophic failures down the road.
Key Specs and Main Parts
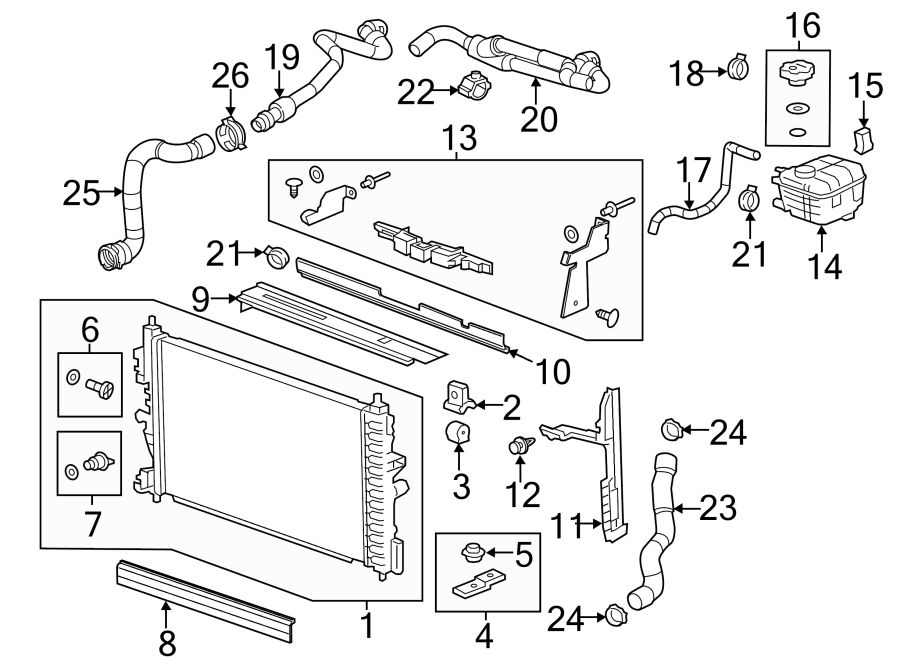
The 2014 Chevy Cruze typically utilizes a closed-loop cooling system with several key components. The heater hose diagram illustrates the connection between these components, primarily focusing on the heater core circuit.
Main Components:
- Engine Coolant Reservoir (Expansion Tank): This is where you add coolant and monitor the coolant level. It acts as a buffer for coolant expansion and contraction due to temperature changes.
- Thermostat Housing: The thermostat controls the engine's operating temperature by regulating coolant flow to the radiator. The thermostat is housed within the thermostat housing, often a critical connection point for heater hoses.
- Water Pump: The heart of the cooling system, the water pump circulates coolant throughout the engine and cooling system, including the heater core.
- Heater Core: Located inside the vehicle's dashboard, the heater core is a small radiator that transfers heat from the engine coolant to the air flowing into the cabin.
- Heater Hoses: These are flexible rubber or silicone hoses that transport coolant to and from the heater core. They are subject to high temperatures and pressures.
- Hose Clamps: Various types of clamps, such as worm-drive or spring clamps, secure the hoses to the connections and prevent leaks.
- Coolant: Typically a 50/50 mix of antifreeze and distilled water, coolant provides freeze protection, corrosion protection, and heat transfer. The Cruze often uses Dex-Cool coolant.
- Bypass Hose (if applicable): Some diagrams show a bypass hose which allows coolant to circulate within the engine when the thermostat is closed, ensuring even heating and preventing hot spots.
Heater Hose Specs (General):
- Diameter: Heater hose diameters typically range from 5/8" to 3/4", but always verify the correct size for your specific vehicle using the diagram or parts catalog.
- Material: Usually constructed from EPDM (ethylene propylene diene monomer) rubber for heat and chemical resistance. Silicone hoses are a performance upgrade but come at a higher cost.
- Pressure Rating: Heater hoses are designed to withstand the pressures of the cooling system, typically around 15-20 psi.
- Temperature Rating: Must withstand the operating temperatures of the engine coolant, often exceeding 200°F.
Symbols and Conventions
Understanding the symbols used in the heater hose diagram is essential for accurate interpretation. Here's a breakdown of common conventions:
- Solid Lines: Typically represent hoses or pipes carrying coolant. Thicker lines may indicate larger diameter hoses.
- Dashed Lines: May represent vacuum lines, vent lines, or less significant connections within the cooling system.
- Arrows: Indicate the direction of coolant flow. Follow the arrows to understand how coolant circulates through the system.
- Different Colors: Some diagrams use different colors to distinguish between supply and return hoses (e.g., red for supply, blue for return). Others may use colors to designate different coolant circuits.
- Component Labels: Clearly labeled components (e.g., "Heater Core," "Water Pump," "Thermostat") help you identify their location and function.
- Connector Symbols: Symbols may represent different types of connectors, such as quick-connect fittings or threaded connections.
- Clamps: Indicated by small marks or symbols along the hose, representing the location of hose clamps.
How It Works
The heater hose circuit functions by diverting a portion of the hot engine coolant through the heater core. Here's a simplified explanation:
- The water pump circulates coolant through the engine.
- A portion of this heated coolant is routed through a hose (the heater hose supply) to the heater core, typically from the engine block or cylinder head.
- As coolant flows through the heater core, air is blown across the core's fins by the blower motor. This process transfers heat from the coolant to the air.
- The heated air is then directed into the vehicle's cabin through the vents.
- After passing through the heater core, the cooled coolant returns to the engine through another hose (the heater hose return), usually connecting to the water pump inlet or the radiator.
The heater control valve (if equipped, some Cruze models don't have one) regulates the amount of coolant flowing to the heater core, controlling the temperature of the air entering the cabin. In models without a heater control valve, a blend door manages the amount of air flowing across the heater core.
Real-World Use: Basic Troubleshooting Tips
The heater hose diagram is invaluable for troubleshooting common heating system problems:
- No Heat: Check coolant level first. Then, use the diagram to trace the hoses to and from the heater core. Look for kinks, blockages, or leaks. A cold heater hose could indicate a blockage or a faulty heater control valve (if equipped).
- Coolant Leak: Visually inspect all hoses and connections shown on the diagram for signs of leaks (wet spots, coolant residue). Pay close attention to hose clamps and connections near the engine, where temperatures are highest.
- Overheating: While not directly related to the heater core, a coolant leak in the heater hose circuit can contribute to engine overheating. Use the diagram to locate the leak and repair it promptly.
- Low Coolant Level: Frequent topping off of coolant indicates a leak. Use the diagram to systematically inspect the cooling system for leaks, including the heater hoses and connections.
- Smell of Antifreeze: A sweet, pungent smell inside the cabin often indicates a leaking heater core. This requires accessing the heater core, a potentially complex task. The diagram helps locate the core and understand the hose connections involved.
When diagnosing problems, remember to consider other factors, such as a faulty thermostat, a malfunctioning water pump, or air trapped in the cooling system.
Safety Considerations
Working on the cooling system involves certain risks:
- Hot Coolant: Never open the cooling system when the engine is hot. Coolant is under pressure and can spray out, causing severe burns. Wait for the engine to cool completely before attempting any repairs.
- High Pressure: Be aware that the cooling system is pressurized. Release the pressure slowly by opening the coolant reservoir cap gradually.
- Sharp Edges: Use caution when handling tools and working around engine components. Wear gloves to protect your hands.
- Coolant Disposal: Coolant is toxic and should be disposed of properly. Do not pour it down the drain or onto the ground. Take it to a recycling center or auto parts store.
- Electrical Components: Be mindful of electrical components near the heater hoses. Disconnect the negative battery cable before starting any work to prevent electrical shock.
Specifically concerning heater hoses:
Heater hoses are often located in tight spaces near the engine and exhaust manifold, increasing the risk of burns. Use appropriate tools and take your time to avoid contact with hot surfaces.
By understanding the 2014 Chevy Cruze heater hose diagram, you'll be well-equipped to tackle cooling system repairs, maintenance, and troubleshooting. Remember to always prioritize safety and consult a professional mechanic if you're unsure about any aspect of the repair.
We have the full high-resolution 2014 Chevy Cruze heater hose diagram available for download. This detailed diagram will provide you with a precise visual reference for your repair or maintenance project.