2014 Chevy Cruze Thermostat Housing Diagram
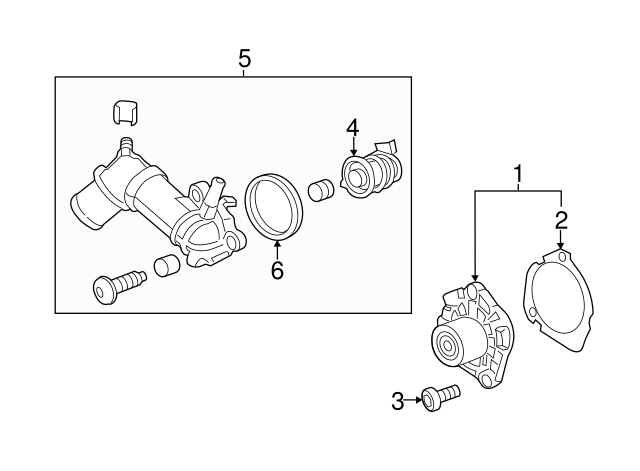
If you're diving into engine work on a 2014 Chevy Cruze, understanding the thermostat housing is crucial. This article provides a detailed breakdown of the 2014 Cruze thermostat housing diagram, offering insights for repairs, performance modifications, and general engine comprehension. We'll cover its purpose, key components, how it functions, troubleshooting tips, and essential safety precautions. We even have the diagram available for download.
Purpose of the Thermostat Housing Diagram
The thermostat housing diagram is your roadmap to understanding and working on the cooling system. It serves several key purposes:
- Repair and Maintenance: Accurately identify parts for replacement during leaks, overheating issues, or thermostat malfunctions.
- Diagnostics: Trace coolant flow and identify potential blockages or failures within the housing and connected components.
- Engine Understanding: Gain a deeper understanding of how the cooling system regulates engine temperature and the role of each component.
- Performance Modifications: While less common, understanding the thermostat housing is beneficial when considering modifications that impact engine temperature, such as installing a lower temperature thermostat.
Key Specs and Main Parts of the 2014 Cruze Thermostat Housing
The 2014 Chevy Cruze (specifically, the 1.4L Turbo engine, which is a common configuration) utilizes a thermostat housing that is typically made of plastic or aluminum. Here's a breakdown of the essential components and specs:
- Thermostat Housing: The main body that holds the thermostat and provides connections for coolant hoses. Often integrates the coolant temperature sensor.
- Thermostat: A temperature-sensitive valve that regulates coolant flow to the radiator. It opens and closes to maintain the engine's optimal operating temperature (typically around 195°F or 90°C).
- Coolant Temperature Sensor (CTS): Sends temperature data to the engine control unit (ECU) to adjust fuel injection and ignition timing. The CTS is crucial for efficient engine operation.
- Coolant Outlet: The connection point where coolant exits the thermostat housing and flows towards the radiator.
- Coolant Inlet: The connection point where coolant returns from the radiator and enters the thermostat housing.
- Hose Clamps: Used to secure coolant hoses to the thermostat housing connections. Use of proper clamps is crucial to prevent leaks.
- O-rings/Gaskets: Provide a tight seal between the thermostat housing and the engine block or other connecting components to prevent coolant leaks.
- Bleeder Valve (if equipped): A small valve used to release air pockets from the cooling system. Some housings incorporate this, while others require a separate bleeder location.
Key Specs
- Thermostat Opening Temperature: Typically 195°F (90°C) for stock thermostats.
- Material: Usually plastic or cast aluminum.
- Coolant Hose Sizes: Vary based on connection point; refer to the specific hose for accurate sizing.
Understanding Symbols in the Diagram
Thermostat housing diagrams use standardized symbols to represent different components and flow paths. Here's a general guide:
- Solid Lines: Typically represent coolant hoses and pipes. The thickness of the line might indicate the diameter of the hose.
- Dashed Lines: May represent electrical wiring or vacuum lines connected to the thermostat housing or associated sensors.
- Arrows: Indicate the direction of coolant flow. Understanding the direction of flow is vital for diagnosing issues.
- Circles or Squares with Letters/Numbers: Usually represent specific components, such as the thermostat (T), coolant temperature sensor (CTS), or connections for wiring harnesses.
- Color Coding (if present): Might indicate different types of fluids (e.g., blue for coolant, green for vacuum) or the temperature range of components.
- Icons: Small icons may represent hose clamps, O-rings, or other small hardware.
How the Thermostat Housing Works
The thermostat housing's primary function is to regulate the engine's operating temperature. Here's a simplified explanation:
- Cold Start: When the engine is cold, the thermostat remains closed, restricting coolant flow to the radiator. This allows the engine to warm up quickly.
- Warm-Up Phase: As the engine warms up, the coolant temperature rises.
- Thermostat Opens: When the coolant reaches the thermostat's opening temperature (e.g., 195°F), the thermostat begins to open, allowing coolant to flow to the radiator.
- Temperature Regulation: The thermostat modulates the coolant flow to the radiator, maintaining a stable engine operating temperature. If the engine is running hot, the thermostat opens further, allowing more coolant to flow to the radiator for cooling. If the engine is running cool, the thermostat closes partially, restricting coolant flow.
- Coolant Temperature Sensor: The CTS monitors the coolant temperature and sends this information to the ECU. The ECU uses this data to adjust fuel injection, ignition timing, and other engine parameters to optimize performance and efficiency.
Real-World Use: Basic Troubleshooting Tips
Understanding the thermostat housing can help you diagnose common cooling system problems:
- Overheating: If the engine overheats, the thermostat might be stuck closed, preventing coolant from reaching the radiator. Check the thermostat's operation. Also, check for blockages in the radiator or coolant hoses.
- Engine Runs Too Cold: If the engine runs too cold, the thermostat might be stuck open, allowing coolant to flow to the radiator even when the engine is cold. Replace the thermostat.
- Coolant Leaks: Coolant leaks around the thermostat housing are common. Check the O-rings, gaskets, and hose connections for damage. Replace damaged components. Ensure proper torque when tightening housing bolts.
- Check Engine Light (CEL) with Coolant Temperature Codes: Faulty CTS can trigger a CEL. Use a scan tool to read the codes and replace the CTS if necessary. Remember to check the wiring to the sensor as well.
Safety Precautions
Working on the cooling system involves risks. Be mindful of the following safety precautions:
- Hot Coolant: Never work on the cooling system while the engine is hot. Allow the engine to cool completely before opening any coolant lines or the radiator cap. Pressurized hot coolant can cause severe burns.
- Electrical Components: Disconnect the battery's negative terminal before working on any electrical components, such as the CTS.
- Sharp Edges: Wear gloves to protect your hands from sharp edges on the thermostat housing and surrounding components.
- Coolant Disposal: Dispose of used coolant properly. Coolant is toxic and should not be poured down drains or onto the ground. Take it to a recycling center or auto parts store for proper disposal.
We have a detailed 2014 Chevy Cruze Thermostat Housing Diagram available for download. This diagram provides a visual aid to complement the information provided in this article. Having the diagram on hand will greatly assist you in troubleshooting and repairing your Cruze's cooling system.