2014 Chevy Impala 3.6 Serpentine Belt Diagram
Let's talk about the serpentine belt diagram for the 2014 Chevy Impala with the 3.6L V6 engine. Understanding this diagram is crucial for a variety of maintenance and repair tasks. Whether you're replacing a worn belt, diagnosing a squealing noise, or simply familiarizing yourself with your engine's layout, having a clear visual guide will save you time and prevent costly mistakes.
Purpose of the Serpentine Belt Diagram
The serpentine belt diagram serves several important purposes:
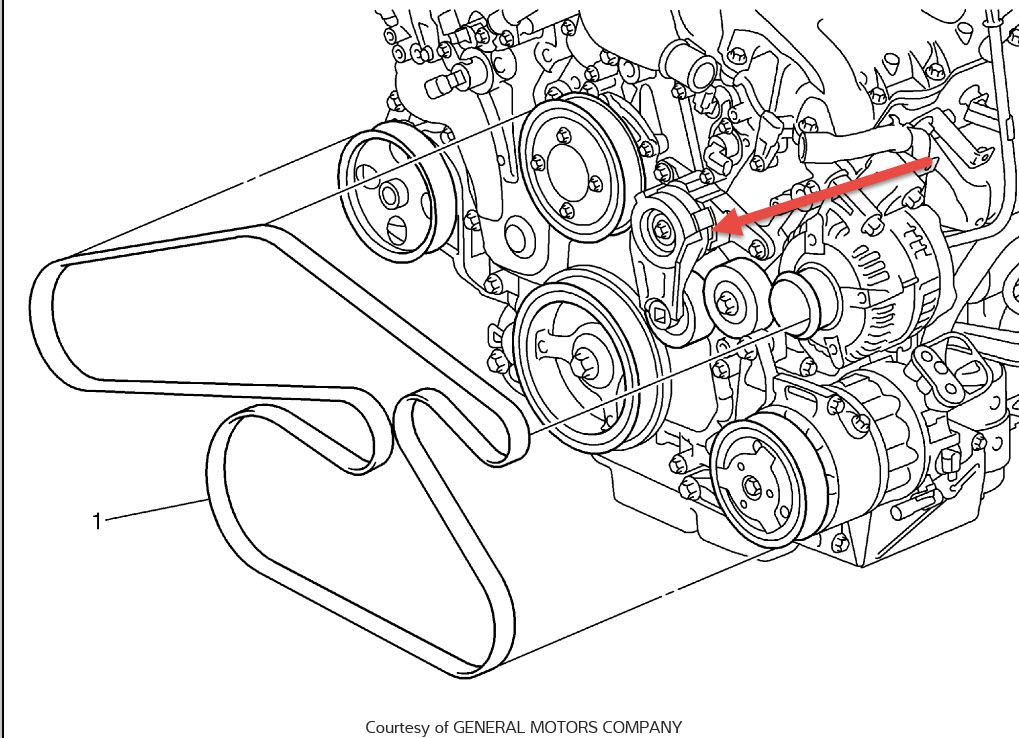
- Replacement Guide: It shows the correct routing of the serpentine belt around all the pulleys. This is *essential* when replacing a worn or broken belt to ensure proper component operation. An incorrectly routed belt can cause serious engine damage.
- Troubleshooting: The diagram helps you identify the components driven by the belt, assisting in diagnosing issues like power steering failures, air conditioning problems, or alternator malfunctions.
- Preventative Maintenance: Familiarizing yourself with the belt's routing allows you to inspect it for wear, cracks, or fraying. Early detection of these issues can prevent a complete belt failure, which can leave you stranded.
- Component Identification: The diagram labels each pulley, helping you learn the names and locations of different engine accessories.
Key Specs and Main Parts
The 2014 Chevy Impala 3.6L V6 utilizes a single, multi-ribbed serpentine belt to drive several crucial engine components. The specific belt length may vary slightly depending on the presence or absence of certain optional accessories (like heavy-duty cooling). However, a belt length of approximately 90.5 inches (2300 mm) is a common starting point. Always double-check the manufacturer's recommended belt length for your specific vehicle using its VIN number.
Here's a breakdown of the main components driven by the serpentine belt:
- Crankshaft Pulley (or Harmonic Balancer): This is the driving pulley, connected directly to the engine's crankshaft. It's responsible for transferring the engine's rotational force to the belt.
- Alternator Pulley: The alternator generates electrical power for the vehicle.
- Power Steering Pump Pulley: The power steering pump provides hydraulic assistance for steering.
- Air Conditioning Compressor Pulley: The A/C compressor circulates refrigerant to cool the cabin.
- Water Pump Pulley: The water pump circulates coolant through the engine to prevent overheating.
- Idler Pulley(s): These are smooth, bearing-mounted pulleys that guide the belt and maintain proper tension. They don't drive any specific component.
- Tensioner Pulley: This spring-loaded pulley automatically maintains the correct tension on the serpentine belt. It's *critical* for proper belt operation and longevity.
Symbols and Diagram Conventions
Serpentine belt diagrams use standard symbols to represent different components and belt routing.
- Solid Lines: Typically indicate the main path of the serpentine belt.
- Dotted or Dashed Lines: May represent the belt's path on the back side of a pulley or areas where the belt is not directly visible.
- Arrows: Show the direction of belt travel. Pay close attention to these!
- Circles: Represent pulleys. The size of the circle doesn't necessarily correspond to the actual size of the pulley.
- Abbreviations: Common abbreviations include ALT (Alternator), P/S (Power Steering), A/C (Air Conditioning), W/P (Water Pump), and TEN (Tensioner).
- Icons: Some diagrams use simplified icons to represent the specific components (e.g., a battery symbol for the alternator).
Color coding is less common but may be used to highlight specific sections of the belt path or differentiate between components. Refer to the diagram's key if color coding is used.
How It Works: The Serpentine Belt System
The 3.6L engine's serpentine belt system is elegantly simple, yet crucial. The crankshaft pulley, driven directly by the engine, powers the entire system. As the crankshaft rotates, it spins the serpentine belt, which in turn drives all the accessory pulleys. The tensioner pulley plays a vital role in maintaining the proper belt tension. The tensioner is spring-loaded and designed to automatically compensate for belt wear and stretching, ensuring the belt maintains sufficient grip on all the pulleys. Without the correct tension, the belt can slip, causing squealing noises, reduced component performance (e.g., weak power steering), and eventually, belt failure.
Real-World Use: Basic Troubleshooting
Here are a few troubleshooting tips related to the serpentine belt system:
- Squealing Noise: A squealing noise, especially when the engine is first started or when accessories (like the A/C) are turned on, is often a sign of a slipping serpentine belt. This could be due to a worn belt, a loose tensioner, or a pulley with a bad bearing.
- Visible Cracks or Fraying: Inspect the belt regularly for cracks, fraying, or missing chunks. Any significant damage warrants immediate replacement.
- Component Failure: If you experience a sudden loss of power steering, A/C, or alternator function, check the serpentine belt immediately. A broken or slipped belt is a common cause of these issues.
- Tensioner Movement: Observe the tensioner pulley while the engine is running. Excessive bouncing or movement of the tensioner indicates a problem with the belt or the tensioner itself.
To diagnose a squealing belt, you can try spraying a small amount of belt dressing onto the belt while the engine is running (exercise extreme caution!). If the squealing stops temporarily, it confirms that the belt is the source of the noise. However, belt dressing is a temporary fix. The underlying issue needs to be addressed.
Safety Considerations
Working on the serpentine belt system involves several safety hazards. Always disconnect the negative battery cable before working on any part of the engine. The crankshaft pulley rotates at high speeds and can cause serious injury. Keep your hands, hair, and clothing clear of the moving belt and pulleys.
The tensioner pulley is under spring tension. When releasing the tension to remove the belt, use the correct tool (usually a wrench or socket on the tensioner arm) and exercise caution. The tensioner can snap back quickly and forcefully if released improperly. Always refer to the service manual for specific instructions on releasing the tension.
Never attempt to work on the serpentine belt system while the engine is hot. Allow the engine to cool completely before starting any repairs.
Important Note: Working on automotive systems can be dangerous. Always follow proper safety procedures and consult a qualified mechanic if you are unsure about any aspect of the repair.
Having a clear serpentine belt diagram readily available can significantly simplify maintenance and troubleshooting. We have a downloadable version of the 2014 Chevy Impala 3.6L serpentine belt diagram ready for you. This document will be invaluable for your future repairs and maintenance. Contact us through the appropriate channels to obtain your copy.