2014 Chrysler Town And Country Belt Diagram
For the experienced DIYer tackling maintenance or repairs on a 2014 Chrysler Town & Country, having a reliable belt diagram is absolutely essential. This document serves as your roadmap to the serpentine belt system, crucial for powering various engine components. Whether you're replacing a worn belt, diagnosing a squealing noise, or simply expanding your understanding of automotive systems, this article will provide you with a detailed breakdown of the 2014 Town & Country belt diagram. We'll cover key components, diagram symbols, operational principles, and practical troubleshooting tips.
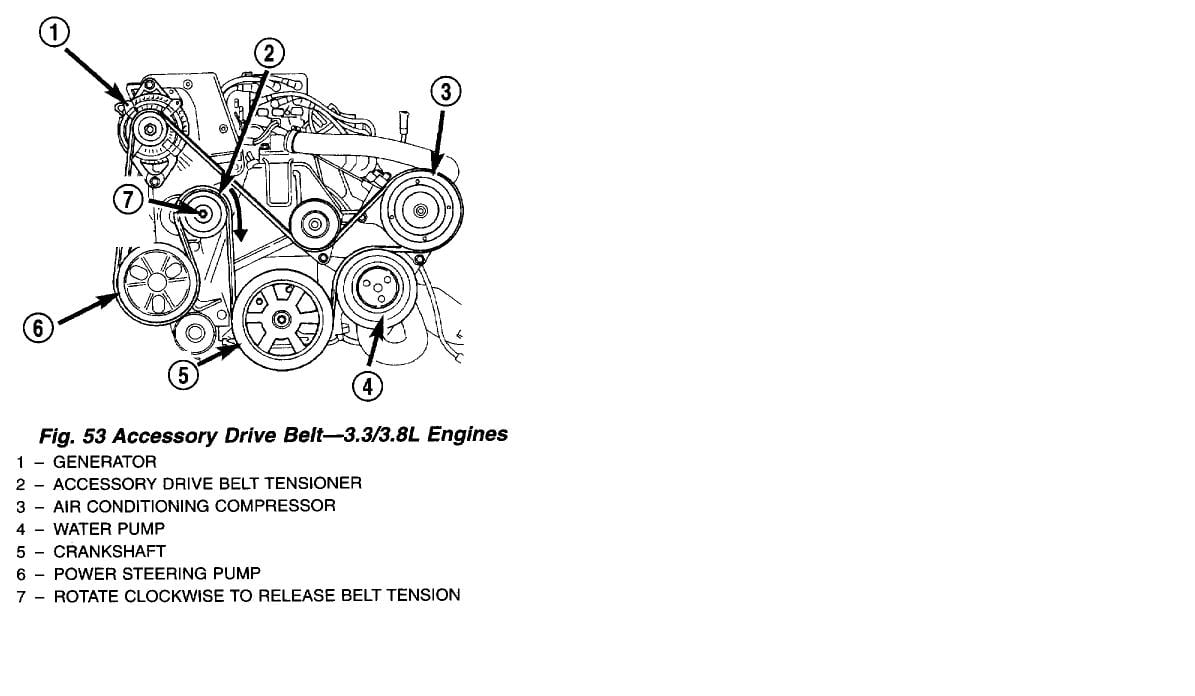
Purpose of the Belt Diagram
The belt diagram for your 2014 Chrysler Town & Country is more than just a pretty picture. Its primary purpose is to illustrate the correct routing of the serpentine belt around the various pulleys attached to engine accessories. This is critical because the serpentine belt is responsible for driving several vital systems, including:
- Alternator: Charges the battery and powers electrical components.
- Power Steering Pump: Provides hydraulic assistance for steering.
- Air Conditioning Compressor: Circulates refrigerant to cool the cabin.
- Water Pump: Circulates coolant through the engine to regulate temperature.
Without the correct belt routing, these systems won't function properly, potentially leading to overheating, loss of power steering, a non-functional air conditioner, or a dead battery. The diagram also aids in identifying the location of the tensioner pulley and idler pulley, components vital for proper belt tension and function. Using a diagram during belt replacement prevents installation errors that could damage the belt, pulleys, or engine components. By having a clear visual aid, you can ensure that the belt is properly seated on each pulley, avoiding slippage and premature wear.
Key Specs and Main Parts
Before diving into the diagram, it's helpful to understand the key components involved in the serpentine belt system. The 2014 Chrysler Town & Country is equipped with a 3.6L Pentastar V6 engine. Key specs you might need include the serpentine belt length and the torque specifications for the tensioner pulley.
The main parts depicted in the belt diagram typically include:
- Crankshaft Pulley (Harmonic Balancer): Driven directly by the engine and provides rotational power to the belt.
- Alternator Pulley: Driven by the belt to generate electricity.
- Power Steering Pump Pulley: Driven by the belt to provide hydraulic assistance.
- Air Conditioning Compressor Pulley: Driven by the belt to power the AC system.
- Water Pump Pulley: Driven by the belt to circulate coolant.
- Tensioner Pulley: Spring-loaded pulley that maintains proper belt tension. This is a *critical* component.
- Idler Pulley: A smooth pulley that guides the belt path.
Diagram Symbols: Decoding the Map
Understanding the symbols used in the belt diagram is crucial for accurate interpretation. Here's a breakdown of common symbols:
- Solid Lines: Represent the main path of the serpentine belt. Thicker lines may indicate the belt's outer surface.
- Dotted Lines: May indicate the belt's inner surface or the path behind other components.
- Arrows: Show the direction of belt rotation around each pulley. These are vital for correctly installing the belt.
- Circles: Represent pulleys, with labels indicating their function (e.g., ALT for Alternator, P/S for Power Steering).
- Squares or Rectangles: May represent the engine block or other fixed components for reference.
- Tensioner Icon: A specific symbol identifies the tensioner pulley, often with an arrow indicating the direction to move it for belt removal and installation.
- Labels: Each pulley is labeled with its corresponding component (e.g., "A/C Compressor," "Water Pump").
It's crucial to pay attention to the arrows indicating the direction of belt rotation. Incorrect routing will lead to system malfunction and potential damage. The placement of the tensioner and idler pulleys is also critical, as they dictate the belt's tension and path.
How It Works: The Serpentine Belt System
The serpentine belt system is a relatively simple, yet crucial, part of your engine. The crankshaft pulley, directly connected to the engine's crankshaft, rotates and drives the serpentine belt. The belt, in turn, wraps around the pulleys of the various engine accessories (alternator, power steering pump, AC compressor, water pump), causing them to rotate as well. The tensioner pulley applies constant pressure to the belt, maintaining proper tension. This ensures that the belt doesn't slip and that all accessories are driven efficiently. Think of it as a precisely engineered network of power transfer. The tensioner pulley is spring loaded, so as the belt stretches over time (and they all do), the tensioner arm automatically adjusts to maintain proper pressure. If the tensioner fails, the belt will slip, resulting in poor performance of the accessories and, potentially, a squealing noise.
Real-World Use: Troubleshooting Tips
The belt diagram becomes especially useful when troubleshooting issues related to the serpentine belt system. Here are some common problems and how the diagram can help:
- Squealing Noise: A squealing noise is often caused by a loose or worn belt. Use the diagram to inspect the belt's condition and check for proper routing and tension. A glazing on the belt from friction can also cause squealing.
- Battery Not Charging: If the alternator isn't being driven properly due to a slipped or broken belt, the battery won't charge. The diagram helps you verify that the belt is correctly routed around the alternator pulley.
- Loss of Power Steering: If the belt slips on the power steering pump pulley, you'll experience a loss of power steering. The diagram helps you ensure proper belt contact with the power steering pump pulley.
- Overheating: If the water pump isn't being driven effectively, the engine can overheat. The diagram helps you verify that the belt is correctly routed around the water pump pulley.
- AC Not Working: Similar to the other accessories, if the belt isn't correctly routed around the AC compressor pulley, the AC won't work.
When diagnosing issues, always visually inspect the belt for cracks, fraying, or missing chunks. Also, check the pulleys for damage or misalignment. If the tensioner pulley is excessively vibrating or making noise, it may need to be replaced.
Safety Precautions
Working on the serpentine belt system involves working near moving engine components. Always disconnect the negative battery cable before starting any work to prevent accidental starting. Be extremely careful when working around the tensioner pulley as it is spring-loaded and can snap back forcefully. Wear safety glasses to protect your eyes from debris. Avoid wearing loose clothing or jewelry that could get caught in the belt or pulleys. Ensure the engine is cool before working near the belt and pulleys to avoid burns. Remember, the crankshaft pulley is directly connected to the engine, so accidental starting could cause serious injury.
Get Your Diagram!
We have the 2014 Chrysler Town & Country serpentine belt diagram available for download. This high-resolution diagram will provide you with a clear and accurate visual reference for all your belt-related maintenance and repair needs. Having this diagram readily available will not only save you time and frustration, but also ensure that you perform your work safely and effectively. Good luck!