2014 Dodge Avenger 2.4 Serpentine Belt Diagram
Alright, let's dive into the serpentine belt diagram for your 2014 Dodge Avenger with the 2.4L engine. This guide is aimed at helping you, the DIY enthusiast, understand the system, perform your own maintenance, and maybe even troubleshoot some common issues. Think of me as your friendly neighborhood mechanic, breaking it all down in a way that makes sense. We'll cover everything from why this diagram is crucial to the nitty-gritty of belt routing and safety.
Why This Diagram Matters: Your Avenger's Lifeline
The serpentine belt diagram isn't just a pretty picture; it's the key to understanding how your engine's accessories are driven. Why is that important? Well, the serpentine belt, a single, continuous belt, powers critical components like:
- Alternator: Charges your battery and keeps your electrical system running. No alternator, no power, no driving.
- Power Steering Pump: Makes steering your Avenger effortless. Trust me, you'll miss this when it's gone.
- Air Conditioning Compressor: Keeps you cool in the summer heat. Essential for comfort, especially on those long drives.
- Water Pump: Circulates coolant through your engine, preventing overheating. Overheating is a *major* engine killer.
Without the serpentine belt functioning correctly, these accessories won't work. This diagram is crucial for:
- Belt Replacement: Ensuring the new belt is routed correctly is *vital*. Incorrect routing can damage the belt and the components it drives.
- Troubleshooting: A slipped or broken belt can cause a variety of problems. The diagram helps you quickly identify if the belt is in the right position.
- Maintenance: Inspecting the belt for wear and tear is part of routine maintenance. Knowing the layout helps you visually inspect the entire length of the belt.
- General Understanding: Even if you don't plan on working on your car yourself, understanding the system helps you communicate better with your mechanic.
Key Specs and Main Parts
Let's get down to the specifics of the 2014 Dodge Avenger 2.4L serpentine belt system. The system comprises of the following:
- Serpentine Belt: A long, ribbed belt made of reinforced rubber. Its ribbed design provides grip for the various pulleys. The belt length is a crucial specification, usually around 90-100 inches, but you'll need to confirm the exact length based on your specific vehicle options.
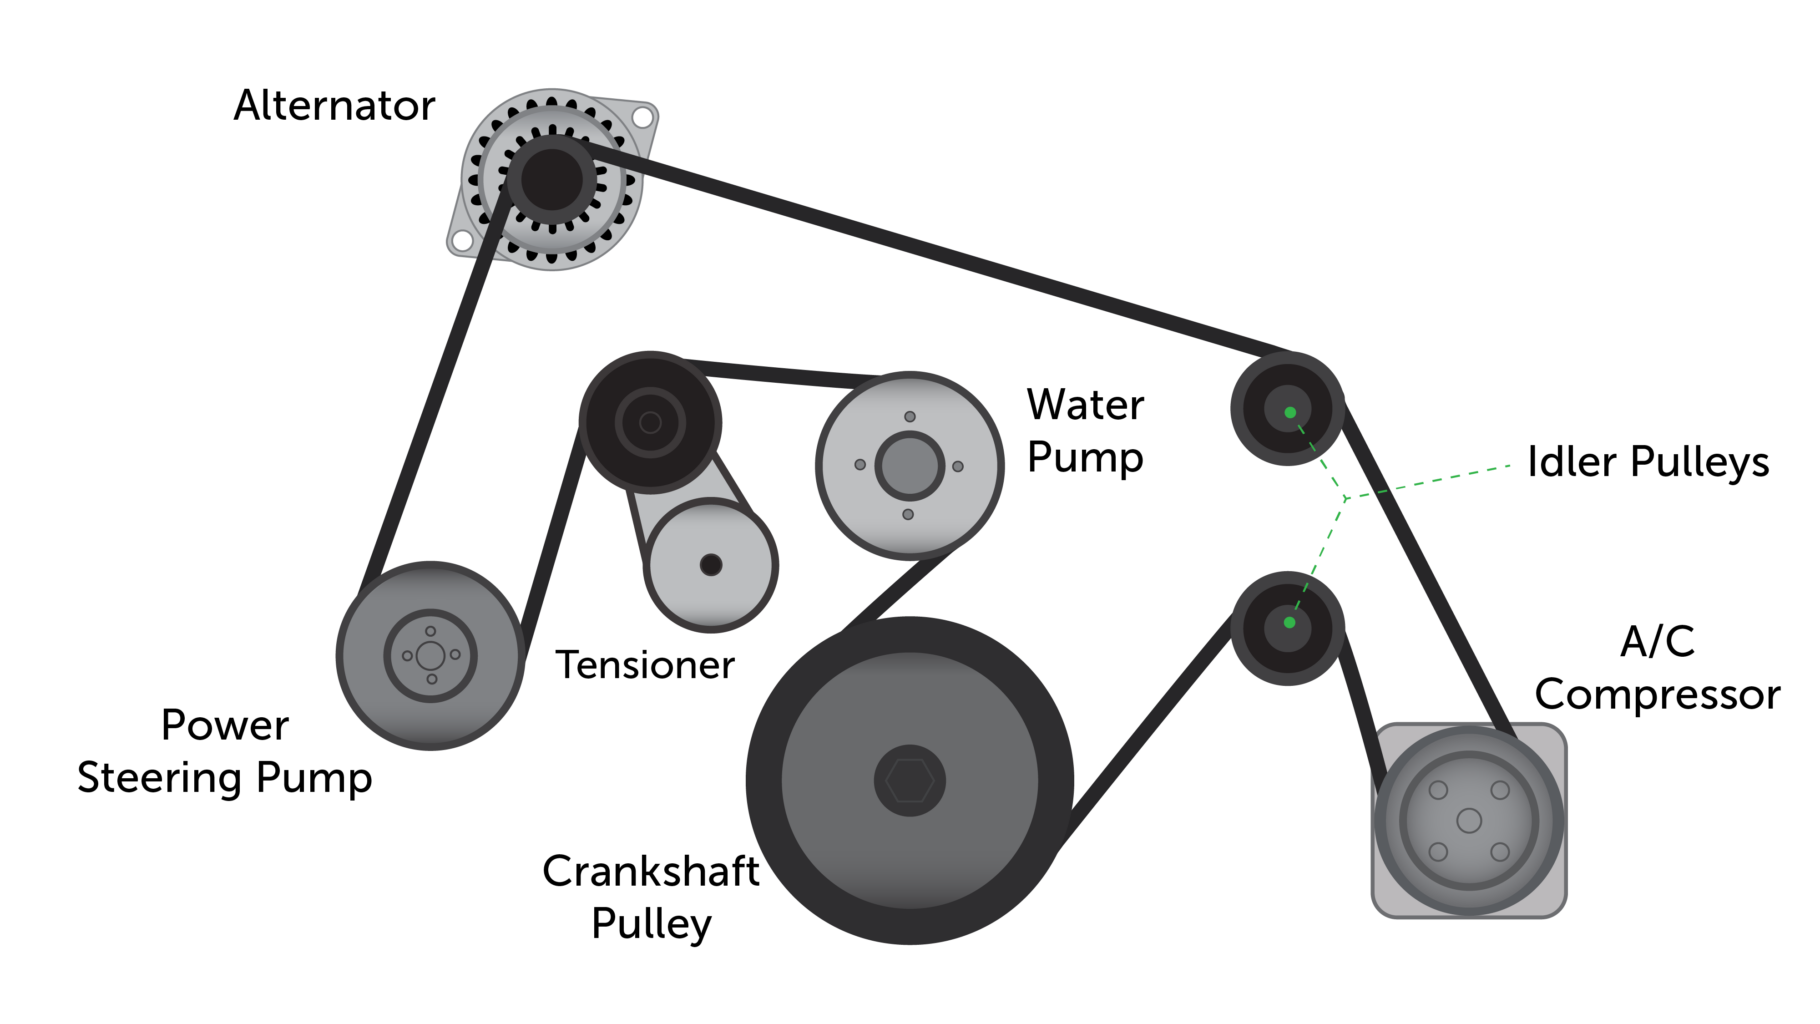
- Crankshaft Pulley (or Damper): Located at the bottom of the engine, driven directly by the crankshaft. This is the *primary* driver of the serpentine belt.
- Alternator Pulley: Connected to the alternator. The belt turns the pulley, which spins the alternator, generating electricity.
- Power Steering Pump Pulley: Connected to the power steering pump. The belt turns the pulley, which powers the hydraulic pump for steering assist.
- Air Conditioning Compressor Pulley: Connected to the A/C compressor. The belt turns the pulley, engaging the compressor to cool the refrigerant.
- Water Pump Pulley: Connected to the water pump. The belt turns the pulley, circulating coolant through the engine.
- Tensioner Pulley: A spring-loaded pulley that maintains the correct tension on the serpentine belt. This is critical for proper belt function and prevents slippage.
- Idler Pulley: A smooth pulley that simply guides the belt's path. It helps to increase the belt's wrap angle around other pulleys or change its direction.
Decoding the Serpentine Belt Diagram: Symbols and Markings
The diagram is your roadmap. Here's how to read it:
- Solid Lines: Represent the serpentine belt itself. The *thickness* of the line is generally uniform but can sometimes vary slightly in diagrams.
- Pulleys: Represented as circles. The diagram will usually label each pulley with an abbreviation of the component it's attached to (e.g., "ALT" for alternator, "P/S" for power steering).
- Arrows: Indicate the direction of rotation for each pulley. Pay close attention to these! They help you understand how the belt loops around each component.
- Tensioner: The tensioner pulley will often be depicted with a spring symbol or an arrow indicating its range of movement. Understanding the tensioner's location is crucial for belt replacement.
- Routing Path: The diagram clearly shows how the belt weaves around each pulley. The routing is *very* specific. Deviation from this path can lead to malfunction and damage.
- "Smooth" vs. "Grooved" side: Diagrams usually indicates which side of the belt is in contact with the pulley face (Grooved or Smooth).
How It Works: The Chain Reaction
The magic starts with the crankshaft. As the engine runs, the crankshaft rotates, turning the crankshaft pulley. This rotation is then transferred to the serpentine belt. The belt, in turn, drives all the other pulleys connected to the accessories (alternator, power steering pump, A/C compressor, and water pump). The tensioner pulley ensures the belt remains taut, preventing slippage and maximizing the efficiency of the system. Think of it as a carefully choreographed dance where each component relies on the others.
The tension of the belt is critical. Too loose, and the belt will slip, causing the accessories to underperform or fail altogether. Too tight, and it can damage the bearings in the accessories and shorten the belt's lifespan.
Real-World Use: Troubleshooting and Maintenance
Okay, so you've got the diagram. Let's talk about how to use it in the real world:
- Squealing Belt: A common problem. Often indicates a loose belt or worn pulley. Use the diagram to check the belt's routing and tensioner. Look for glazed or cracked areas on the belt.
- Battery Light On: Could be a failing alternator, but first, check the serpentine belt. If the belt is broken or slipping, the alternator won't be charging the battery.
- No Power Steering: Again, check the belt. If it's broken or slipping on the power steering pump pulley, you'll lose power steering assist.
- Overheating: A broken or slipping belt can prevent the water pump from circulating coolant, leading to overheating.
- Visual Inspection: Regularly inspect the serpentine belt for cracks, fraying, glazing, or missing ribs. Replace the belt if you see any of these signs of wear. Remember to compare belt's routing with the diagram.
Important Note: When replacing the serpentine belt, always use the diagram to ensure proper routing. Take a picture of the old belt routing before removing it as a backup. Double-check everything before starting the engine.
Safety First: Proceed with Caution
Working on the serpentine belt system can be dangerous. Here's what to watch out for:
- Hot Engine: Never work on the serpentine belt system when the engine is hot. Allow it to cool down completely to avoid burns.
- Moving Parts: The serpentine belt and pulleys are moving parts. Ensure the engine is off and the key is removed before working on the system. Accidental engagement of the engine can cause serious injury.
- Tensioner Release: The tensioner pulley is spring-loaded. Use the correct tool to release the tension safely. Improper release can cause the tensioner to snap back, potentially causing injury.
- Battery Disconnect: While not always necessary for belt replacement, disconnecting the negative battery terminal is a good safety precaution to prevent accidental electrical shocks.
Disclaimer: This guide is for informational purposes only. Consult a qualified mechanic if you're not comfortable working on your car yourself. Safety should always be your top priority.
By following this guide, you will be able to easily understand, diagnose and replace your 2014 Dodge Avenger 2.4 serpentine belt.
We have the full resolution serpentine belt diagram available for download. This diagram will provide you with the most accurate and detailed routing information for your vehicle. It’s invaluable for proper belt installation and troubleshooting.