2014 Dodge Grand Caravan Serpentine Belt Diagram
So, you're staring down a 2014 Dodge Grand Caravan and need to tackle the serpentine belt? Good choice. Replacing it yourself can save you some serious cash. Having the serpentine belt diagram handy is absolutely crucial for this job, whether you're dealing with a squealing belt, preventative maintenance, or even diagnosing other engine issues. This guide will walk you through everything you need to know about the 2014 Grand Caravan's serpentine belt layout.
Purpose of the Serpentine Belt Diagram
Why is this diagram so important? Well, the serpentine belt snakes its way around several engine components, powering them all. Without the diagram, you're essentially blindfolded. It helps with:
- Proper Installation: Ensuring the belt is routed correctly around each pulley. A misrouted belt will either fail immediately, or cause other components such as the A/C compressor and the power steering pump not to function.
- Troubleshooting: Identifying which component might be causing belt wear or noise. For example, if the belt is shredding on one side, the culprit might be a misaligned pulley on the A/C compressor.
- Preventative Maintenance: Knowing the belt's layout allows for easy inspection of each pulley and the belt itself for wear and damage during regular checkups.
- Component Replacement: If you are replacing a component driven by the belt, like the alternator or the water pump, it is vital to properly reroute the belt once you reinstall the component.
Key Specs and Main Parts
The 2014 Dodge Grand Caravan typically came with two engine options, affecting the serpentine belt setup: the 3.6L Pentastar V6. This article focuses on the 3.6L V6 engine. Knowing your specific engine is crucial because the belt routing can vary.
Here are the key components the serpentine belt drives on the 3.6L:
- Crankshaft Pulley: The engine's main pulley, providing the rotational force.
- Alternator Pulley: Powers the vehicle's electrical system.
- Water Pump Pulley: Circulates coolant to regulate engine temperature.
- Power Steering Pump Pulley: Provides hydraulic assistance for steering.
- A/C Compressor Pulley: Compresses the refrigerant for the air conditioning system.
- Tensioner Pulley: Maintains proper belt tension. This pulley is spring-loaded, and is crucial for a long lasting serpentine belt.
- Idler Pulley (if equipped): Guides the belt around certain components. Some models may or may not have idler pulleys.
The serpentine belt itself is a multi-ribbed belt, often made of reinforced rubber. The 'ribs' increase surface area which helps with friction and power transfer. Belt length is critical; use the part number specified for your 2014 Grand Caravan 3.6L. Don't guess!
Understanding the Serpentine Belt Diagram Symbols
Serpentine belt diagrams aren't complex, but understanding the symbols is key:
- Solid Lines: Represent the path of the *smooth* (non-ribbed) side of the belt.
- Dashed Lines: Often indicate the path of the *ribbed* side of the belt. The ribbed side of the belt should always be in contact with the pulleys driving components.
- Arrows: Show the direction of belt travel. Very important to ensure the belt goes the right way!
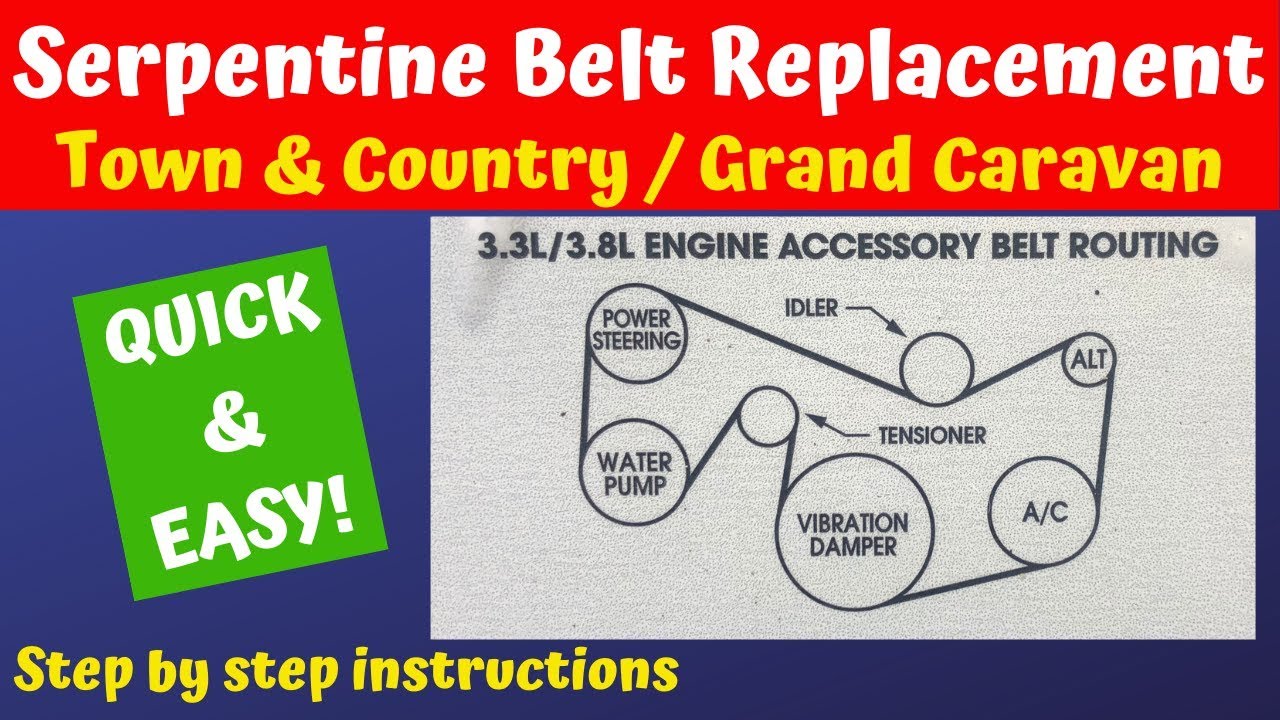
- Pulleys: Represented as circles. Sometimes they'll have labels (ALT for Alternator, P/S for Power Steering, etc.). Some diagrams will have shaded pulleys while others have open pulleys.
- Tensioner: Usually marked with a "T" or a special symbol that resembles a spring. This indicates the location of the tensioner pulley.
Color-coding is less common but if present:
- Different Colors: May be used to highlight specific sections of the belt path or differentiate between different belt configurations.
Most diagrams also include abbreviations to indicate each of the components driven by the serpentine belt. The diagram that we have available for download is clear and easy to understand.
How the Serpentine Belt System Works
The serpentine belt system is elegantly simple yet crucial. The crankshaft pulley, driven by the engine's rotation, is the *driving pulley*. It provides the rotational force that is then transferred via the serpentine belt to all the other pulleys in the system. The belt wraps around each of the driven components, transferring power. The tensioner pulley's job is to maintain the proper amount of tension on the belt. Too little tension and the belt will slip, especially under load (like when the A/C compressor kicks on). Too much tension and the belt and bearings on all the pulleys will be stressed and wear out prematurely. The tensioner is spring-loaded, automatically adjusting for belt stretch and wear.
The ribbed side of the belt makes contact with the *driving pulleys* (e.g., alternator, power steering), while the smooth back side typically runs against idler pulleys and the tensioner pulley. This configuration allows the belt to wrap around multiple components in a compact space.
Real-World Use: Basic Troubleshooting Tips
Here are some common problems and how the diagram helps you diagnose them:
- Squealing Belt: Often caused by a loose belt or a worn pulley. The diagram helps you inspect the tensioner and each pulley for signs of wear or misalignment. Start by inspecting the tensioner; its position can indicate whether the belt is stretched beyond its service life.
- Belt Slipping: Similar to squealing, but may be more pronounced under load. Check the belt tension and the condition of the pulley surfaces. Make sure they are clean and free of oil or other contaminants.
- Belt Shredding: Indicates a serious problem, often a misaligned pulley or a seized component (e.g., a locked-up A/C compressor). The diagram helps you visually inspect the alignment of each pulley.
- Component Failure: If a component like the alternator isn't working, the diagram reminds you to check the belt and its tension before assuming the component itself is faulty.
A quick visual inspection using the diagram as a reference can save you hours of unnecessary troubleshooting. For example, if the belt is riding off one side of a pulley, you immediately know that pulley is a prime suspect.
Safety Considerations
Working on the serpentine belt system can be dangerous. Here are a few key safety points:
- Disconnect the Battery: Always disconnect the negative battery terminal before working on any electrical components.
- Hot Engine: Never work on the belt system while the engine is hot. Burns are a real possibility.
- Moving Parts: Keep hands, clothing, and tools clear of the belt and pulleys while the engine is running, even for a brief test. The rapidly rotating belt and pulleys can cause serious injury.
- Tensioner Spring: Be extremely careful when releasing the tension on the belt tensioner. The spring is under significant pressure, and uncontrolled release can cause injury. Use the correct tool to relieve tension.
- Sharp Edges: Some pulleys and belt components may have sharp edges. Wear gloves to protect your hands.
Specifically, the tensioner pulley and crankshaft pulley are the riskiest components to work around. The crankshaft pulley is directly connected to the rotating engine and can cause severe injuries if contacted while the engine is running.
Conclusion
The serpentine belt diagram is an invaluable tool for anyone working on a 2014 Dodge Grand Caravan with a 3.6L engine. It simplifies installation, aids in troubleshooting, and enhances preventative maintenance. By understanding the diagram and following proper safety procedures, you can confidently tackle serpentine belt-related repairs and maintenance tasks. Remember that quality belts are more durable and resist stretching better than cheap belts.
We have the specific serpentine belt diagram for the 2014 Dodge Grand Caravan with the 3.6L V6 engine. It is formatted for easy viewing and printing. Please reach out to request a copy. Having it on hand will make your serpentine belt projects far easier and safer.