2014 Dodge Journey Serpentine Belt Diagram
Alright, let's dive into the serpentine belt diagram for the 2014 Dodge Journey. If you're planning on tackling any belt-related maintenance, replacement, or even just trying to understand how the accessories in your Journey are driven, understanding this diagram is absolutely crucial. Think of it as the roadmap for your engine's accessory drive system.
Purpose of the Serpentine Belt Diagram
Why bother with a diagram at all? Well, a good serpentine belt diagram serves several critical purposes:
- Repair and Maintenance: The most obvious reason is for replacing a worn or broken serpentine belt. The diagram shows the correct routing of the new belt. Incorrect routing can cause serious damage to the belt, pulleys, and driven accessories.
- Troubleshooting: Understanding the belt's path helps diagnose issues like squealing belts, accessory malfunctions (power steering, AC, etc.), and even engine overheating (if the water pump is driven by the belt).
- General Understanding: It provides a visual representation of how your engine's accessories function and interact. This knowledge is invaluable for any serious DIY mechanic.
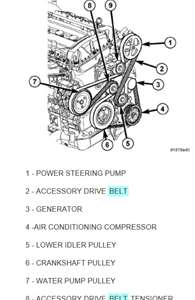
- Component Identification: You can readily identify each pulley and the accessory it drives.
Key Specs and Main Parts of the 2014 Dodge Journey Serpentine Belt System
The 2014 Dodge Journey, depending on the engine, typically comes with one of two engine options that significantly affect the serpentine belt configuration:
- 2.4L Inline-4 (I4): This engine has a simpler serpentine belt layout compared to the V6.
- 3.6L V6: This engine has a more complex layout, accommodating the additional accessories.
Key components you'll find in either system include:
- Crankshaft Pulley (Crank Pulley): This pulley is directly connected to the engine's crankshaft and provides the rotational power for the entire system.
- Alternator Pulley: Driven by the serpentine belt, the alternator generates electrical power to recharge the battery and power the vehicle's electrical systems.
- Power Steering Pump Pulley: If equipped with hydraulic power steering, this pulley drives the pump that provides assist to the steering system.
- Air Conditioning (AC) Compressor Pulley: This pulley drives the AC compressor, responsible for cooling the vehicle's interior.
- Water Pump Pulley: This pulley drives the water pump, which circulates coolant through the engine to regulate its temperature. Note that on some models, the water pump may be driven by the timing belt/chain instead of the serpentine belt. Consult your specific engine's diagram.
- Tensioner Pulley: The tensioner pulley applies the correct amount of tension to the serpentine belt, preventing slippage and ensuring proper accessory operation. This is typically a spring-loaded pulley.
- Idler Pulley(s): These pulleys are used to guide the belt around the engine and maintain the correct wrap angle on other pulleys. They don't drive any accessories; they simply redirect the belt's path.
- Serpentine Belt: The heart of the system, this belt is a single, continuous belt that drives all the aforementioned accessories.
The specific belt length and routing will vary depending on the engine (2.4L or 3.6L) and whether or not the vehicle is equipped with AC. Always refer to the correct diagram for your specific vehicle.
Understanding the Symbols in the Diagram
Serpentine belt diagrams use specific symbols and conventions to convey information efficiently:
- Solid Lines: Indicate the path of the serpentine belt. The thicker the line, the easier it is to see the belt routing.
- Pulleys: Represented by circles. Often, the diagrams will label each pulley with an abbreviation indicating the accessory it drives (e.g., ALT for alternator, AC for AC compressor, P/S for power steering).
- Arrows: Show the direction of rotation of each pulley. This is crucial for understanding how the belt is supposed to be routed.
- Tensioner Symbol: The tensioner pulley is often depicted with a spring symbol, indicating its spring-loaded nature.
- Idler Pulley Symbol: Usually shown as a plain pulley (circle) with no accessory label.
Color coding is not always used on all diagrams, but if it is, it's generally used to highlight the primary belt path or differentiate between different belt routing options (if applicable).
How It Works: The Accessory Drive System
The serpentine belt system is elegantly simple in concept. The engine's crankshaft turns the crankshaft pulley. This pulley, in turn, drives the serpentine belt, which wraps around all the other pulleys connected to the accessories. The tensioner pulley maintains the correct tension on the belt, ensuring that it doesn't slip and that all the accessories are driven efficiently.
The rotational force from the crankshaft is transferred to each accessory pulley, allowing the alternator to generate electricity, the AC compressor to cool the air, the power steering pump to provide steering assist, and the water pump to circulate coolant.
The wrap angle of the belt around each pulley is important. A larger wrap angle provides better grip and reduces the risk of slippage. Idler pulleys are strategically placed to increase the wrap angle on critical pulleys, such as the alternator or water pump.
Real-World Use and Basic Troubleshooting
Here are some common issues and how the serpentine belt diagram can help:
- Squealing Belt: A squealing belt often indicates slippage, which can be caused by a worn belt, a loose tensioner, or a contaminated belt (oil, coolant, etc.). The diagram helps you visually inspect the belt's condition and the tensioner's operation. Check the tensioner pulley for smooth operation and proper spring tension.
- Accessory Malfunction: If an accessory (e.g., power steering, AC) isn't working, the diagram helps you verify that the belt is properly routed and that the accessory's pulley is rotating when the engine is running. If the pulley isn't rotating, the belt may be broken or slipping excessively.
- Belt Replacement: When replacing the belt, the diagram is your guide. Carefully route the new belt according to the diagram, ensuring that it sits properly in all the pulley grooves. Incorrect routing can lead to immediate belt failure and potential damage to the engine.
- Tensioner Issues: A worn or failing tensioner can cause belt slippage, noise, and premature belt wear. The diagram helps you locate the tensioner and assess its condition. Check for smooth operation and proper spring tension. The tensioner should allow for belt installation and removal without excessive force.
Safety Considerations
Working around a running engine always presents risks. Here are some safety precautions to keep in mind:
- Never work on the serpentine belt system with the engine running unless absolutely necessary for diagnostic purposes. If you must, exercise extreme caution.
- Keep your hands, tools, and clothing clear of moving parts. The serpentine belt and pulleys can cause serious injury.
- Disconnect the negative battery cable before starting any work to prevent accidental starting of the engine.
- Be aware of hot engine components. Allow the engine to cool down before working on the serpentine belt system.
- The tensioner pulley is under spring tension. Use caution when releasing the tensioner to prevent it from snapping back and causing injury.
Specific areas that are dangerous: the rotating crankshaft pulley and any area near the moving serpentine belt. These can cause serious injury if contacted. Also, be cautious around the radiator fan; it can activate even when the engine is off due to thermal sensors.
Understanding the 2014 Dodge Journey's serpentine belt diagram is a key step towards maintaining your vehicle's accessory drive system. By familiarizing yourself with the diagram and its components, you can confidently tackle belt-related maintenance and troubleshooting tasks.
We have the file containing the detailed serpentine belt diagrams for both the 2.4L and 3.6L engines used in the 2014 Dodge Journey. You can download the diagram to have it handy for your next project.