2014 Ford Explorer Serpentine Belt Diagram
The serpentine belt in your 2014 Ford Explorer is a critical component that drives multiple engine accessories. Understanding its routing and function, through the use of a reliable diagram, can be invaluable for routine maintenance, diagnosing issues, and even performing repairs yourself. This guide will provide a detailed breakdown of the 2014 Ford Explorer serpentine belt diagram, empowering you with the knowledge needed to tackle common automotive tasks.
Purpose of the Serpentine Belt Diagram
A serpentine belt diagram isn't just a pretty picture; it's a roadmap for understanding how your engine's accessories are powered. Here's why it matters:
- Repairs and Maintenance: Correct belt installation is crucial after replacing the belt itself, the alternator, power steering pump, or any other accessory driven by the belt. A diagram ensures proper routing, preventing slippage and potential damage to components.
- Troubleshooting: When you hear squealing noises, experience charging problems, or notice a lack of power steering assist, the serpentine belt is a prime suspect. The diagram helps you identify which accessory might be affected by a failing belt or tensioner.
- Learning and Understanding: Familiarizing yourself with the serpentine belt system offers a deeper understanding of how your engine functions. It allows you to identify key components and their roles in the overall system.
- Emergency Situations: If the belt breaks down on the road, having the diagram can help a tow truck operator or even yourself (if you carry a spare belt) install a new one correctly, minimizing downtime.
Key Specs and Main Parts
Let's identify the key components and specifications related to the 2014 Ford Explorer's serpentine belt system.
Main Components:
- Serpentine Belt: A single, continuous belt, typically made of reinforced rubber, that snakes around multiple pulleys.
- Crankshaft Pulley (Damper): Driven directly by the engine, the crankshaft pulley provides the rotational force for the entire system.
- Alternator Pulley: The alternator generates electrical power for the vehicle, and its pulley is driven by the serpentine belt.
- Power Steering Pump Pulley: The power steering pump provides hydraulic assistance for steering, and its pulley is driven by the serpentine belt.
- Air Conditioning Compressor Pulley: The A/C compressor circulates refrigerant in the air conditioning system, and its pulley is driven by the serpentine belt.
- Idler Pulley(s): Smooth pulleys that guide the belt along its path, ensuring proper tension and preventing rubbing against other components. They do not drive any accessories.
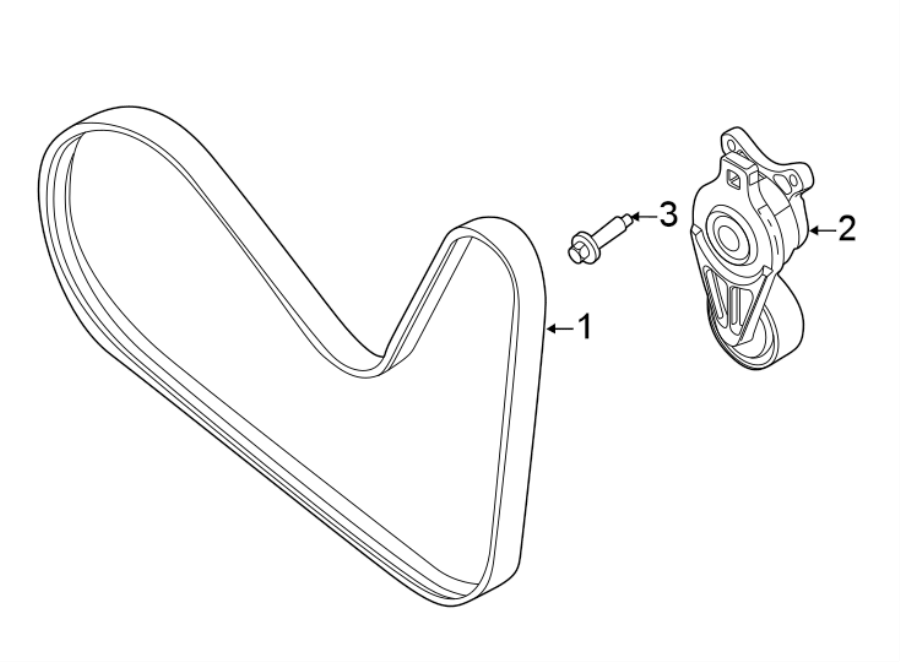
- Tensioner Pulley: A spring-loaded pulley that maintains constant tension on the belt, preventing slippage and extending belt life. A critical component.
Key Specifications:
While the exact belt length varies depending on the specific engine configuration in your 2014 Explorer (3.5L V6, 2.0L Turbo), the principle remains the same. The diagram illustrates the correct routing. Always refer to your vehicle's owner's manual or a reliable parts catalog (like those from Gates or Goodyear) to find the exact belt part number and specifications for your particular engine. This information will include the belt's length and rib count.
Understanding the Serpentine Belt Diagram Symbols
Diagrams use specific symbols to convey information concisely. Here’s a breakdown of what you'll likely encounter:
- Solid Lines: Typically represent the path of the serpentine belt.
- Arrows: Indicate the direction of belt rotation around each pulley. Following these arrows is essential for correct installation.
- Component Icons: Simple drawings represent the various pulleys (crankshaft, alternator, power steering pump, A/C compressor, idler, tensioner). These icons are usually labeled with abbreviations (ALT, PS, AC, etc.) for easy identification.
- Dashed Lines: Sometimes used to indicate the backside of the belt (the smooth side) making contact with a pulley. This is important for understanding which accessories are driven by the belt's ribbed side and which are driven by its smooth side.
- Color Coding (Less Common): While not standard, some diagrams might use different colors to differentiate belt sections or highlight specific areas of concern. Always refer to the diagram's legend if colors are used.
How the Serpentine Belt System Works
The serpentine belt system is relatively straightforward, but understanding the mechanics is key to diagnosing problems. The crankshaft pulley, directly connected to the engine's crankshaft, is the driving force. As the engine rotates, the crankshaft pulley spins, transferring this rotational force to the serpentine belt. The belt, in turn, wraps around the pulleys of various accessories (alternator, power steering pump, A/C compressor). The friction between the belt and the pulleys causes them to rotate, powering these accessories.
The tensioner pulley plays a vital role in maintaining consistent belt tension. As the belt wears or stretches over time, the tensioner automatically adjusts to compensate, preventing slippage and ensuring optimal performance. A malfunctioning tensioner is a common cause of serpentine belt noise and accessory failure.
The idler pulleys merely redirect the belt to avoid obstructions and ensure the belt follows a desired path.
Real-World Use: Basic Troubleshooting
Here's how you can use the serpentine belt diagram for troubleshooting:
- Squealing Noise: A common symptom of a slipping belt. Check the belt for cracks, wear, and proper tension. Refer to the diagram to ensure the belt is routed correctly and the tensioner is functioning properly. If the belt looks glazed (shiny and smooth), it's likely worn and needs replacement.
- Accessory Failure: If your power steering isn't working, your battery isn't charging, or your A/C isn't cooling, check the serpentine belt. The diagram will show you which accessories are driven by the belt. If the belt is broken or excessively loose, that's the likely cause.
- Belt Inspection: Regularly inspect the belt for signs of wear, such as cracks, fraying, or missing ribs. Use the diagram to verify the belt is properly aligned on all pulleys. Misalignment can cause premature wear and damage to the belt and pulleys.
- Replacement: When replacing the belt, use the diagram as a guide to ensure correct routing. Incorrect routing can damage the belt and accessories. Take a picture of the old belt routing *before* removing it for reference.
Safety Considerations
Working with the serpentine belt system can be dangerous if proper precautions aren't taken:
- Always disconnect the negative battery cable before working on the serpentine belt system. This prevents accidental starting of the engine, which could cause serious injury.
- Be aware of rotating parts. Never put your hands or tools near the serpentine belt or pulleys while the engine is running.
- The tensioner pulley is spring-loaded and can snap back with considerable force. Use the appropriate tool (usually a wrench or socket) to relieve the tension before removing the belt.
- Wear safety glasses to protect your eyes from debris.
- Hot Engine: Allow the engine to cool completely before working on the serpentine belt. Exhaust manifolds and other engine components can be extremely hot.
We have a downloadable version of the 2014 Ford Explorer serpentine belt diagram available. Use it in conjunction with this guide for optimal results. Remember to always prioritize safety and consult a qualified mechanic if you are unsure about any aspect of the repair.