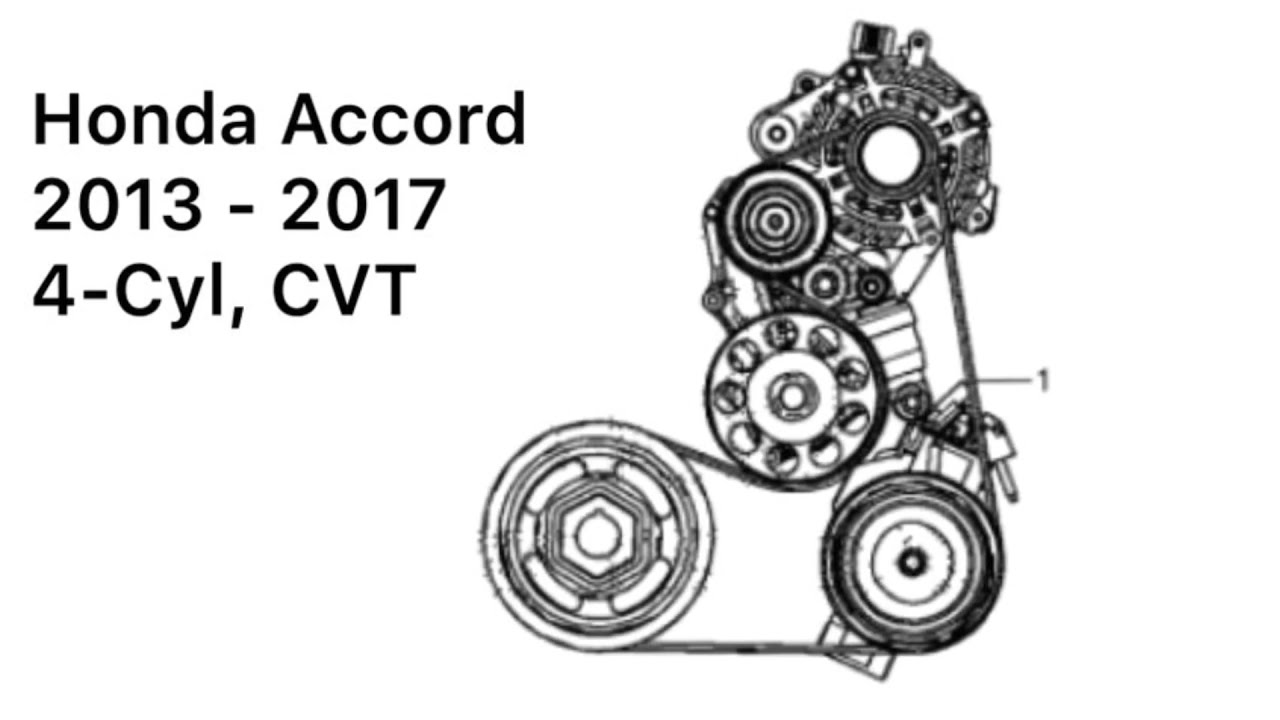
2014 Honda Accord 2.4 Serpentine Belt Diagram
Alright, let's dive into the serpentine belt system on your 2014 Honda Accord with the 2.4L engine. This isn't just about knowing where a rubber belt goes; it's about understanding the intricate dance of power transfer within your engine bay. This knowledge is invaluable for preventative maintenance, diagnosing issues, and even tackling some repairs yourself. We'll break down the diagram, the components, and how it all works together. Plus, you can download a copy of the actual diagram – we've got you covered!
Why This Serpentine Belt Diagram Matters
Why bother with a diagram? Simple: it's your roadmap to understanding the 2.4L Accord's accessory drive system. Whether you're:
- Performing routine maintenance (like belt inspection and replacement).
- Troubleshooting squealing noises or other accessory malfunctions.
- Replacing a component like the alternator or power steering pump.
- Just curious about how your engine works.
Having a clear picture of the belt routing and component locations will save you time, prevent mistakes, and potentially avoid costly damage. It's like having a cheat sheet when the pressure's on. Imagine trying to re-route a belt after a roadside break without a diagram! Not fun.
Key Specs and Main Parts of the 2014 Accord 2.4L Serpentine Belt System
The serpentine belt system on the 2014 Accord 2.4L is responsible for driving several crucial engine accessories. Here are the key components:
- Crankshaft Pulley (or Damper): This is the driving force. Connected directly to the crankshaft, it's the starting point of the belt's journey.
- Alternator: The alternator generates electrical power to charge the battery and run the car's electrical systems. It's a major load on the belt.
- Air Conditioning (A/C) Compressor: The compressor circulates refrigerant to cool the cabin. When engaged, it adds significant resistance to the belt.
- Power Steering Pump: This pump provides hydraulic assistance for steering. A failing power steering pump can drastically increase belt load.
- Idler Pulley(s): These smooth, non-driven pulleys guide the belt and maintain proper tension and routing, preventing excessive wear. They often have bearings that can wear out.
- Tensioner Pulley: This spring-loaded pulley maintains consistent tension on the serpentine belt. A properly functioning tensioner is critical to prevent slippage, noise, and premature belt wear. A failing tensioner is a common cause of serpentine belt problems.
- Serpentine Belt: The heart of the system – a single, continuous belt that wraps around all the pulleys, transferring rotational energy. The belt's condition is crucial for system performance.
Belt Spec Note: The specific belt length will vary based on the manufacturer, but generally the belt for a 2014 Honda Accord 2.4L is between 83 and 84 inches long. It's always best to confirm the exact part number with your parts supplier, using your VIN for accurate identification.
Decoding the Serpentine Belt Diagram: Symbols and What They Mean
Understanding the diagram's symbols is crucial for correctly interpreting the belt routing. Here’s a breakdown:
- Solid Lines: Represent the path of the outer surface of the serpentine belt.
- Dotted Lines: Usually indicate the path of the inner surface of the belt (the side that contacts the grooved pulleys).
- Circles: Represent pulleys. The size of the circle doesn't necessarily indicate the actual pulley size but rather is used for layout clarity.
- Arrows: Show the direction of rotation for each pulley. Knowing the rotation direction helps you visualize how the belt is transferring power.
- Component Labels: Abbreviations or full names identify each component (e.g., ALT for Alternator, AC for A/C Compressor, P/S for Power Steering).
- Tensioner Symbol: The tensioner is often depicted with a spring symbol to represent its spring-loaded action.
The diagram provides a top-down view, so you need to mentally translate this 2D representation into the 3D reality of your engine bay.
How the Serpentine Belt System Works
The serpentine belt system's operation is relatively straightforward, but understanding the underlying principles is key. The crankshaft pulley, driven by the engine's combustion process, rotates. This rotation is transferred to the serpentine belt, which in turn drives all the accessory pulleys.
Think of it like this: the crankshaft pulley is the engine's muscle, and the serpentine belt is the tendon that transmits that muscle power to the accessories. The tensioner pulley is the key to maintaining proper grip and preventing slippage. If the belt slips, it reduces the efficiency of the driven components (e.g., reduced A/C cooling, diminished alternator output) and generates unwanted noise (squealing).
The design of the serpentine belt system aims for optimal efficiency and space utilization. The single belt configuration reduces complexity compared to older systems with multiple belts. However, it also means that a single belt failure can cripple multiple essential systems.
Real-World Use: Troubleshooting Serpentine Belt Issues
Here's how you can use the diagram for troubleshooting:
- Squealing Noise: If you hear a squealing noise, especially when starting the engine or turning on the A/C, it could indicate a slipping belt. Check the belt's condition for cracks, glazing (shiny surface), or fraying. Also, inspect the tensioner pulley for proper movement and spring tension. Compare the actual routing against the diagram to ensure nothing is misaligned.
- Accessory Malfunction: If your alternator isn't charging properly, the A/C isn't blowing cold air, or the power steering feels stiff, check the belt's condition and tension. A loose or damaged belt can prevent these accessories from functioning correctly.
- Belt Failure: If the belt breaks, you'll lose power steering, A/C, and alternator function. Using the diagram, carefully inspect all pulleys for damage and ensure they rotate freely before installing a new belt. A seized pulley can cause a new belt to fail quickly.
- Misalignment: After replacing a component (like the alternator), use the diagram to double-check that the belt is properly aligned on all pulleys. Misalignment can cause premature belt wear and noise.
Safety Considerations: Working Around the Serpentine Belt
The serpentine belt area can be dangerous. Here's what to keep in mind:
- Engine Off: Always work on the serpentine belt system with the engine off and the key removed from the ignition.
- Hot Engine: Allow the engine to cool completely before working in the engine bay. Exhaust manifolds and other components can get extremely hot.
- Moving Parts: Never put your hands or tools near the serpentine belt or pulleys while the engine is running. Serious injury can occur.
- Battery Disconnect: Consider disconnecting the negative battery terminal to prevent accidental electrical shorts while working on the alternator or other electrical components.
- Protective Gear: Wear safety glasses to protect your eyes from debris.
The crankshaft pulley area is especially dangerous due to its proximity to the engine block and the force with which it rotates. Always exercise extreme caution when working in this area.
By following these safety guidelines, you can minimize the risk of injury while working on your 2014 Honda Accord's serpentine belt system.
So, there you have it – a comprehensive look at the 2014 Honda Accord 2.4L serpentine belt system. By understanding the diagram, the components, and the operation, you'll be better equipped to maintain and troubleshoot your car's accessory drive system. And remember, we have the 2014 Honda Accord 2.4L Serpentine Belt Diagram file ready for you to download.