2014 Hyundai Sonata Serpentine Belt Diagram
Maintaining your 2014 Hyundai Sonata’s engine is crucial for its longevity and performance. A key component in this system is the serpentine belt, responsible for driving various accessories. Understanding its routing and function is essential for both preventative maintenance and troubleshooting. This article provides a detailed overview of the 2014 Hyundai Sonata serpentine belt diagram, enabling you to confidently tackle repairs and replacements.
Purpose of the Serpentine Belt Diagram
The serpentine belt diagram is your roadmap for the belt’s path around the engine's pulleys. It's vital for several reasons:
- Repair and Replacement: When replacing a worn or broken belt, the diagram ensures correct routing. Incorrect routing can lead to component failure, reduced performance, and even engine damage.
- Troubleshooting: If you're experiencing issues like a squealing noise or non-functional accessories, the diagram helps you visually inspect the belt and pulleys for signs of wear, damage, or misalignment.
- Understanding Accessory Drives: The diagram allows you to identify which accessories (alternator, power steering pump, A/C compressor, etc.) are driven by the belt and understand their interdependency.
- Preventative Maintenance: Regularly checking the belt against the diagram helps identify potential problems before they become major issues.
Key Specs and Main Parts
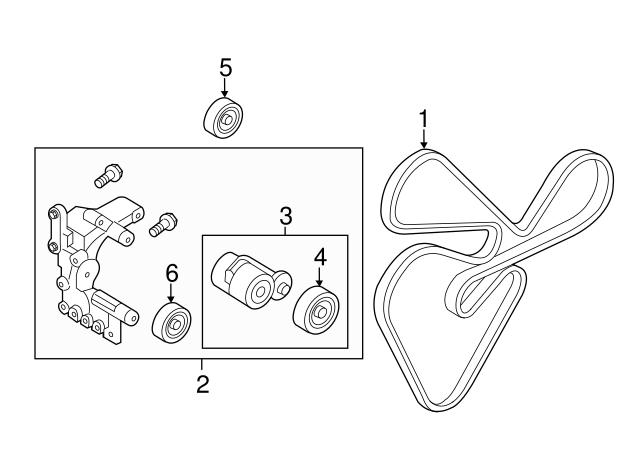
The 2014 Hyundai Sonata typically uses a single serpentine belt to drive most of its accessories. While specific belt lengths can vary slightly based on engine type (2.0L, 2.4L), they generally fall within a narrow range. Always consult your vehicle's owner's manual or a parts catalog for the precise belt specification.
Here are the key components involved in the serpentine belt system:
- Crankshaft Pulley: The driven pulley connected to the engine's crankshaft. This is the primary power source for the belt.
- Alternator Pulley: Powers the alternator, which charges the battery and supplies electrical power to the car.
- Power Steering Pump Pulley: Drives the power steering pump, providing hydraulic assistance for steering.
- A/C Compressor Pulley: Engages and disengages to power the air conditioning compressor.
- Water Pump Pulley: Circulates coolant through the engine to regulate temperature. This may or may not be driven by the serpentine belt depending on the engine variant. Some engines have water pumps driven by the timing belt.
- Tensioner Pulley: A spring-loaded pulley that maintains the correct tension on the serpentine belt. This is critical for proper operation.
- Idler Pulley: A smooth pulley used to guide the belt around other components and maintain the desired wrap angle on key pulleys.
Symbols: Interpreting the Diagram
A serpentine belt diagram typically uses a few key symbols to convey information clearly:
- Solid Lines: Represent the actual path of the serpentine belt. Follow these lines carefully when routing the belt.
- Dotted or Dashed Lines: May indicate the rear of a pulley, showing how the belt wraps around it. These aren't always present, but if they are, they help visualize the belt's 3D path.
- Arrows: Show the direction of rotation for each pulley. This is important for understanding the belt's movement.
- Component Labels: Each pulley will be labeled with its corresponding component (ALT for Alternator, P/S for Power Steering, A/C for A/C Compressor, etc.).
- Tensioner Indicator: The tensioner pulley may have a special marking or indicator to show the correct tension range. This is crucial for proper belt operation.
Color coding is rare on most diagrams; however, if present, a key should be provided to explain the significance of each color.
How It Works: The Serpentine Belt's Function
The serpentine belt system is elegantly simple. The crankshaft pulley, driven by the engine, spins the serpentine belt. This rotating belt, in turn, drives the various accessory pulleys. The tensioner pulley applies constant pressure to the belt, preventing slippage and ensuring efficient power transfer to each component.
The amount of power required by each accessory varies. For instance, the A/C compressor places a significant load on the system when engaged, while the alternator's load depends on the electrical demands of the car. The serpentine belt and tensioner must be capable of handling these fluctuating loads.
The correct belt tension is paramount. Too little tension causes slippage, leading to reduced accessory performance, overheating (due to a poorly performing water pump), and rapid belt wear. Too much tension can damage the belt, pulleys, and accessory bearings.
Real-World Use: Troubleshooting Tips
Here are some common problems associated with the serpentine belt and how the diagram can help:
- Squealing Noise: Often indicates belt slippage. Use the diagram to inspect the belt for glazing (shiny, hardened surface), cracks, or missing chunks. Check the tensioner pulley for proper movement and tension. Misalignment of the pulleys can also cause squealing, so use the diagram to ensure each component is properly aligned.
- Accessory Malfunction: If the alternator, power steering, or A/C isn't working correctly, check the belt for proper routing and tension. A broken belt will immediately disable all driven accessories. Inspect the individual pulleys for damage or binding.
- Belt Wear and Tear: Regularly inspect the belt for cracks, fraying, or missing ribs. Compare its condition to the diagram to identify potential contact points or sources of damage.
- Tensioner Issues: A faulty tensioner can cause excessive belt wear, noise, and accessory malfunction. Use the diagram to locate the tensioner and visually inspect its movement. It should move smoothly and maintain consistent tension.
Troubleshooting Tip: Before replacing the belt, use a straight edge to check the alignment of all pulleys. Misalignment can cause premature belt wear and noise.
Safety Precautions
Working on the serpentine belt system involves potential hazards. Here are some crucial safety precautions:
- Disconnect the Battery: Always disconnect the negative battery terminal before working on any electrical components, including the alternator.
- Hot Engine: Never work on the serpentine belt system when the engine is hot. Allow it to cool completely to avoid burns.
- Moving Parts: Keep hands, hair, and clothing away from the serpentine belt and pulleys while the engine is running. These are extremely dangerous moving parts.
- Proper Tools: Use the correct tools for the job, including a serpentine belt tool for releasing the tensioner. Attempting to remove the belt without the proper tools can result in injury or damage to the vehicle.
- Eye Protection: Wear safety glasses to protect your eyes from debris.
Important: The tensioner pulley stores significant spring energy. Use extreme caution when releasing the tension. Follow the manufacturer's instructions carefully.
By understanding the 2014 Hyundai Sonata serpentine belt diagram and following proper safety precautions, you can confidently maintain and repair this essential engine component. We have the diagram file available, and you can download it to have a readily accessible reference for your work.