2014 Jeep Cherokee Serpentine Belt Diagram
The serpentine belt in your 2014 Jeep Cherokee is a critical component responsible for driving several key engine accessories. Knowing its routing and tension is essential for maintenance, repairs, and even advanced modifications. This article will provide a detailed breakdown of the 2014 Jeep Cherokee serpentine belt diagram, equipping you with the knowledge to confidently tackle related tasks.
Purpose of the Serpentine Belt Diagram
The serpentine belt diagram is your roadmap for understanding the path the belt takes around various pulleys in your engine bay. It's invaluable for several reasons:
- Replacement: When replacing a worn or broken belt, the diagram ensures correct routing. Incorrect routing can lead to accessory malfunction, belt damage, and even engine damage.
- Diagnosis: Identifying the belt's components helps diagnose issues like squealing, slipping, or accessory failure. Knowing which pulley drives which accessory allows you to narrow down the source of the problem.
- Maintenance: Regularly inspecting the belt and pulleys for wear, cracks, or misalignment is easier with a clear understanding of the system.
- Modification: If you're considering modifications like adding a supercharger or a high-output alternator, understanding the belt system's limitations and potential need for a different belt length is crucial.
Key Specs and Main Parts
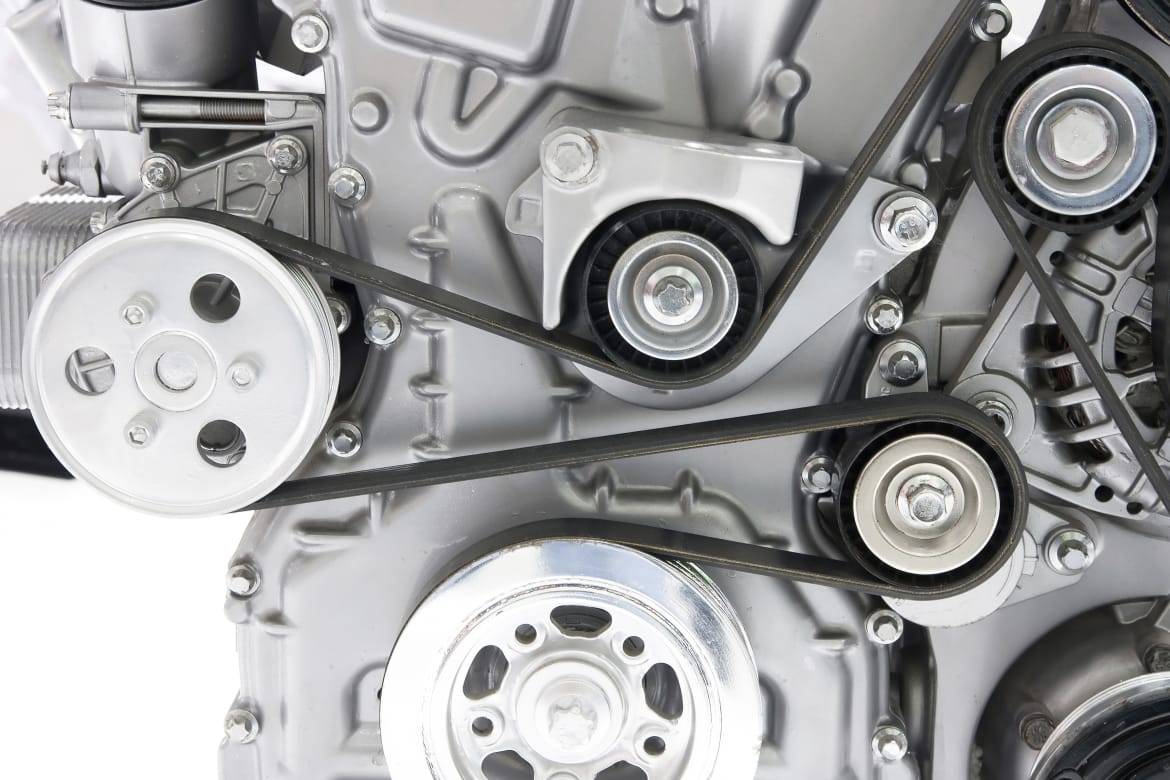
The 2014 Jeep Cherokee (depending on engine – 2.4L Tigershark I4 or 3.2L Pentastar V6) utilizes a single serpentine belt to drive the following components:
- Crankshaft Pulley: This is the driving pulley, connected directly to the engine's crankshaft and transferring rotational force to the belt.
- Alternator Pulley: The alternator converts mechanical energy from the engine into electrical energy to power the vehicle's electrical system and charge the battery.
- Power Steering Pump Pulley: The power steering pump provides hydraulic pressure to assist steering.
- Air Conditioning Compressor Pulley: The A/C compressor circulates refrigerant to cool the cabin air.
- Water Pump Pulley: The water pump circulates coolant through the engine to maintain optimal operating temperature.
- Idler Pulley(s): These smooth, non-driven pulleys guide the belt and maintain proper tension along its path. The exact number and location of idler pulleys can vary.
- Tensioner Pulley: This spring-loaded pulley automatically adjusts the belt tension to compensate for wear and thermal expansion. This is crucial for proper system function.
The belt length is critical and varies depending on the engine and specific vehicle options. Refer to your vehicle's owner's manual or a reliable parts catalog for the correct belt part number and length. Using the wrong belt length can cause slippage, damage to the accessories, or prevent the belt from being installed correctly.
Symbols in the Diagram
Understanding the symbols in the serpentine belt diagram is key to interpreting its information accurately:
- Solid Lines: Typically represent the path of the *front* side of the serpentine belt.
- Dashed Lines: Usually indicate the path of the *back* side of the serpentine belt. Understanding this difference is key to routing the belt correctly.
- Arrows: Show the direction of belt travel around each pulley. Always double-check the arrow direction to ensure proper installation.
- Pulley Symbols: Each pulley is represented by a circle, and often labeled with abbreviations indicating the component it drives (e.g., ALT for alternator, P/S for power steering).
- Tensioner Indicator: The tensioner pulley is often shown with an arrow indicating the direction to release the tension for belt removal or installation. This arrow usually also denotes the direction to place a wrench or socket for releasing tension.
Pay close attention to how the lines connect to the pulleys. The orientation (front vs. back) is usually obvious from the diagram but crucial to get right.
How It Works
The serpentine belt system operates on a principle of transferring rotational force from the engine's crankshaft to the various accessories. The crankshaft pulley, directly connected to the crankshaft, drives the serpentine belt. As the crankshaft rotates, the belt travels around the various accessory pulleys, causing them to rotate as well. The tensioner pulley maintains proper belt tension, ensuring consistent power delivery to all accessories.
The correct belt tension is critical for proper operation. Too little tension leads to slippage, reducing the efficiency of the accessories and potentially causing damage to the belt. Too much tension can overload the bearings in the accessory pulleys, leading to premature failure. The tensioner pulley is designed to automatically maintain the correct tension, but it can wear out over time, leading to problems.
Real-World Use & Troubleshooting
Here are some common issues and how the serpentine belt diagram can help:
- Squealing Belt: This is often caused by a worn belt, a glazed pulley, or insufficient tension. Inspect the belt for cracks, fraying, or glazing. Check the tensioner pulley for smooth operation and proper spring tension. Use the diagram to ensure the belt is routed correctly.
- Accessory Failure: If an accessory (e.g., alternator, power steering pump) suddenly stops working, check the belt for breakage or slippage. The diagram will help you determine if the failed accessory is driven by the serpentine belt.
- Belt Slippage: Slippage can be caused by a worn belt, oil contamination, or a faulty tensioner. Inspect the belt and pulleys for oil leaks. Check the tensioner pulley for proper operation. The diagram can help identify potential interference or obstructions that might be causing the belt to slip.
Simple Troubleshooting Steps:
- Visual Inspection: Carefully examine the belt for wear, cracks, fraying, or glazing. Check the pulleys for damage or misalignment.
- Tension Check: Verify that the tensioner pulley is moving freely and maintaining proper tension. There should be a visible indicator on the tensioner to show if the belt is too loose or too tight.
- Alignment Check: Use a straightedge to check the alignment of the pulleys. Misalignment can cause premature belt wear and accessory failure.
- Listen Carefully: Note any unusual noises coming from the belt or pulleys. These noises can provide clues about the source of the problem.
Safety Considerations
Working on the serpentine belt system can be dangerous. Here are some safety precautions to take:
- Disconnect the Battery: Always disconnect the negative battery terminal before working on the engine. This will prevent accidental starting and electrical shock.
- Allow Engine to Cool: Never work on the engine while it is hot. Hot engine components can cause burns.
- Keep Hands and Clothing Clear: Keep your hands, clothing, and tools clear of the belt and pulleys while the engine is running.
- Use Proper Tools: Use the correct tools for the job. Using the wrong tools can damage the components or cause injury. Most modern tensioners require a specific size socket or wrench to relieve the tension.
- Wear Safety Glasses: Always wear safety glasses to protect your eyes from debris.
- Be Aware of Moving Parts: The serpentine belt system contains rapidly moving parts. Be aware of the potential hazards and take precautions to avoid injury. The crankshaft pulley is the most dangerous, as it is directly connected to the engine.
The tensioner pulley itself stores a significant amount of spring force. When releasing the tension, be prepared for the sudden movement of the tensioner arm. Control the movement carefully to avoid injury or damage to other components.
Remember, if you are uncomfortable working on the serpentine belt system, it is always best to consult a qualified mechanic.
You can download a detailed serpentine belt diagram for your 2014 Jeep Cherokee for various engines (2.4L, 3.2L) by contacting us. We've got the files!